💧 Elevate your watercooling game with precision and style!
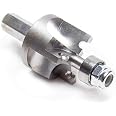
The PrimoChill Hardline/Rigid Watercooling Tubing Finishing Bit (RFB) is a precision tool designed for reaming, deburring, and trimming 12mm ID x 16mm OD rigid tubing made from PETG and PMMA. Featuring a 12mm shank diameter and spiral flute design with a durable copper finish, it ensures smooth, professional-quality cuts to perfect your custom watercooling loop.


| Material | PETG, PMMA (Due to extremely quick dulling of the bit, Copper tubing is not recommended.) |
| Shank Diameter | 12 Millimeters |
| Finish Type | Copper |
| Brand | PrimoChill |
| Item dimensions L x W x H | 0.01 x 0.01 inches |
| Tool Flute Type | Spiral |
| Surface Recommendation | Acrylic,Copper,Plastic |
| Unit Count | 1 Count |
| Manufacturer | PrimoChill |
| Item model number | RT16M-TOOL |
| Item Weight | 0.352 ounces |
| Item Dimensions LxWxH | 0.01 x 0.01 inches |
| ASIN | B07MZB2GPK |
| Is Discontinued By Manufacturer | No |
| Date First Available | January 21, 2019 |
J**N
Must-Have Tool for Custom Water-Cooled Builds
If you're working on a water-cooled PC build and you're not using the PrimoChill Hardline/Rigid Watercooling Tubing Finishing Bit, you're missing out big time. This tool is an absolute game-changer for anyone dealing with hardline tubing.Chamfering the tubes, which is crucial for a perfect fit and finish, literally takes just 2 seconds with this bit. It's incredibly efficient and takes away so much of the hassle typically associated with preparing tubing for a water-cooling system. The ease and speed at which it works are just phenomenal. It turns what used to be a tedious part of the build process into something quick and enjoyable.The quality of the finish it provides is equally impressive. It leaves the edges of the tubes smooth and perfectly angled for insertion into fittings, reducing the risk of leaks and ensuring a clean, professional look for your setup.I can't emphasize enough how much of a beast this tool is. It's well-built, durable, and perfectly designed for its purpose. Using it has made my water-cooling setup process much more straightforward and enjoyable.In conclusion, the PrimoChill Hardline/Rigid Watercooling Tubing Finishing Bit is an essential tool for any DIY PC builder venturing into custom water-cooling. It saves time, effort, and ensures a high-quality finish to your tubing work. Don't do a water-cooled build without it – it's that good and absolutely worth the investment.
N**K
Handy Time-Saver
I picked up one of these for my first PETG loop build, which used Thermaltake V-Tubler lines. I also got the Thermaltake mandrel kit, which comes with its own combination reamer tool, but the hand reamer has a tendency to chatter and skip on the ends of the lines, and therefore doesn't give a very clean finish for the amount of effort involved to get any sort of passable result.Enter the PrimoChill bit. I found out the hard way that you want to use this with an adjustable speed drill. When I started my build, all of my rechargeable packs for my cordless drill had died, so I had to revert to a cheap single-speed corded drill that I had lying around. Unfortunately, the single-speed spun way too fast to get a decent result. It would end up melting the ends instead of cutting them, and sent PETG shavings all over the place -- including into the cut ends, where it would melt and stick back onto them if I wasn't careful. Nothing that the hand reamer and an Xacto couldn't clean up, but it was counterproductive overall. Once I was able to switch over to my variable-speed cordless drill, I started getting infinitely better results.The trick is to start out extremely slowly. Hold the tube as steady as you can, and if you are able to rotate it slowly while chamfering, it does help even out the cut. If your hardline fittings are deep enough, the ends don't have to be completely even, but you do want to make sure that the outside edges are nice and smooth so you don't chew up the inner o-rings in those fittings. Start off slowly with the drill, and then use a few short bursts of full speed (no more than a second or so), and then finish out on low/medium speed. Repeat if you need to shorten the end by a few millimeters. A few turns against the bit while the drill is off can also help trim off any remaining flash.All in all, great product; it probably saved me from a repetitive stress injury.
G**E
Lifesaver! First Time Hardline Loop Builder Review
Let me start of by saying this was my first hardline water cooling build. Initially I bought the Thermaltake Pacific DIY OD 16mm Tube Bending Kit thinking it would have everything I needed. For a first time builder I consistently cracked my acrylic tubes when using the pipe cutter from the kit.I then started googling better ways, found most people use a bow saw or a hack saw, long story short I used a dremel since I had one. The bur tool they had, while good was hard for me to keep level/flat so my smoothing was often awkward.Thus again more googling! I can't remember how, but I came across a video of a guy using this tool and thought, sweet! Let's give that a try. Sure enough, it worked WONDERS! Not only was I able to smooth out the ends of my cuts with ease, it also had the power to drill down the size of my tube if I was a little bit off. For me that was a HUGE time saver. I haven't yet finished my build as I'm still waiting on some parts (newbie me) but here is a photo of what my rig looks like so far.
S**K
I would not be sane if I didn't use this!
It was my first time building a custom watercooling loop for my PC. I did not even like using distro-plates because in my opinion, they are not the classiest. So, that makes the build harder because there will be more bends to make (not much parallels when compared to using distro-plate).With that being said, this product is very effective. With the amount of tubes I had to bend, there were a lot of times where I would leave decent amount of extra tube so I can simply cut more if needed. I would test the length of my tube every so often, meaning I used to product over and over to make sure my O-rings do not get cut. I can imagine if I used a normal deburr tool, I would have had such a hard time. Using this tool would cut the amount of time to deburr to 5-10 seconds (not even when you get used to it). So, that gave me a very nice advantage of actually testing if my tubes were good to go or not, rather than wasting a lot of time deburring because I wanted to save a little more cash.Trust me, this is a tool that's worth the investment!! My only tip when using it is not to push against the tube too hard while using it. At least in my experience, it lead my tubes to become uneven. Going at it with just the right amount of force would result in a very clean/smooth ends of the tubes. Do not sweat if you used it for the first time and it feels weird, just trust the process and you will get used to it in no time!
TrustPilot
1天前
1 周前