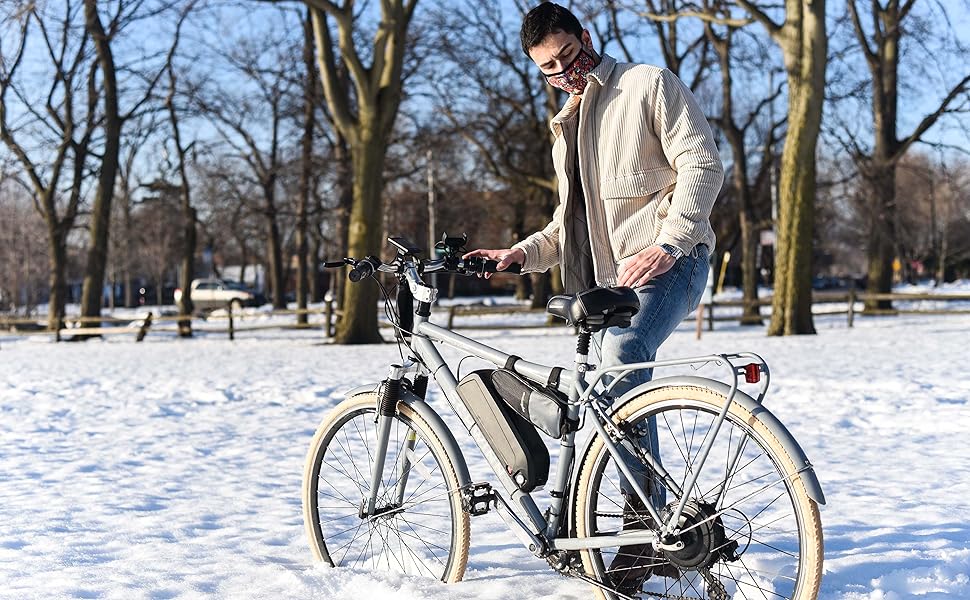
⚡ Transform your bike, transform your commute!
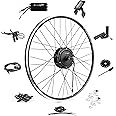
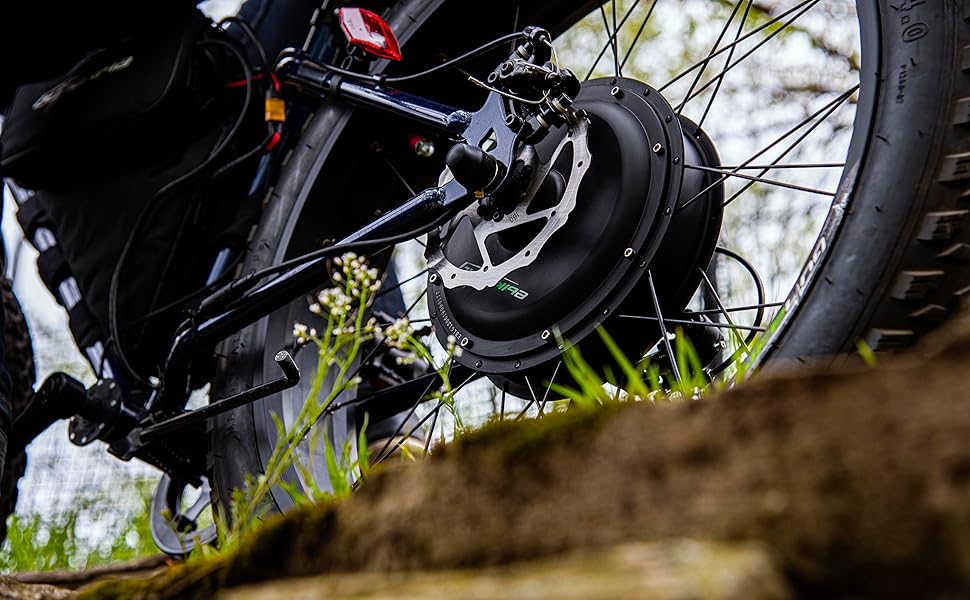
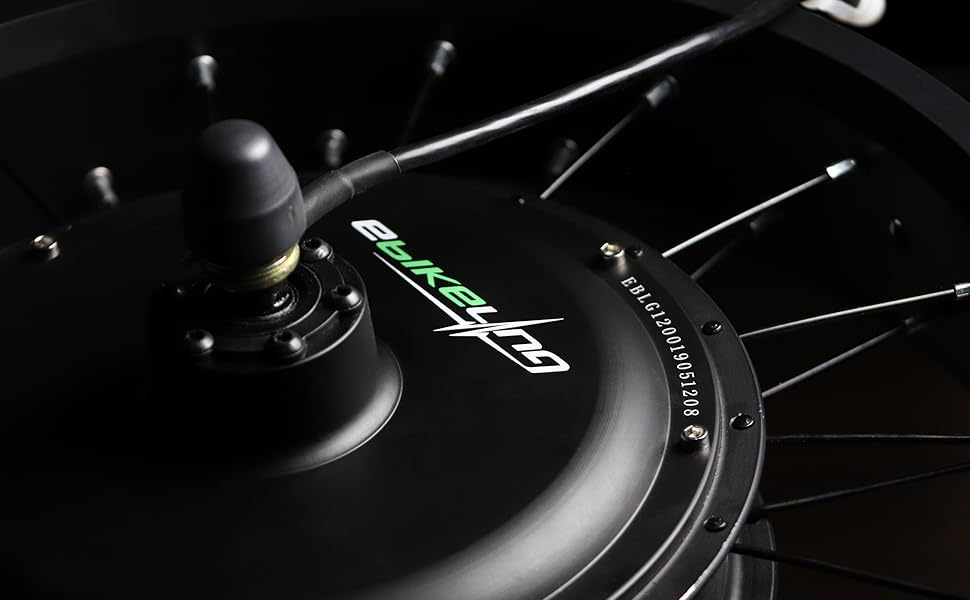
The eBikeling 36V 700C Front 500 Watt Ebike Conversion Kit is a robust, waterproof electric bike upgrade designed for versatile cycling needs. Featuring a powerful 500W hub motor, it delivers smooth, efficient power while including all necessary components for easy installation. Compatible with multiple bike types and built with durable aluminum and alloy steel, this kit offers a lightweight yet reliable solution to electrify your ride and elevate your daily journey.
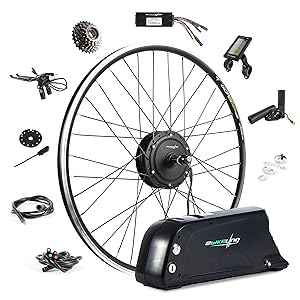
Bike Type | Electric Bike |
Brake Style | Works with Disc, V, Caliper, Cantilever |
Item Weight | 16.1 Pounds |
Number of Spokes | 24 |
Rim Size | 20 Inches |
Rim Width | 19 Millimeters |
Wheel Size | 29 Inches |
Material Type | Aluminum, Alloy Steel |
T**M
Great Product 350 miles in.
I installed this wheel with a 36v 14ah lithium ion battery. Without pedaling, the range is about 20 miles, with pedaling, I get about 40. The max speed I have gotten on electric power alone is 29mph on flat ground. The conversion kit is easy to install and has great starting tourque and other features. My only complaint is that the wheel was not trued when it arrived. I had to adjust the spokes for about 45 minutes to get it perfect, but I am sure a bike shop could do that part just as well.
T**R
At 5000mi still works well, but some parts seem cheap, and the manual needs help
The motor hub and motor controller appear to be well-made. I like the included torque arm. Installation was straightforward. I have the 500w kit installed on 700x42c tires.Some of the parts are disappointing in their build quality. For instance, the thumb-lever to control the motor speed has a mold part-line right on the thumb pad, and the mold is not well aligned. While it's not particularly problematic, it feels and looks really cheap and has me wondering how soon I'm going to have to replace that piece. Also, the LCD display panel has a mounting clip that has to be stretched open to fit over the handle bars. There is an adapter to accommodate handlebars of a smaller diameter, but on my bike, the provided screws are too short to attach the clip with the adapter in place and the clip is too big to secure the LCD without the adapter in place. In any case, when trying to adjust the display later, part of the clip snapped off (I think the plastic is cheap), and the unit is now held in place on one side by friction. The customer service representative agreed to send me a new unit.Another disappointment is the user manual. The box arrives with a note saying to find installation instructions on the website. I found that fine, and installation was straightforward. However, there is no help for the motor controller and display. I figured that I would plug it in, and it would just work and be self evident what to do. (Apple seems to get away with this approach just fine.) When I flipped the switch on my (separately purchased) battery, nothing happened. No response. No lights or beeps. No nothing. I double-checked the installation instructions. I disassembled everything and reassembled everything; measured the battery voltage; re-crimped the connectors; pressed the buttons I could find, and still nothing. Disappointed, I tried calling the support number but didn't get an answer (it was late Friday afternoon in central Texas) and then sent a note to customer service. On Monday, the customer service agent wrote me back to suggest that I press and hold the "M" button on the Pedal Assist Sensor control for 6 seconds to turn the unit on.I could not find the user manual for the S830 LCD display on the eBikeling web site. (It turns out it is there, at the bottom of the installation page, but the website search tool did not turn it up.) I found it elsewhere in an online search. On the last page of that manual, there is there is this: "Turn on/off the LCD Panel: When the display panel is operating, long press 'M' and it will be turn off, otherwise it will be turned on." This really should be restated in a Quick Start section at the front "To power up your e-bike, switch on the battery, then press and hold the 'M' button if the display has not already lit up."Setup and installation aside, the kit is nice to use for commuting. There are a number of different ways to use the motor. I find the thumb-level to useful for navigating intersections and blind sections of trail. However, for long straights, the cruise-control feature is quite nice. One setting on the LCD allows you to monitor current draw, so with the cruise control set, you can contribute by pedaling and see how much assist you're getting (or how much current you're saving with your pedaling).One interesting quirk is that the LCD odometer only measures distance that the motor is energized. That means the motor's odometer is not a replacement for your regular cyclometer since the motor spins down when coasting.On a related note, I found that having the motor energized interfered with the signal from my wireless cyclometer. I ended up replacing it with a cyclometer with a wired sensor.**800-mile update**I am into my fifth week of commuting 35 miles (round trip) most days of the week and have put about 800 miles on my bike with this kit.So far it is holding up well, and I have a few observations:- I can cruise at about 25mph on a straight with the PAS set on 5. On certain downhill sections, I can touch 30mph. The same section in the other direction, I can go about 20mph. PAS level 4 is useful in school zones, where the speed limit is 20mph. I don't use the other settings.- The torque is pretty significant. At stop lights, I usually end up beating the first cars through the intersection once the light changes. There's a noticeable kick when I press the thumb lever, even at speed. It's fun!- There is a short lag between pressing the thumb controller and getting torque. I believe this is inherent in the design of any free-wheeling geared motor. By now I am used to it and have learned to time my accelerations, but it takes some getting used to, particularly around corners or when navigating bumps, curbs, etc. If you hit the brakes when the cruise control is set and immediately press the thumb lever again, you will have not quite a second's lag time before the torque kicks in again.- Setting the cruise control (a very useful feature!) requires a button press of about 2 seconds. If the road is bumpy, sometimes my finger will come off the button and the "cruise control" long button press will be interpreted as a "lower the PAS level" short button press. A minor irritation, but if the engineers at eBikeling are listening, then they should take note.- I predict that the mode of failure on this kit will be the rubber button covers on the controller. Those buttons (especially the down arrow and middle button) get a lot of use during my daily ride, and I'm concerned the rubber will tear and/or the switch underneath with stop responding. Because of the way it is connected to the LCD panel, The whole panel will need to be replaced when that happens.- I fitted a light (I recommend using a motor-cycle style light with its own switch; some even have horns integrated) and connected it directly to the battery's power cables. The eBikeling-provided connector is made by Julet, and Julet connectors (while high quality and waterproof, etc) are not available in the US for individual purchase. I could not find a light with a two-conductor Julet connector for sale anywhere. If you want to use that connection and control it through the eBikeling controller, you'll need to find another weatherproof connector at the local auto parts or home improvement store. In any case, I was never able to measure voltage at that cable, no matter what I did with the controller- Finally, and this is minor, the motor tends to make a fair bit of noise. In addition to the whine of the gear set, I notice when it's almost up to cruising speed, it starts to sound like my disc brakes are rubbing (sching-sching-sching), although the noise disappears immediately when I disengage the motor. It doesn't always make that noise either. I'm not on stealth missions, so it's really not an issue.**1600-mile update** [2100 miles on my cyclometer, 1600 miles on the eBikeling trip computer]The motor is still holding up well, and my initial worries about the build quality of the control buttons have abated somewhat.Two complaints have surfaced in colder weather:- The PAS control buttons are hard to use with cold weather gloves. Use of the cruise-control function is more or less a necessity on long commutes; mine is about an hour - (16 miles) each way. It is not feasible to hold the thumb lever for that long. The buttons are small enough that it is tricky to press just one through gloves that are warm enough in the winter.- Once the battery level gets to about 25-30%, the cruise control becomes very finicky about whether it wants to hold the speed. That is, it frequently shuts off, and use of the motor requires the thumb lever. I find this to be pretty annoying since this often happens on a hill when I need the boost the most. The battery tends to fade faster when the weather is colder, so this is also largely a cold-weather phenomenon.- Also related to the cruise control but not cold weather, it seems to be sensitive to bumps or vibrations. Sometimes when accelerating, if I hit a bump in the road, the cruise control shuts off. This typically happens when a red light has turned green, and with accelerating cars around me, I'd rather have a consistent boost.**5000-mile update** [5000 driven miles on the eBikeling trip computer, corresponding to something like 7000 miles traveled] This motor has been a workhorse and is still running solidly. I have to say that despite my initial assessment of the part quality, the only problem I've had was with the mounting bracket for the LCD display. Everything else has held up well, including the thumb switch I had such doubts about.- About a year ago, I opened up the hub to check the gear train inside and re-grease it if necessary, but it was in fine shape.- A few times now, I have had questions for the staff at eBikeling, and they have been really good about answering technical questions quickly. Most recently this was to check whether I could use a 48V battery to replace the 36V unit I originally installed but has lost capacity after 400 or so charging cycles.
N**A
Be careful of buying this product if needed to be returned it hard to due.
It doesn't fit the bike I have, I have read every thing on the dimensions. It Should have fitted the bike I have but it didn't. So I return it and now the process is very long to do so be very careful. I still have not received my refund and it been over a week now.Note: I had to file a BBB complaint and still waiting for the refund to be processed
L**E
worst experience
I have written a complete formal review of this system but it is far too long and complex to post here. So here are the highlights:Conclusion:Since 1995 I have built at least a half dozen e-bikes (my first one had Lead Acid batteries). E-Bikes are my only form of transportation. Unfortunately while one E-bike was being rebuilt the motor failed on the other. The whole point of purchasing this kit was to get back on road with a quick, reliable solution. This kit turned out to be anything but that. The only advantage of this kit is fast delivery. This has been without question the worst experience I have ever had installing E-Bike hub motor system.OH … that question everyone always asks: maximum speed with a fully charged 36 volt battery, no cargo and a 135 pound rider is approximately 24 miles per hour …. I say approximately because I believe the speedometer is about 10% optimisticEDIT: That inaccuracy of the speedometer has since been confirmed. Also the battery gauge is a joke. It is based on voltage (rather than power consumption). It goes from 90% to shutdown in less than two blocks.Power usage and temperature:Top speed = 20 miles per hourRound trip to grocery store = 2.4 miles one wayTo store = 57 watt hours used = 23.8 watt hours per mileFrom store = 67 watt hours = 27.9 watt hours per mileAmbient Temperature = 85 degreesMotor Temperature = 94 degreesController Temperature = 101 degreesController:The controllers are offered in 500 watt (36/48 volts, 22 Amps), 1200 watt (36/48 volts, 30 Amps) and 1500 watt (36/48 volts, 35 Amps) versions. The 500 watt controller weighs 12.8 ounces. It is not totally water proof. The back of the SY60 power connector exposes the power pins to the environment. That can be remedied with a bit of RTV. One also needs caps (or heat shrink) for any connectors not used. I recommend a touch of lithium lubricate if you want to be able to separate those connectors in the future.The thing to be acutely aware of is that this series of controllers is driven by the PAS (pedal assist system). The throttle system operates by feeding the PAS system. Thus every parameter for PAS affects the throttle as well. Even if one does NOT install the PAS hardware, the PAS parameters must be set appropriately for the throttle system to function at all. This is poorly covered in the documentation (in some cases just plain wrong). The PAS level also controls the maximum throttle speed.Wheel Assembly:Ebikeling does not give much information about the motor and does not even have any photographs of the left (disk) side. The available photographs for the right side are poor quality and low resolution. They provide a bit more information about the rim. Carbon steel spokes … seriously??? Copper nipples?? Copper is soft and expensive. Surely they mean brass.Motor Wheel Weight 7.4lbs (3.36 Kilograms) WRONG! It is 9.43 pounds !That is a full 20% more than the 7.4 pounds claimed by eBikeLing. Those heavy overweight spokes are one reason that they can not get an accurate weight for the wheel.By the way, you will need steel tire levers to get tires on and off this shallow, narrow rim (the plastic ones just bend).Credit where credit is due: The wheel came assembled less than 1mm out of true. With a mounted and inflated tire, it required very little tweaking on the truing stand.Torque Arm:While the pictures of the kit show two sets of Torque arms, the kit only comes with one. Ebikeling list two V2 Torque arm kits with different prices. However I can not see any difference between them and the descriptions are exactly the same. If you are mounting this wheel on a Aluminum fork then you should definitely use TWO Torque Arms.The Torque arm provided is neither laser cut or high quality. It is best described as SLOPPY! The pictures used by the eBikeLing marketing department on their web site and in their sales literature are NOT of the actual part that they ship in their kits.Documentation:I saved the worst for last. The documentation is more a source of problems than a valid product reference. Some parts are just plain wrong. There are also conflicts between the PDF documentation and the information on their web site. One of those conflicts was the source of it taking me four days to get this system to actually function … and that was discovered by a fortunate accident.Installation:I have included two pictures to illustrate the hardware stackup needed to center the wheel in the 100mm wide fork dropouts. The first picture is the cable side of the motor (normally the right side of the bike frame). The stackup consists of: the motor, 1mm thick washer, fork, torque arm, 12mm flanged nut.The second picture is the disk brake side of the motor (normally the left side of the bike frame). The stackup consists of: the motor, 1mm thick washer, tabbed anti-rotation washer, fork, torque arm, 12mm flanged nut.The keen observer should note that the width of the motor precluded the installation of “two” tabbed anti rotation washers. In fact the one that was installed had the backside ground off a bit to get it to fit in the available space. This makes the proper installation of two properly sized torque arms all the more important.
TrustPilot
1天前
2 个月前