🚿 Elevate your bathroom game with Grohe’s LadyLux Hose—where style meets flawless function.
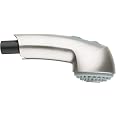
The Grohe 46092000 LadyLux Hose is a premium 59-inch pull-out sprayer hose finished in durable StarLight Chrome, engineered specifically for Ladylux plus and europlus faucet models. Combining sleek design with robust materials, it offers easy installation, long-lasting performance, and a limited lifetime warranty, making it the smart choice for modern bathroom upgrades.


| Brand | GROHE |
| Material | chrome |
| Color | StarLight Chrome |
| Product Dimensions | 1"L x 1"W |
| Item Weight | 0.24 Kilograms |
| Outside Diameter | 0.51 Inches |
| Item Length | 1.5E+3 Inches |
| Manufacturer | Grohe |
| Specific Uses For Product | Inside |
| Global Trade Identification Number | 04005176057755 |
| Part Number | 46092000 |
| Item Weight | 8.4 ounces |
| Item model number | 46092000 |
| Is Discontinued By Manufacturer | No |
| Size | 15mm x ½ x 1500 inches |
| Style | Sprayer Hose for Pull-Out Faucet |
| Finish | Starlight Chrome |
| Shape | Round |
| Installation Method | Wall Mounted |
| Item Package Quantity | 1 |
| Included Components | Product Only |
| Batteries Included? | No |
| Batteries Required? | No |
| Warranty Description | “*1 year Limited warranty from date of purchase” |
M**T
Great Psychic Rewards Come With Having The Right OEM Part, 50% Off, and Driplessly Installed In Less Than 10 Minutes!!
I was initially extremely concerned because all the generic photos online of this 46-092-000 replacement part didn't look in detail like the O-ringed brass end and threaded quick-release end of my old broken flex-hose. So, semi-freaked out, I decided I'd trust the other Amazon reviews that said this was in fact the real deal. Wow! Was I ever glad I did!Other reviews said it would take 10 minutes to install my new replacement hose on my 8 year-old Grohe Lady Lux faucet. A gross exaggeration! It took no more than five (excluding under the sink clean-up prep) and fit perfectly, with not a drop of leakage! Only tool needed is a 13mm open-end wrench to unthread the old hose end from the quick-release coupling at the water line and later tighten the new one back onto that coupling. Slip-joints, Vise Grip, small crescent wrench, or similar tools would probably work just as well. Note: a 1/2" open-end will NOT fit the flats - too small by a smidgen.Installation is a total no-brainer. My old hose broke at about 1" before the spray-head, so the weight of old hose had then caused it to slip back down the faucet neck into the cupboard below the sink where it lay like a dead chrome snake.Procedure: turn off the hot and cold water valves under the sink first. Clear the space out, then decouple the plastic quick-release coupling fastening the broken flex-hose to the small-diameter water-line pipe to which it is attached by pushing upwards on the quick-release fitting while simultaneously retracting its collar. Hold the green-and-black (or older yellow-and-black) plastic coupling in one hand and use the 13mm wrench on the flats of the old chrome hose fitting to unfasten the two. Save the long, slinky spring encasing the old hose for re-use later. Slide on the new threaded, tapered sprayer-head bezel (or re-use your familiar old one, as I did) over the new hose, then connect that end of the new hose to the sprayer-head by first unscrewing the original tapered bezel fitting, removing the old broken end, and pushing the new O-ringed brass hose-end coupling into the sprayer head, then screwing together the hose with the sprayer by hand-tightening the hose bezel. Feed the new hose length back down the faucet neck and refit the sprayer-head back into the faucet neck as it normally resides. Now go underneath the sink and slide on to the new flex-hose length the original slinky spring you saved earlier (easier to do than to describe). Once it's on, reattach the plastic quick-release to the threaded end of the new flex-hose and tighten using the 13mm wrench. Now reattach the entire assembly to the water line with the quick-couple. You're now ready to turn back on the water valves and - Presto! - you'll be back in business. You can do the whole thing in about the time it takes to read this, plus you'll feel great because you did it yourself and saved so much money, starting with this replacement hose purchase.The replacement hose sold here on Amazon is an OEM part, fits perfectly, and about 50% off list. All-in, I doubt you can find it cheaper anywhere else. Being a 'value-conscious shopper', I tried. Save your time. I paid an extra $5+ bucks for Priority Mail shipping, and it got from NY to SoCal in 2 1/2 days! No 9% CA sales tax about paid for the expedited shipping.
S**4
SO EASY TO INSTALL ONCE YOU KNOW THE TRICK
The media could not be loaded. This product is a name brand Grohe 46092000 LadyLux replacement hose that worked beautifully for the LadyLux Plus faucet we have. It took me more time to clear out the items under the sink than it took to do the repair. I kid you not, it took maybe 10 minutes to do the repair. The hardest part was removing the hose from the swivel faucet but once I found a video describing a trick to use it was super easy to get out. For those novice DIY home repair warriors, I have listed the steps I used below. I hope this is helpful. My faucet is working great!To Remove Old Hose:1. Turn off water under sink2. Find green or yellow coupler under sink on one end of hose and pull back on the sleeve to release (have a container ready to collect drainage from the hose. Part: Grohe America 46315000 Quick Coupling, Green3. Unscrew coupler from old hose and save (or replace with new one--mine was still good with so I kept it)4. Slide wire cage around hose and set aside to reuse being careful not to tangle.5. Pull spay faucet handle to pull hose up through bottom of sink. the end of the hose is bulky and I had to push it up through the hole in bottom of sink.6. Pull hose all the way out faucet end--this is where the trick helps. If the bulky end gets stuck in the curved neck of the faucet, pull up on the curved facet neck to remove it. You might need to give it a good tug, but It comes off where the seam is shown. I did this and the hose was easy to get out.7. Unscrew spray faucet from hoseTo Put In New Hose:1. Screw faucet nozzle on (Hand tighten only)2. Thread hose through goose neck of the faucet and down sink3. Push the faucet goose neck back into place--it snaps back on pretty easy4. Slide cage back up over hose5. Screw green or yellow coupler back on (Hand tighten only)--The Grohe manufacturer site said yellow or green connectors can be used with this faucet.6. Pull sleeve back on coupler and re-attach under sink7. Turn supply back water on8. Test it out
Trustpilot
4 days ago
2 months ago