🛠️ Build, Learn, and Display Your Masterpiece!
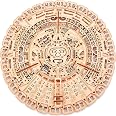
The Wood Trick Mayan Wall Calendar is a 3D wooden puzzle kit featuring 73 pieces made from natural wood. Measuring 16 inches in diameter, this interactive model allows users to track dates in a modern way while exploring the intricacies of ancient Maya culture. Ideal for both adults and kids, it offers a fun and challenging DIY experience that enhances engineering skills and serves as a perfect gift for various occasions.


B**S
Fun to put together!
This is a great puzzle . It looks detailed, but went together fast.
C**R
fun, and nice gift
our family really likes this item. we painted it but then some of us didn't like the color choices while others really liked the color choice. this version will go in their room and we're going to buy another one to paint in alternate colors for the office! I did see some versions come with a wax to put on moving parts to reduce friction. our version didn't have the wax so we'll just use a bit of hand soap, bees wax, or candle wax, particularly on the square window around the date to slide that mechanism a bit more smoothly. really neat item!
V**9
A Fun Project to Build
I had a lot of fun putting this together. Basically you remove the parts from the wood sheets and put them together. the wood is of good quality and I did not have ant problems with the parts breaking. The parts are very accurately laser Cut and the parts fit together exactly as they should. No finish work is needed. The Instruction booklet is excellent. it is Mostly pictures and very easy to follow. If you are a very experienced modeler this type of model is a fun build and would be a nice break from some of your more demanding projects, and if you are a beginning modeler this is a good first project. just take your time to build it exactly as the picture instructions show you. Hang on your wall and enjoy all the praise from family and friends.
R**T
Awesome kit!
I thoroughly enjoyed assembling this perpetual calendar. There's an incredible amount of detail all throughout the pieces. All told, this took me about three hours to complete. The instructions were clear and aside from a small curly-q end that looks like it broke off sometime before it arrived (I am NOT blaming shipping. The piece was deep in the stack of plywood.) Everything looks amazing. Unless you're looking for it, you're not going to see it so I saw no reason to ding the review a second star.The only reason I bumped it down to four stars instead of five is because the example the instructions give as to how use/read it is wrong. So, for those of you looking to figure out how to use it correctly, and/or wondering why January and February are listed twice, this is for you.To use the calendar correctly, take the last two digits of the year (in this case, 19, see picture) and turn the outer ring so that those two digits are sitting over top the current month. As the outer ring turns, it will also turn the middle wheel which has the days of the week. Moving the two digit year number will also change where the days of the week fall. When the calendar changes to the next month, rotate the outer ring to the corresponding month. As to why January are February are listed twice and one set is underlined? Leap years.2020, 2024, 2028 and so on, are all leap years so for the first two months, use the underlined January and February listings. Once those two months have passed, continue on with the rest of the months as listed. Not a leap year? No problem! Just use the January and February listings that are NOT underlined as proceed as usual.A pair of tips for assembly:1. When removing pieces, push them out FROM the back. Hold the piece in front of you (if the numbers in the lower corner are backwards, turn the plywood) and carefully push from the back, so the piece is coming towards you. This way, if the wood doesn't make a clean break the plywood will pull away from the back of the piece instead of the front.2. Lightly test fit the pieces to determine whether wax is needed. The kit includes some paraffin wax you can rub on the wood pieces to make assembly easier. If the piece feels like you'll need to apply some pressure, hit the corners of the tab with the wax. The tabs don't need a lot of wax so don't slather it on.Other than that, have fun! You'll end up with an amazing looking, Mayan themed calendar that will accurately last into the 2040's.
B**Y
Looks great
Very nice
J**K
Beautiful, functional, fun build with a bit of challenge
This is a BEAUTIFUL calendar with an interesting mechanism of rotating pieces to provide you with a working perpetual calendar.The build is challenging. You have to pay attention to detail and be willing to put in some labor to make the best possible version of this project.They use toothpicks to pin various pieces together. There was one point where I was taken aback. The large outer ring is composed of five arc-shaped pieces held together by five joining pieces. EACH of those had SIX toothpicks to do the job. That's 5x6 = 30 toothpick insertions and trimming them to length on BOTH sides... that's SIXTY trimming steps.So I took a deep breath and got to work. It was a Zen exercise in focusing on each step with quality and care. It's kinda like eating an elephant... one bite at a time.Ultimately, the payoff is AWESOME. If I were to assemble another one of these, I'd paint/stain it to bring out more of the detail and functionality.You won't whip this one out in a half hour. You'll have to invest the time. BUT IT'S WORTH IT!
K**R
Fun
It was very fun to put together just wish it had more parts
S**R
Beautiful display piece
I've always loved ancient civilizations, and the Aztec calendar has always been one of my favorite ancient artifacts. So when I saw this, I knew I had to get it. Any type of water-based ink or paint won't work well with this type of wood, so I ended up coloring it with a mix of sharpies, alcohol markers, and acrylic pain pens.It took me about 4 months of on and off work on it to finish. However, if I were to just build it, it would only take about 2-3 hours.The only issue I came across was the use of the toothpicks as they're hard to push in while on a flat surface. I ended up getting a piece of cardboard to go under it so the tips of the toothpicks could be inserted in further.
Trustpilot
3 weeks ago
3 days ago