🏡 Shed Your Limits with Style!
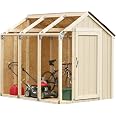
The 2x4basics 90192MI Custom Shed Kit offers a customizable solution for your storage needs, featuring a peak roof design and durable .22 gauge galvanized steel brackets. This kit allows you to build a shed up to 10 feet, with the option to combine kits for a larger structure of up to 22 feet. Assembly is straightforward, requiring only straight 90-degree cuts, making it perfect for DIY enthusiasts.


| Item Dimensions D x W x H | 5"D x 11.5"W x 6.7"H |
| Item Weight | 4.4 Kilograms |
| Style | Peak Roof |
| Color | Gray, Ivory |
| Top Material Type | Alloy Steel |
| Frame Material | Galvanized Steel,Wood |
| Base Material | ['Galvanized Steel', 'Wood'] |
| Material Type | Wood |
| Is Assembly Required | Yes |
| Water Resistance Level | Waterproof |
A**Y
Great kit.
First off, I'm at best an amateur carpenter with a little common sense and a handful of woodworking tools.This shed kit is great. When I first opened it, I was a little doubtful when looking at the metal pieces and seeing how flimsy they are by themselves. Worry not though. Once everything gets tied together it becomes very sturdy.As a previous poster mentioned, you need to TRUST the measurements in the book. If you follow those, everything will all work out.I bought 3 kits to make the 10x22 shed. One thing to be aware of is this. The 10x22 shed is 11 feet tall! By the time you add some bricks to keep it off the ground and 4x4 runners (which I highly recommend) it gets really tall.One of the kits I got didn't have all the correct pieces in it and I was 24 pieces short. I called the company and they promptly shipped me replacement parts.When you go to build this shed, spend a little more time and be SURE the base is flat. I put three 4x4 runners under my shed and spent a long time making sure they were level all the way down. Time well spent because the rest of the shed went up with ease.Oh yeah, after my comment above about following the directions...on page 13 of the book it calls for 2 pieces of wood labeled 'NN'. Problem is they forgot to put NN back on page 5. Not a big deal since it's easy to figure out the correct length (97 inches), but you'll end up two 2x4x10's short.I also recommend printing out the instructions and then going through and marking out all the instructions that don't pertain to you. Makes it much easier.After all is said and done the 10x22x11 (WxLxH) shed cost around two grand total. That's materials only, not labor of course. Not bad at all. Go price one that size pre-built somewhere.As far as the person complaining they didn't get an entire shed....REALLY???
G**Y
Turned out nice 11'x14' barn style
I started this shed one year ago, I bought 2 kits, the brackets seem really flimsy until you start putting it together, then things start to tighten up, the reason why it took so long was that I was using 90% recycled material from work, the 2x4 material took the longest to collect, every other one was warped, I followed the instructions for the most part, I put in blocking half way up the walls for added support, I also wanted more headroom inside so I cut wood gussets to attached to the trusses, I made the trusses first because I wanted them to all be exactly the same and when placing the two by four walls level them and brace them and leave the braces on until you have all walls sided, getting the trusses up on the 2x4 walls was a challenge by myself but I figured it out, over all the shed came out perfect. I posted many pictures.Update, DO NOT build the floor the way it says on the ground, use pressure treated and elevate it with piers or blocks, my sub floor rotted after three years, it has to be vented!!!!!!Update: so after learning what not to use on the subfloor, I jacked up the shed, removed the rotted floor, installed pressure treated 4x6 perimeter with 4x4 pressure treated, 16" on center, screwed and glued down 3/4 " plywood, and sealed the plywood with primer sealer. I used blocks to elevate it 2" off the ground.
M**L
Great instructions brackets not so great🤔
Ok instructions great clearly made and easy to understand. In my opinion the parts thats that come with it are to me cheaply made, well look at the differences in my pictures you be the judge. Sturdiness well I can’t say not with the brackets that come with this kit because I’ve replaced most of them and will probably change what’s left too.I can also say that most people could probably build this shed with the instructions mostly by yourself but I would not recommend it. I had to take mine all apart except the floor.My best friend came over and with his help the shed is coming out much better than when I tried to do it alone.Understand this is my first time doing anything like this so you will have to judge for yourself if or when you buy this shed kit. Overall for someone that can’t afford getting the sheds that cost mostly over a thousand dollars this kit is for you but wood is not cheap either but at least you can do this at your own pace a little bit at a time. I will try and update this when I’m done..update and I’m not done well being that the brackets that come with the shed kit are proprietary if you damage any you won’t have enough to finish and since my knowledge in angle cuttings nada! I have to order another kit just so I can finish my shed, (more updates soon) I hope🤪 update frame solid super strong for me, the upgrades for the 2x4’s has a made all the difference in my opinion but you should decide for yourself. One important thing you should know not go skimpy with the level perfect or nothing. Eeeeehh “it’s ok shouldn’t cause a problem doesn’t have to be perfect” attitude will go badly will make one more update.Tomorrow I’ll put up some pics to show were we’re at so far.