🎬 Elevate Your Viewing Experience—Wherever You Go!
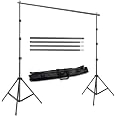
The 120” Portable Spandex Projector Screen is a versatile and lightweight solution for both indoor and outdoor movie experiences. Made in the USA, it features a unique 4-way stretch material that allows for front and rear projection, making it ideal for any setting. The complete kit includes everything you need for a quick and easy setup, eliminating the need for bulky equipment or complicated installations.
D**S
Works great, easy to use, but don't put it directly in front of a white wall
This screen worked exactly as described--I followed the clear instructions to install the (included) hooks for a "semi-permanent" living room install, which was done in ~10 minutes max (including careful measuring). The screen hung up nice and flat with no wrinkles.I did notice that, since this is NOT an opaque screen, there is some 'blooming' around bright features on the image, and black levels weren't what I had hoped. To be fair, I HAD been using a grey bedsheet previously.However, when I hung up a blackout curtain immediately behind this screen, essentially all my problems went away. A picture is worth 1,000 words, so look at the (annotated) pictures!Room lights on always equals poor contrast on a projector, but this lets you see where the blackout curtain is, and note how well it rescues the image already.Room lights off, the magic starts! Dark regions are OK even without the curtain, but there is light blooming/softness around bright regions. The blackout curtain works magic for both bright and dark.Final shot is with a full-coverage blackout curtain, and I tweaked the settings on my phone to approximate what it looked like in-person. You can still sort of see the screen, but contrast and detail are great!Note that all the images are from OLED demo videos on Youtube, which are a torture test for black levels and dynamic range. Ordinary content is far, far more forgiving. Furthermore, these are low-res, low-light, handheld cellphone shots; mostly everything looked better in-person.
G**H
OMG! This screen is that awesome!
The media could not be loaded. Ok I thought the hype was just that when it came to the quality, reliability and ease of use for this material as a projection screen. OMG! This screen is that awesome! Not only does it work well, sharp image and have both rear and front projection, but you can do some sick effects with it that you simply could not do on the greatest and most expensive of screens.For instance, because it blends in with the background so well, no matter where you put it, you can cheat and make your 120 inch projection screen into a 200 plus inch 3dimensional party time. I've uploaded a video to show you what I mean. Turned the lights off and on so you can see the 3D effect it gives by moving the projector back a few feet more overlapping the screen image. We love this thing. Stayed up till 2am with kids just having so much fun using it and the better the projector you have the more In Awe you'll be, but mine was only 500 Lumens 720 p aaxa pico projector, definitely not top end but boy did it do the job. Thank you guys and as a Army Combat Wounded Retiree, love that it's made here in USA. You guys not only have pride in what you make but it Shows... pun intended:) Seriously, I don't do reviews but this definitely deserved one. Thinking of buying my immediate family and close friends one or two or more this Christmas.Sincerely,Herrera Family
N**G
Great bang for the buck with some assembly planning needed
The usable screen size ends up as a 108" or 9' diagonal for a 16:9 aspect ratio...aka the widescreen hdtv standard. As others have mentioned it's not far off from what you could figure out for as a DIY project but the cost is worth it for not having to do that. Keep in mind what your projector's throw offset is if you plan to put the hooks in the ceiling as my projector and ceiling mount required my screen to be at least 8 3/4” below the ceiling. If just putting the hooks in the ceiling I would use a string, a laser line or snap a line to set the hooks perfectly straight so you can keep the image focus as uniform as possible. Also remember If you do snap a line with the chaulk it will need washed off so I'm not sure about that idea. I ended up using a 4" x 10' x 3/4" poplar board to mount my hooks into it's edge. The board on edge is rigid enough to stay straight and not bow over it's span. I used two more 2 foot pieces on each side to form a 90 degree top using angle brackets. The pieces gave me a surface to prop or screw the assembly to the ceiling. I used the rigid adjustable paint poles as legs to prop it up. When I went to hang my good projector I found I need to drop my mounted board down at least another 4" so I used rigid cardboard tubing I had cut square and straight on a chop saw. PVC or wood would have also worked. I had to hang a doubled up black landscape cloth from the wood to hang behind the screen to stop the light bleed hitting the wall since the screen material is very sheer. The image looks very good but I was using a painted wall before so a videophile might be more critical. I mounted this covering my unused fireplace and mantle so needed a screen. It would be cool to take advantage of the dual sided nature of the screen if I had the room.
K**N
Good, but translucent
The screen is a nice color, and decent quality, however, when it is streched, it does allow bleed-through. if you look at my two pictures, one is stapled right to the wall, the other, I built a frame with a blackout fabric behind it. It looks much better with the blackout fabric behind it. If you have a dark wall, that might work too.