
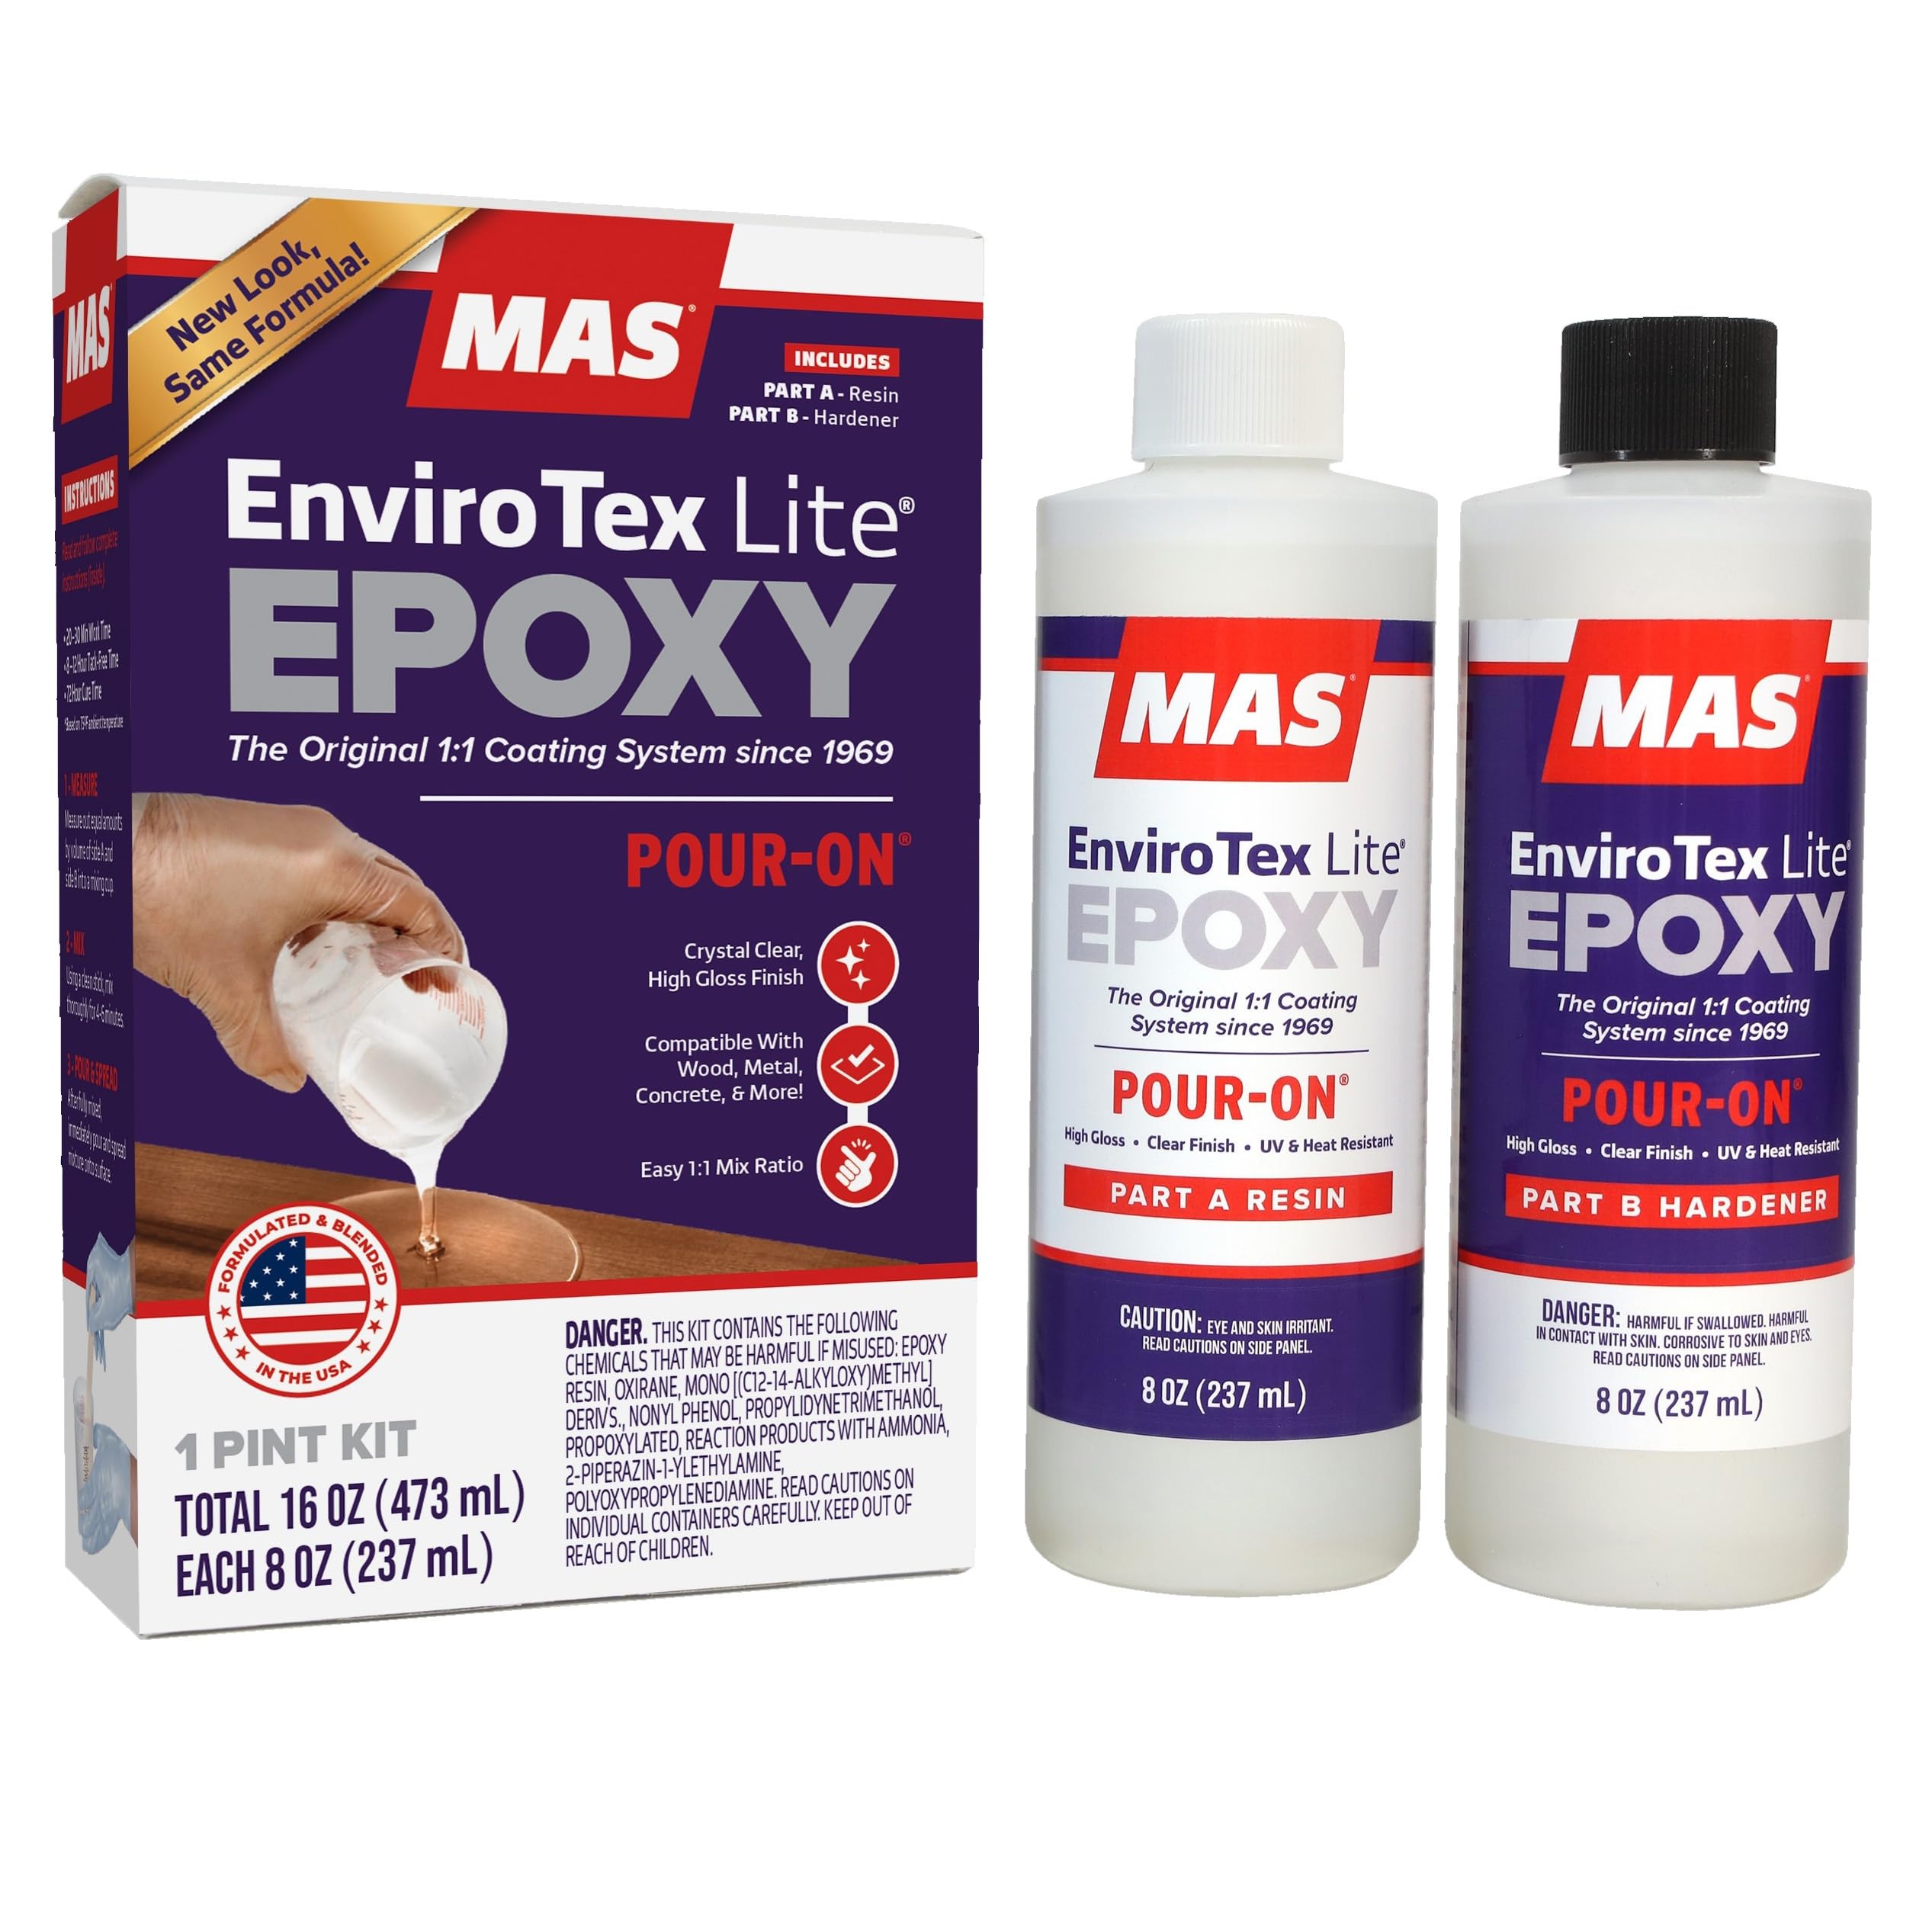
✨ Elevate your surfaces with a crystal-clear finish that commands attention!
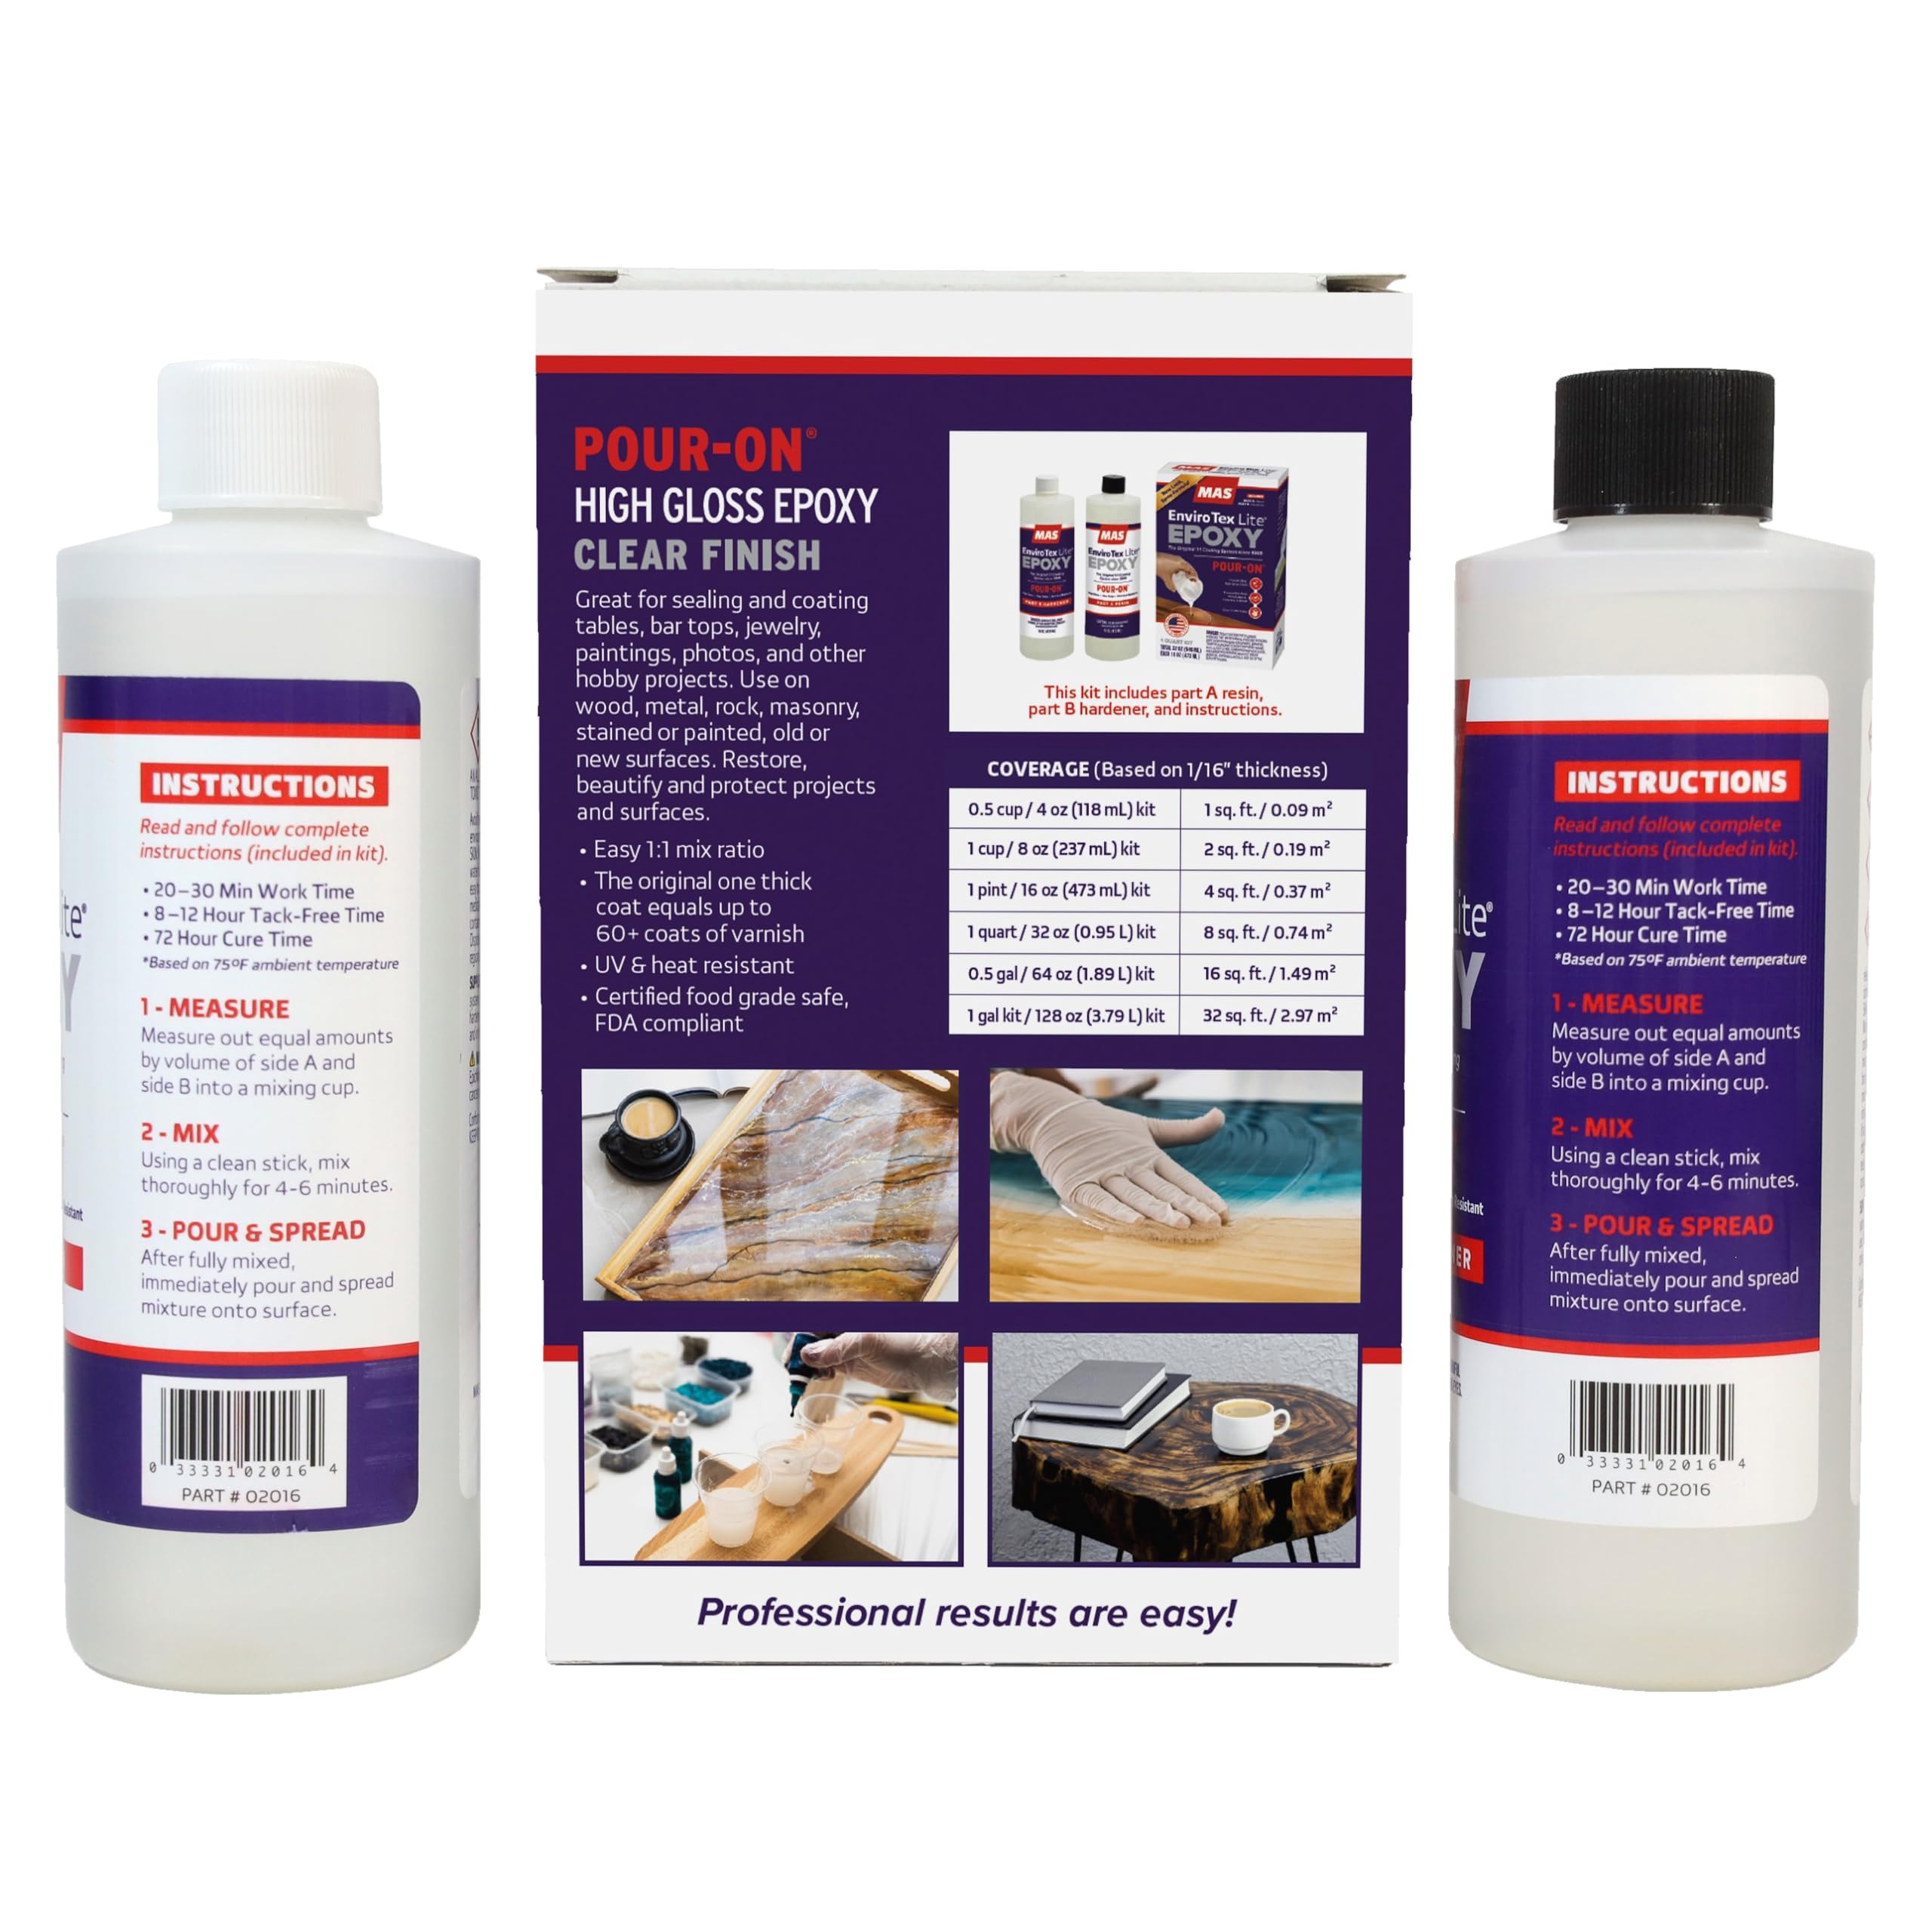
EnviroTex Lite is a high-gloss, clear epoxy resin kit designed for quick, one-coat application. It cures in 8 hours and fully hardens in 72, delivering a durable, waterproof, heat- and alcohol-resistant finish ideal for furniture, bar tops, and creative projects. Its easy 1:1 mixing ratio and self-leveling properties make it perfect for professionals and hobbyists seeking flawless, glass-like surfaces without polishing.

| ASIN | B000LNS9CW |
| Best Sellers Rank | #136,036 in Tools & Home Improvement ( See Top 100 in Tools & Home Improvement ) #250 in Interior & Exterior House Paint |
| Brand | ETI |
| Brand Name | ETI |
| Color | Clear |
| Compatible Material | Metal, Plastic, Wood |
| Container Type | Can |
| Customer Reviews | 4.5 out of 5 stars 1,085 Reviews |
| Full Cure Time | 8 Hours |
| Global Trade Identification Number | 00033331020164 |
| Included Components | ENVIRONMENTAL Watercolor Stains Sealers |
| Item Form | Liquid |
| Item Height | 6.5 inches |
| Item Package Quantity | 1 |
| Item Type Name | Environmental Technology 16-Ounce Kit Lite Pour-On, High Gloss Finish (2016) |
| Item Weight | 16 ounces |
| Manufacturer | Environmental Technology |
| Material | Plastic |
| Material Type | Plastic |
| Model | 2016 |
| Other Special Features of the Product | special_feature |
| Special Feature | special_feature |
| Specific Uses For Product | Interior |
| UPC | 033331020164 |
| Unit Count | 16.0 Fluid Ounces |
| Viscosity | High |
| Volume | 16 Fluid Ounces |
| Warranty Description | Because we have no control over working conditions or methods, our liability is limited to the price of this product. |
| Water Resistance Level | Waterproof |
I**T
Works great
I bought these to make tile photo coasters and wanted an epoxy covering. I followed the directions exactly. I setup a table in the garage and covered my project with a sheet of plywood with a dollar tree plastic tablecloth so it wouldn’t get lint particles. It turned out amazing! This is self leveling but you need to have a kitchen torch or couple long grill type lighters to get rid of the air bubbles. This box covered about 24 4” square tile coasters with overspill, I made them in groups of six. FYI, if you use wax paper as a drop cloth the epoxy won’t stick to it but you need to elevate your project so the epoxy can run off the sides and self level. I put wax paper around a wooden tongue depressor/stick to use as a brush to spread the epoxy on the sides. Do not touch up once it starts setting. If a piece of hair or dust gets in it while it’s drying and you leave a mark, your project isn’t ruined, you can lightly sand paper it once dry, clean with isopropyl alcohol and then put another layer of epoxy over it. This is time consuming but make sure you have everything you need upfront including plastic gloves. It’s worth the hassle, it really looks amazing when done.
K**N
Perfect starter resin!
As a resin jewelry beginner with no prior experience, I was stunned at the number of resin types and brands and more than a little nervous to trust online reviews. I finally picked this one, admittedly with some hesitation, because it seemed to be multipurpose and have pretty decent reviews. It turns out my concerns were for nothing; everything I've made with this resin has turned out well. It's easy to use and has very precise instructions as well as a simple 1:1 mixing ratio. The resin itself dries beautiful and clear, is sturdy yet pliable when thin, and has no trouble with additives such as color and pearlizing powder. As long as I follow the instructions, it leaves virtually no bubbles. I've used it both with molds and as a sealant/varnish for other items, and it has done well for both. I realize there are many other uses for this product, and I can't speak for all of them. But I can assure my fellow jewelrymakers that this resin is a good quality and easy to use. This is definitely the brand I'll be getting from now on.
M**S
Great product!
If the two components are mixed accurately 1:1 as described in the instructions the epoxy resin cures fully in 24h @ 23oC. In my case, the product was spread manually over the surface of a (well dried) cedar coffee table top. The use of a silicone spatula to spread the epoxy resin allowed me to use this product on wooden slats and to pre-treat exposed wood knots as well. I put two layers (the second layer was laid on once the first was fully cured) and so far the glossy finish looks great with no need for special maintenance even when the table top is kept outdoors. Sunlight has not darkened the product to a significant extent. It is exactly what I was looking for, it was easy to use and the end result is better than I thought. This resin also works well for coating graphics, e.g., drink coasters. Highly recommended.
M**N
Great stuff. I'm a frequent buyer
I use this stuff all the time for small woodturning projects mostly. I turn vases for my dearly beloved and use this product to make the inside waterproof. It works very well for a couple of reasons: 1. It completely seals the wood, period. Absolutely, if used correctly. 2. It provides a smooth finish for the interior and means I don't have to sand like a madman to get a nice final finish. So I just sand interiors to about 120 grit or so, which seems to provide a good substrate for this product, and then after mixing, pour it in and rotate the vessel until it is well coated. Let it dry for a few days in my case and add flowers and water. Result: a very happy lady. A few helpful pointers here (I have learned the hard way): 1. have all your materials ready and the workpiece in position 2. use PRECISE measurements of equal parts. Don't weigh it, measure it (as the instructions say) 3. I use disposable plastic cups like the little Dixie bathroom cups (it only takes a couple ounces for a vase, usually) 4. popsicle sticks (craft sticks, etc) make a great mixing tool and they are cheap 5. mix until your arm is tired. :-D Scrape the sides of the mixing vessel frequently 6. pour and leave it alone. other than blowing on the surface to remove bubbles, don't poke around at it. you'll be glad you didn't.
A**N
High Gloss Resin
i contacted several very well known special effects company's (who I will not name) to see if they can make a more solid (resin) version of my saw blade weapon cus it's made of all foam not plastic and I hated that. So they said they can do it but it'll cost between $$-$$$ and I'm like "really just for a simple prop?!" So I told myself "I'm going to DIM" (do It myself) so I re-searched a desist clear resin that's good for anything and most surfaces. So I found this one. Originally I was gonna do the whole thing to make it look like it's made of plastic that's why I wanted it clear but then I realized the blade was the weakest part and the bat was thick enough. So I after reading and measureing everything just right it turned out... perfect. If you see a clear shiny glare on the blade that's the resin and obesely the light. CAUTION: do this in well vented room, (or outside), wear latex free gloves, safty glasses, a apron, wear a resparator and measure equal amounts for both parts. While its curing it looks and feels sticky like the back side of tape but that's normal. So after the full cure time it's hard and smooth. Also PLEASE make sure you read the directions first and do everything right cuz if you don't it won't cure right, it'll be sticky (the wrong way) and it will take longer to cure maybe not even cure at all. Sometimes you have to risk it and do it and do it yourself. THX Amazon and Environmental Technology!
J**H
the results were excellent. If you follow the mixing directions
I used this on a bathroom counter top over some "granite effect" spray paint, the results were excellent. If you follow the mixing directions, you should have no trouble with it setting up. There are plenty of YouTube tutorials on application, watch a few of those before using. If you are using this on something that will require it to drip over the edge for coverage, be sure to cover EVERYTHING. It will flow a lot more than you expect it to. If you need to tape anything off, remove the tape about 3 hours after application; a piece of advice I did not heed and had some trouble getting the tape removed when I went to take it off 12 hours later. One word of caution, buy more than you think you will need. The estimated coverage listed on the box is not totally accurate. The coverage listed for the 16oz is 4 sqft, and I used every drop of the kit on a very small counter top thats a shade under 4 sqft. It's worth it to have the extra on hand in case you need it, rather than be left with an uneven surface because you ran out.
S**E
Follow instructions fully
My thoughts is I never done this before and boy I would hate to ruin my 75 dollar table I just made. But I took the chance and I think it came out very nice. You really have to create a border, I have no clue why they would say to brush the sides while letting it set? No sense at all. I simply placed tape as you can see around it and it seemed to work just fine. Let it dry for 24 hours and off it came, no issues! But definitely have a cheap hot air gun / blower in your immediate proximity. This helps bring any bubbles to the surface and make them disappear that "You" will create while stirring. My opinion also is to stir it even more than the required time, you have plenty of time to set this up. At least 20 mins to half an hour with out any problems. (4 X 4 16 ounce kit) By then your leveling will be done and your scope of bubbles should be done also. Seriously check out the other prices and I chose this one and to me I'm so pleased! I just ordered another one this size the 16 ounce! Where protective gloves and throw away anything you mix it up in. You will be fine! Best of luck well worth buying this product!
T**E
Took two coats, VERY easy to use!
This resin was insanely easy to use and the finished product came out better than i could have ever imagined. The only flaws are two noticable hairs and that is entirly my own fault, not the resin (be sure to not lean over your project much and wear hairnet if possible.) I poored full bottle resin, then full bottle hardener in container. Mixed 2 Min. Poored into new container and mixed for another minute. Poured onto project in the center immediatly. Ended up doing 2 coats as you can see from the pictures! At first i forgot to tape off the edges and i pulled too much resin to ends of the board causing it to faul off. All in all, this product is great to use; highly reccomended.


