🌟 Enclose brilliance: Print smarter, quieter, and cleaner with every layer!
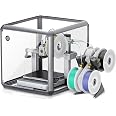
The 3D Printer Enclosure for Bambu Lab A1 features a robust acrylic and aluminum build that stabilizes temperature below 40℃, reduces noise by 60%, and offers 360° visibility with LED lighting. Designed specifically for the Bambu Lab A1, it isolates odors and particles, protects prints from dust and accidental contact, and enhances print quality through consistent environmental control.


A**R
Excellent, quality enclosure for the money!
Being cheaper than the other options, this is definitely the best enclosure for the money! I can see where the cast pot-metal corners might be a bit fragile, but I was just careful inserting them into the extrusions. I plan to purchase a few more for use with Prusa Minis as the factory provided enclosure for those cost nearly four times as much as the Top Cube. The acrylic sheets are thick enough, the doors fit nicely and all the fittings for the A1 Mini are well thought out. I’m very happy with it. I did add a bottom surface (400mm by 2mm carbon fiber panel that fit without trimming) and added squash ball feet, making the enclosure nearly silent when printing.
D**.
I'm really disappointed.
I rarely write a review. But, I had to for this one.First!I have Not read any reviews on this. I probably should have before I purchased it.Now..This was the most challenging assembly I've had in many years.The Instructions were a nightmare!1. The diagram is so small, you have to visually study the parts to figure what they're saying.2. They use this weird green highlight as a guide, but it makes the diagram that much more difficult to follow.3. Most of the diagram the wire port is in the front at the bottom. By section 11 it's shown in the back at the bottom.4. Two of The Hinges I received are not exact and causes the Connector Pin to sit slightly further away and angled.This caused an uneven gap on the end of the door panel.As well as making both doors uneven when opening and closing.This is definitely Not going to last longterm.5. Every time I open or close the door. The Thermo Graph keeps turning out of position. 20 times of opening and closing the door and I'll more than likely have to read it upside down.6. I'm not sure why I have 3 extra Profile Connectors left over. I thought there was more to the installation. Especially, trying to read the diagram.7. It's a little tight on space when the Printer is added. I haven't even tried to add the waste catcher yet.Overall.It looks nice, but the hassle of open and closing the uneven doors I'm not thrilled about.And knowing it's just a matter of time before something breaks off has left me feeling like I just threw away money on something I thought was a great product.Hopefully, the company will reach out.
C**C
Has some issues, good overall.
Apart from a few issues, it looks absolutely great and does the job of keeping some heat around the bed and preventing drafts, so I’m just going to share some notes and thoughts, so you’ll be prepared.The instructions are decent but the images are a little confusing, it’s hard to see some details.Be careful when assembling. The corner brackets have stems that insert into the frame rails, and these are only a couple millimeters thick on either side of the screw holes, so they’re easy to snap (I broke one while assembling). The instructions specify that there are “self tapping” screws meant to hold the door brackets to the frame rails. The ones I was provided were not self-tapping and I had to take a drill to the rails. These door brackets work as additional structural support for the frame, so I was able to make the one snapped corner bracket work by moving it to the front and reinforcing it with the door bracket.Once built, the frame seems sturdy enough, but I’d still handle it carefully.The included tools are weak and flex easily, making them almost comical to use. If you don’t already have a decent set of hex wrenches (and you should), grab one before starting this.The included passthrough for filament did not work for me. I suspect this might be my fault, as I reversed the left and right panels to make my AMS more accessible. If you set it up the right way, you might not have this problem, but if you do what I did, you may find that the positioning of the holes and the length required for the tubing to reach the full bed range results in bends too sharp for filament to pass, causing jam errors. I just removed it and put the stock tubing through the holes in the plexi. The tubes sort of move in and out of the frame as the print head moves, and it seems to be working fine that way. I’ll probably try to find grommets that fit the holes to keep the tubing from scraping on the plexi, as it feels like it might cause damage over time.Overall, apart from these minor problems, I’m very pleased with the way it turned out.Edit: On further reflection, these issues probably wouldn’t be “minor” for a lot of people, and I’m probably being more forgiving than I should be. You shouldn’t have to worry about snapping brackets with a small amount of force, and you shouldn’t have to take a drill to something like this to make it work. Might be best to avoid this if you’re looking for something that doesn’t have to be modified to achieve the functionality it was supposed to have out of the box.
TrustPilot
1 周前
4天前