We remain fully operational. Our teams are working around the clock to ensure your deliveries continue safely.

下载应用程序


💎 Elevate Your Mining Game!
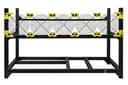
The VeddhaV3C 6-GPU Mining Case is a premium aluminum open-air frame designed for efficient cryptocurrency mining. It supports multiple currencies including Ethereum, Bitcoin, and Monero, and features a stackable design for optimal space utilization. With a super cooling system and easy installation, this mining rig is perfect for both beginners and seasoned miners.
| ASIN | B073SMF21G |
| Antenna Location | Gaming |
| Best Sellers Rank | #2,227 in Computer Cases |
| Brand | Veddha |
| Case Type | Mid Tower |
| Color | Black, Green |
| Compatible Devices | Micro ATX motherboard devices |
| Cooling Method | Air |
| Customer Reviews | 4.2 4.2 out of 5 stars (418) |
| EU Spare Part Availability Duration | 1 Years |
| Enclosure Material | Aluminum |
| Fan Size | 120 Millimeters |
| Hard Disk Form Factor | 3.5 Inches |
| Item Weight | 3.7 Kilograms |
| Manufacturer | Veddha |
| Model Name | Veddha V3C |
| Number of Fans | 5 |
| Other Special Features of the Product | stackable design, super cooling system, easy installation |
| Power Supply Mounting Type | Rear Mount |
| Supported Motherboard | Micro ATX |
| Total Expansion Slots Quantity | 6 |
| Total USB 2.0 Ports | 4 |
| Total Usb Ports | 4 |
| UPC | 710280392787 710280392817 642940907508 618028273148 642940907560 |
A**N
Wow! What a bargain!
This frame is made (mostly) of 20mm aluminum extrusion and based on my experience (as an automated robotics designer that uses aluminum extrusion every day) I can tell you that there is no way you can build this frame cheaper, or higher quality by yourself! All of the aluminum is processed (holes are added and ends are tapped) prior to being anodized which is awesome! Some makers will buy black extrusion, then process the aluminum making all of the additional cuts in the material “silver” but this is all uniformly black. All of the brackets and grills for the 5x 120mm fans were included. And there were more than enough of all of the hardware. Mine even came with a power switch, something most normal tower cases have that you may not think of when building a mining rig! Every thing fit as intended, and the polycarbonate had nice paper protection so it was not scratched. Some cons: -The instructions are lacking, but like I said I use aluminum extrusion all the time and it was really a non-issue for me. -The magnesium angle brackets were obviously just painted black to match the frame and this was a pretty poor paint job. I would have rather had silver brackets than the poorly painted ones, but they reside on the bottom of the frame for the most part, and are not highly visible. -The hardware is black oxide coated which needs to be coated in oil for corrosion resistance while shipping. I understand the need for this, but it does sort of make a mess of the frame during assembly. I just wiped the frame off with some windex after it was built. These are all minor cons and should not sway anyone from buying this case/frame. I build stuff with this aluminum all day long and they can sell it cheap cause they a building frames in bulk. If I had to design and build this even after reverse engineering the existing frame, I could not sell A single frame for less that $250, and I probably wouldn’t make a dime... Mine even came with a pair of white gloves - maybe for assembly???
J**N
Quite a complicated job, but very sturdy and high quality in the end.
Solid build. Very high quality, durable. Sturdy. Nicely engineered. QA is not 100% great. I had one tiny silver connector piece that had no threading at all, and one that was mangled. One crossbar piece stripped out very easily when I tightened down on it. Luckily it wasn't bad enough that it compromised any integrity. The bolt still stuck in enough to support the vertical pressure that would be on it. I'm a mechanically inclined guy, and have been building computers for a couple decades. This thing took me 90 minutes to put together. It probably would've been about 60 if I did it all right the first time. Tips: Pay attention to which direction and which rotation the piece is supposed to go in. Plan ahead. The 3 bars where you mount the motherboard do have indicators in the instructions on which side the 3 holes go on, and which side the 2 holes go on. Also, not sure how everyone else is doing it, but for the corner pieces that have the silver nut that goes in the track, you can pre-assemble those, then put them in place and start screwing down. The silver pieces will grab and stay in the correct position. See pics.
K**W
Great Design / Terrible Instructions
I purchased this frame to replace a previous purchase that was wildly inadequate . It took me about six hours to put it together. To be fair, I was dealing with three kids getting fed and bathed simultaneously, so it didn't really take six hours to put together. The only issue I have is one that probably applies to every other frame out there...the instructions are terrible. Thank God for YouTube! Instructions started off OK, and then whoever was in charge seemed to quit about half-way through. I have some small parts left over and I'm not sure what purpose they serve. They are listed on the contents, but never addressed during installation. Anyway, I managed to get it together though I think the fans may be on backwards. Neither fans nor PSU installation are ever mentioned. I only have three GPUs installed at the moment but it looks like it will be relatively easy to install the remaining GPUs and the materials are top shelf. It is very solid and I am glad I made this purchase. If there were proper installation instructions included, I would give it five stars.
K**R
Great 15 series T-slotted aluminum framing
Great 15 series T-slotted aluminum framing. No issues with assembly but it took longer than expected. The instructions required magnification to read. My only issue is that I'm using Zotac mini 1070s and the frame is designed for full size cards, and even then, it is not designed with any place to mount your PCIe risers. With full sized cards, they are just resting on the bar and only held by screws on one end. I'll be adding two bars across the width of the frame so I can better secure the cards. Also, the power supply piece is not friendly to the PSU I chose for my build. I will be using a dremel tool to resolve, which is no big issue because the piece is resin/plastic. All in all pleased.
T**R
Once you get it assembled, it's perfect. Yes, as others have pointed out, the instructions are a little difficult to follow. After a little time and patience, I was able to figure how it's supposed to go together. My gpu temps went down once they were all put on the frame due to better airflow than my home-made solution. It's a quality frame and feels very sturdy.
L**I
結論から書くと、工作好きで自分で金属加工できる自信のある人以外、買って損すると思った一品。 以下、実際に起きたことを列挙します。 ・金属加工が粗末で、至る所ネジ穴から飛び出た金属片が見られ、怪我するリスクあり! ・添付品の袋が油だらけで、手や衣類が汚れる ・寸法が合わず、脚部のがたつきが発生する ・拡張カード用のネジが使えない。無理して使うとネジをなめる!穴に刺さったままのネジの芯が外れない(ネジザウルスによる除去失敗) ・ミニルーターで支柱に穴が開かない(逆にルーター側のドリルが欠損する) ・電源を固定するパーツがない! ・組立て及び組立て後のリグの修正に3時間以上かかる(小生の場合) ・塗装が簡単に禿げる! ・グラフィックボードはカード側のネジでしか固定できず、別途支柱を自分で購入し工作しないとカードが斜めにぶらさがる 以上です。 リグの出来の悪さ(最悪品質)を修正するための出費が増えて、何もいいことありません。 この商品を買って組立て始めたときは、不良品すぎて笑いましたが、本格的にPCパーツ類を載せて運用する段階になると、あまりの不備の多さに愕然とさせられました。 取説も粗悪で、日本製がどんなに品質が高く、マニュアルや加工済み素材の精度が高いかに感動します! そういう意味で、本製品をお買い上げする(高い勉強料を払う)価値はあると思います。
G**O
Me gusto el producto llegó en los tiempos, el vendedor se comunico conmigo, porque con American Express detienen la compra hasta que uno se comunique por seguridad, una vez liberada la compra, se reactiva, sin embargo dice continuar la compra y se generó un segundo pedido, y el vendedor muy amable y honesto detecto y se comunicó vía correo para confirmar si efectivamente eran dos pedidos o solo, uno le comente que uno, y me hizo el reembolso del segundo. Sólo un detalle la pieza marcada con FS05 va atornillada a FS06 según el plano, sin embargo el agujero va del lado equivocado, no le veo problema porque con taladro le hago el agujero por el lado correcto, fue todo. Felicidades.
C**S
No es fácil montarlo porque instrucciones no son muy claro pero cuando terminado se nota muy buena calidad. Muy fuerte y con balda arriba coge peso de la tele sin problemas. Tambien tiene power botón para placa base pero yo no necesito porque uso parte frontal de mi torre vieja. Muy contento
F**O
Mode d'emploi erroné (mauvais marquage des pièces et vis), mais on s'y retrouve car les pièces sont décrites. Après en avoir monté 2, je les trouve top et de très bonne qualité. Et c'est moins cher que de les faire soi-même, si j'avais su... Je vais en racheter !
TrustPilot
2 周前
5天前