
Desert Online General Trading LLC
Dubai, United Arab Emirates
Desert Online General Trading LLC
Dubai, United Arab Emirates


🔌 Power Up Your Control Game!
The Double Head Push Button with Signal Lamp is a high-quality control switch designed for both home and industrial applications. With a robust operational voltage of up to 660V AC and a durable zinc alloy construction, this switch is perfect for a variety of installations, including operating rooms and distribution boxes. Its easy installation and high visibility make it an essential tool for safety and efficiency.


M**C
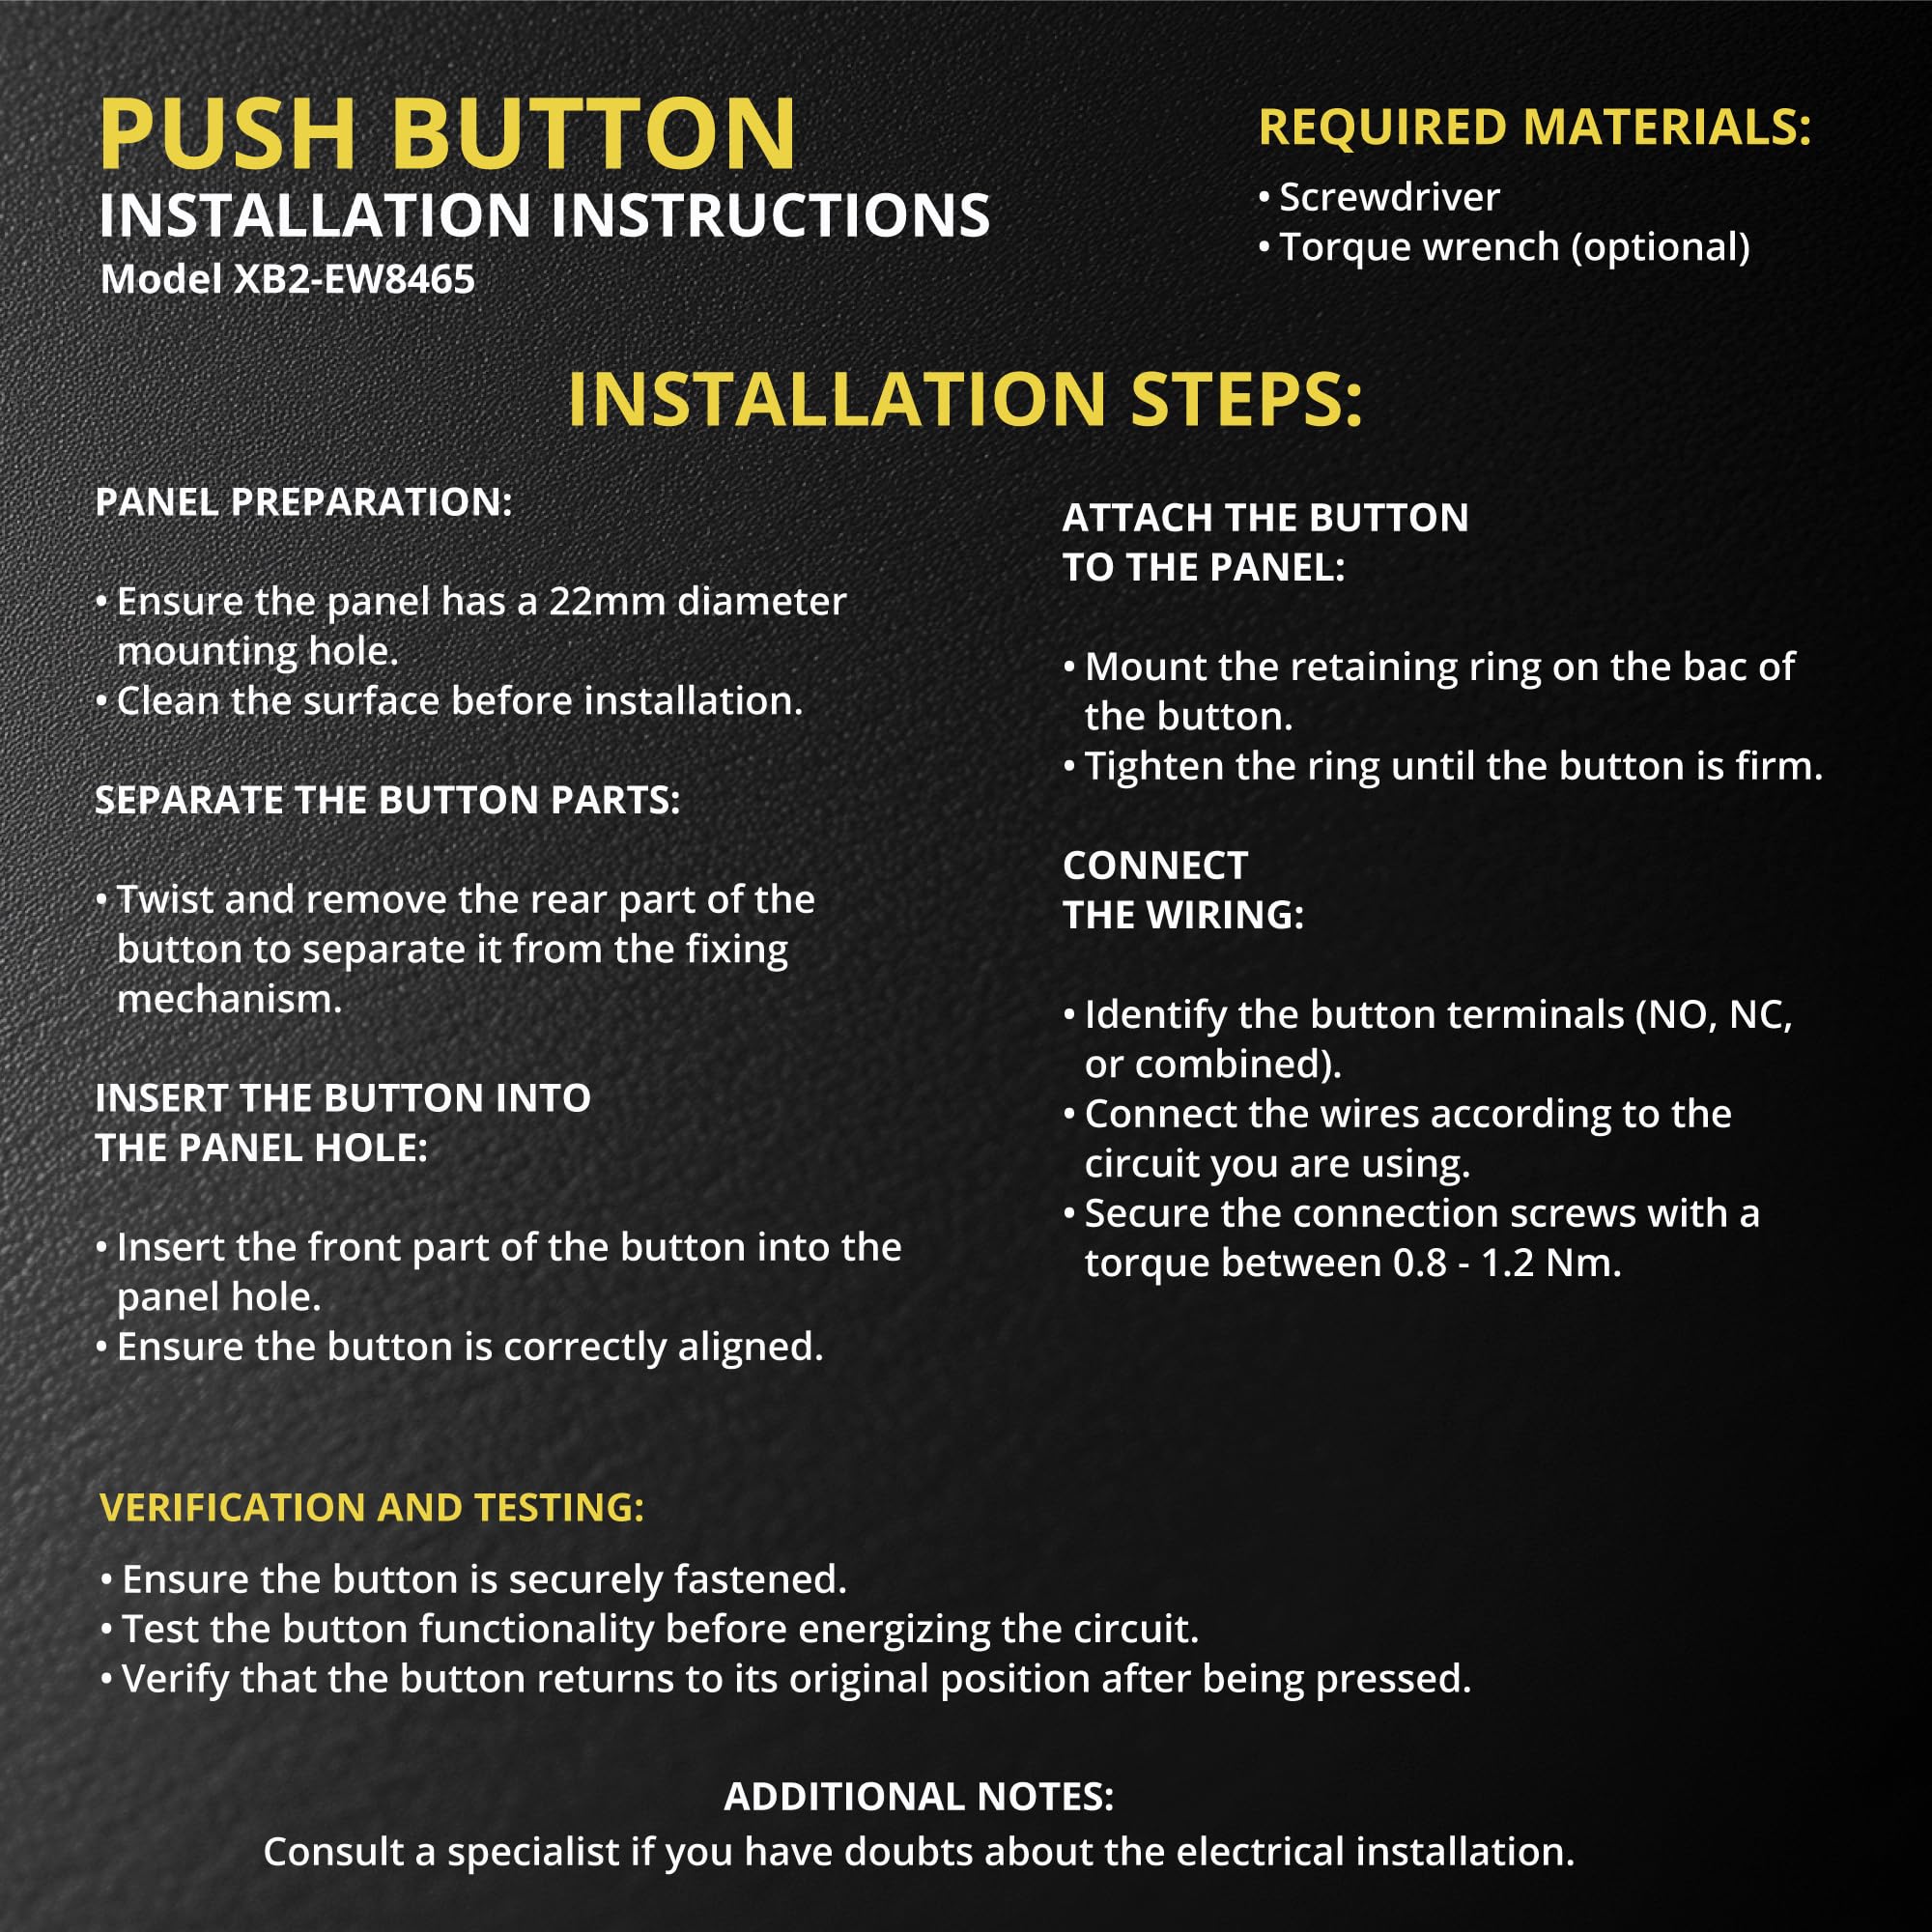
Standard industrial control station
This Shopcorp industrial control unit operator has one NO momentary contact that closes when the green button is pushed. The red button operates a single NC momentary contact that opens when the red button is pushed. The indicator light is made for 220V circuits but it will glow dimly at 120VAC. The indicator bulb is incandescent with a standard BA9S single contact bayonet type base. Replacements can be found that operate at many different voltages and colors example: Amazon # B08ZSTT1GD for 120VAC. It is probably easiest to wire the indicator bulb when the switch elements are removed. There seem to be places to insert a screwdriver to access the wire screws but it was not possible for me.All the wire connections are standard industrial screws with standard phillips or flat blade screws and captive plates for stranded control wires used in industrial machines stripped about 1/4" and securely clamped under the flat plates.To mount the operator buttons etc. the mounting plate complete with the bulb and switch contacts can be separated from the front by using a 3/16" flat bade screwdriver inserted into the keyhole shaped hole near the point marked 13 on the baseplate. Twisting the screwdriver slightly will release a latch that fits in a notch on the threaded portion on the front panel part. There is no need to pull the parts apart violently or break anything. The side opposite the latch will then snap free. Make sure you note the orientation of all the parts as you remove them. Do not panic if you assemble the unit backwards since everything will come apart very easily and gently again. Remember that slight "gentle" twist of the screwdriver to release the latch. These parts are made for industrial environments where everything comes apart for service and replacement. The light unit will only assemble one way due to a small pin near that #13 on the base plate.Also note these parts are meant to control a machine with a contactor or relay. They are not latching on/off switches by themselves. Simple on/off latching industrial circuits can be found online in many places. Search for "on off industrial circuit diagrams"This operator seems to be a typical knockoff copy of an older name brand industrial part.I bought this operator to control a relay for a DC motor drive for a lathe. I like the raised red OFF button that is easy to push and the recessed green ON button that takes a deliberate push to operate. I will also be using a prominent Emergency Stop button.
M**K
FIgured out the easy way to mount it!
So i finally got around to using these. Couldn't for the life of me get the button out to mount it, but i've figured it out! You don't have to disassemble the whole thing, you just have to use a pick or screwdriver to release pressure on the clip.Sorry for the lack of pictures, but:~on the wide portion of the part inside the control box there is a loop on one side and an indent on the other~I used a 90 degree pick (could use a more tightly curved one) to go through both parts of the loop and pull or pry back while using my other hand to hold the switch body and apply upwards pressure to the switch plate.~the upper part of the loop that we are prying on has very tough clip molded into the casing.~The side that you are prying on should pop up and then the other side will come up with some more pulling.~After that it will snap back together!I hope this helps some of you!
P**T
Removing the faceplate to mount in switch box.
I found it difficult to figure out how to remove the faceplate to mount the switch in the switch box. I tried to do what another person posted which described using a tool to unlock the indent which holds it in place. I found that just lifting up on the side where the red button is while holding the switch in my other hand it just popped off. See the pictures I provided and maybe it will work for you.
J**.
Works as intended, No instructions
Works just fine, just can't figure out how to get the light to work, which is a pain because I'm running 24v and not 220V so I'm going to try to switch out the light for a 24v one and see how it goes Giving 3 stars because of lack of instructions If I get the light to work I'll give it 4 stars
D**E
Not very user-friendly
I did not like the way you have to disassemble the complete switch in order to mount it to the control panel. 😒
S**E
Good product; No instructions
The items work as advertised. However there were no instructions included as to it’s disassembly and configuration. I figured it out but some documentation would have been helpful.
R**.
No instructions provided, very difficult to remove switch body
No instructions provided and not obvious at all how to remove switch body to install in panel. Another user provided some instruction but still very difficult to remove switch body for panel installation.
C**H
HOW TO GET TOP OFF
GREAT SWITCH ,But took me a couple of minutes to look the thing over on how the tops come off. The red and green buttons have taps on them that hold the bottom on like a snap. You have to depress both the buttons at the same time and put a finger in the top area and then pry apart. It will snap , click apart.
TrustPilot
1 个月前
3 周前
1 周前
3 周前