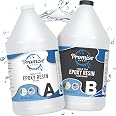
✨ Elevate your craft with flawless clarity and lasting shine! ✨
This 2-gallon epoxy resin kit offers a user-friendly 1:1 mixing ratio, delivering a crystal-clear, self-leveling, UV-resistant finish that’s food safe when cured. Perfect for tabletops, wood casting, jewelry, and more, it ensures durable, water-resistant protection with American-made quality trusted for over 40 years.


R**E
Amazing product!
This product worked absolutely PERFECT for my countertop project. I’m beyond thrilled with the results. Everything went on smooth and gave me just enough time to accomplish what I needed to before the product set.Now, if you’ve never worked with Epoxy Resin there are a few VERY important things you need to keep in mind. I’ve worked with a good amount of resin and done a ton of research on this stuff, here’s all my tips and tricks I’ve picked up for doing countertops. Hope they help!1) Temperature is CRITICAL. Your space MUST be between 75-85 degrees for the first 24 hours or you run the risk of your resin not setting properly. I’ve tested this theory on purpose and it didn’t turn out right. Even if it is miserable working in that temperature, you won’t regret it when your project turns out right. Scraping resin off your project because you decided to not do this, is literally the worst thing. Just picture runny, sticky, glue like bubblegum that you are trying to get off something. And water DOES NOT WORK for cleanup. Just FYI. Rubbing alcohol gets it off your skin pretty good. But not all of it.2) Mixing the product for the right amount of time AND dumping it and remixing in a second container is very important. Don’t skip this step. It’s annoying and seems unnecessarily, but really you need to just do it. Yes, even if you’re using an electric mixer, which, side note, generates a lot of bubbles! So if you’re going for glass smooth, stick to a paint mixing stick. Constantly scrape the sides and bottom of your bucket to make sure you’re not leaving any unmixed product. Also, it’s best not to use a mixing container that has corners, stick to a bucket or something that is circular and does not have any wax coating on it.3) Pouring more is better than pouring less, if you don’t pour enough you’re trying to drag the Epoxy across a surface and it won’t cover evenly.4) Using a foam roller is great to help spread the Epoxy evenly, but it will absorb lots of resin. Which is good if you are doing a lip or edge of your countertops. You can get away with it well enough. Or I use a plastic paint scraper. That works pretty well too!5) With this product I didn’t need to use a torch or heat gun very much because I didn’t have many bubbles. I personally like to use a heat gun opposed to a blowtorch because I feel like the heat gun doesn’t get as hot as the blowtorch but it pops the bubbles well enough and you don’t run the risk of scorching your Epoxy as much.6) If you do decide to mix paint into your resin, make sure it’s Acrylic. Or you can use spray paint. That works well with resin. If you do decide to use any kind of metallic paint, don’t leave it sitting in the bucket for too long. For whatever reason, I left a bucket of resin with metallic spray paint mixed in sitting for a little too long and it got WAY too hot and bubbled up and started melting my bucket... so just a heads up about that. Don’t leave your resin sitting in a small container for too long.7) Prep your surface well. My countertops had laminate on top so I sanded that well and applied a primer coat (just found a water based paint from Lowe’s.) let that dry completely and it worked great.I purchased two 2 gallon kits and it did a base coat, a second coat, and a final flood (top) coat, (3 coats total.) My countertops are approximately 38 square feet and I just barely had enough. If you’re not experienced with using Epoxy resin, I’d say you should probably get a little extra just to be safe.Whew!!Hope all that helps someone out there! Good luck!
B**E
Works Great, but you'll need a good heat torch!
The media could not be loaded. My husband bought this to use on a table that he made and it turned out really well. He technically gave it a "4.5" out of 5, but I rounded up.It takes 72 hours to fully harden, it dried quickly, but had that feeling of nail polish when you first leave the salon, "dry but could still smudge" until the 72 hours. But now it feels great and looks great. The only thing my husband said to mention was to MAKE SURE YOU HAVE A LARGE GOOD-WORKING HEAT TORCH.He only had a very small one, okay, technically it was a lighter, and because of this, we do have a few small bubbles, but you have to look closely to see them. (And this is user-error. He attempted to use my hair dryer too, but it was a dyson, and he abandoned that quickly)It still worked, and looks better than others he has used before. I love how great it looks with the wood grains, the perfect gloss.The hubs said it's for sure a repurchase for future projects...along with the torch.
J**E
It CAN produce amazing results, but it has many nuances that you need to understand
For first time users, I would highly recommend mixing small amounts and trying little jobs. The product can produce amazing results BUT has many nuances. This is my 2nd kit (and was substantially better than the first from a different manufacturer).I used the product in a cool garage - 55-60f so realize my comments relate to THIS TEMPERATURE. This is a big deal as the viscosity changes dramatically based on temp. If you're using this in the summer in Phoenix in your garage with the door open, this will flow like water!Viscosity will dictate 1) how this flows and if not properly contained completely, how quickly it drips out 2) how it traps bubbles and how thick you can/should pour it 3) if it will level itself out or not. There is NO optimal temperature as you need to figure out how to use it and then decide what works best for your application.I needed a build up to about 1" in certain areas of my project. I took 4-5 applications to get it there based on temp and bubble trap. To that, adding epoxy in layers is super easy, takes no prep other than keeping to clean and then pouring again within 24-36hrs. In fact, I routinely needed to sand edges off based on my forming method (packaging tape which worked pretty well but did allow for some dripping at times) AND POURING FRESH EPOXY OVER MATTE SANDED AREAS RENEWED it to CLEAR AGAIN. This was fantastic when I first tried this and realized I didn't need to sand down with 400-600 grit before repouring. This made reworking an area so easy.Using wax paper or parchment paper under your project works great. It peels off easily after curedUsing a heat gun can help a lot. It eliminated a lot of bubbles that came to the surface. It also quickly warms up the epoxy which increases flow which again, can be good or bad depending on your application. When it thins out, more bubbles can also come to the surface and burst. Heat guns can be used to shape the epoxy for up to 2 hours or more after initial pour. I used it to level out the product when it won't cover an area 100%. Once I set it outside after it'd been sitting for a few hours in my garage to cure in the sun.It actually started to move in direct sunshine at 70F after 6 hrs!!! This does not set quickly at 60f.Curing - it is noted in the instructions and is true that it takes a LONG time to fully cure (up to 3 days I believe). If you want to sand an area, it is gummy for the first 12-24 hours making sanding difficult if you want to keep working. Heating it up will cure it more quickly as it'll move the reaction forward faster, but it's not going to happen in minutes or even a few hours.Overall, I think this is a great product. I will use it again for sure. Just really think about how it works both chemically and it's physical traits to help you figure out how to manipulate it. Try small first and don't get in a hurry. It's taken me 2 weeks of working on my project every day to finally get it right mixing 6-10 oz at a time for several sq feet of uneven surface (root ball I'm encasing)