🚗 See What You’ve Been Missing!
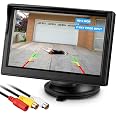
The Chuanganzhuo 5-Inch HD Backup Camera Monitor is a compact and versatile solution for enhancing your vehicle's safety. With a crystal-clear LCD display and compatibility with RCA video output devices, this monitor is perfect for cars, trucks, SUVs, and more. Its sleek design allows for easy installation on your dashboard or windshield, making it an essential tool for confident parking and reversing.


| Compatible Devices | Devices with RCA Video Output |
| Display Type | LCD |
| Supported Media Type | DVD |
| Item Dimensions L x W x H | 5.9"L x 4.7"W x 2.9"H |
| Screen Size | 5 Inches |
| Color | Black |
D**.
Easy installation into 2010 F150, great product at a great price
Straightforward installation in a 2010 F-150 Supercrew Cab truck into my sunglasses holder. I have some experience with vehicle electronics but am by no means an expert. Probably took around 3 hours but that was including a lot of looking and figuring things out as I went. If you are installing in a similar vehicle, here is a step by step:1. Mount camera. As a side note, I'm concerned that I"ll step out of the back of the truck and onto it. Right now it covers the top of the license plate (the state name, which is surely illegal). I'm probably going to modify later with a couple of strips of metal bent to place it above the plate and between the tailgate and bumper, tucked out of the way.2. Connect red wire to backup lamp (search online to figure out which one is hot or use a tester).*when using the blue snap/splice wire connectors, go ahead and strip the red wires so that there is an immediate connection. I ran into a problem with one of them because it didn't slice through the small wire's insulation and didn't make a connection.3. Drill a hole into the metal taillight housing out of the way to attach the black ground wire.4. Run the feed wire through the frame to the back corner of the cab.5. On the F-150, there is a small grommet (about 1") that leads right up to the plastic door sill from the bottom. I poked a hole through the center of it and pushed it through. I'll go back later and put a little bit of caulk on it but I don't know that it matters.6. Pop both door sills loose on the driver's side. Run the wire along the channel with the factory wires.7. Run the feed wire up the front of the door frame on the inside behind the plastic kick panel up to the front left windshield pillar. It pops off easily and you can quickly run it to the top of the windshield.8. Take the visor off to release the headliner.9. Take out the sunglasses holder.10. Find the hot wire that feeds the overhead lights and tap into it with a blue wire snap/splice connector (again, strip the small hot wire so that it makes a good connection).11. I hooked everything up to be sure it worked, and mine worked without a ground on the monitor. However, I went ahead and grounded it to one of the screws that holds in the black plastic bracket that holds in the sunglasses holder.12. Tuck the excess wiring up into the headliner.13. Once you get it wired, check to make sure everything works.To mount the screen into the sunglasses holder:1. Peel back the adhesive on the stand base and remove the screw from the stem.2. Carefully remove the 4 small screws in the back of the LCD in order to take the stem out of the back. This will leave a hole but I didn't cover it because it will be in a clean, dry location.3. I flipped the "u-shaped" plastic piece onto the bottom and used some 1/2" thick x 1" wide weatherstripping and stuck it to the bottom. This lifts it up toward the top of the holder so that it's not hidden behind the tall bottom part (I saw on a blog where someone took a Dremel tool and trimmed it, but this seemed like an easier option IMO).4. Drill about a 1/2" hole in the rear sunglasses holder in a spot that does not interfere with it closing and feed all of the wires through it (I did this on the drivers side near the top).5. I found a round black plastic plug laying around the garage, notched it, and put a couple of dabs of hot glue on it to hold in place for a more finished look.6. Hook up the wires, tuck them all out of the way, and pop the sunglasses holder back into place.I took it out for a drive after dark and the screen really lights up and produces a bright picture. Comes on within about 1 second of shifting into reverse. I was able to back up looking only at the screen and it was easier than trying to look over my shoulder or through tinted windows to the side mirror.I didn't add any fuses, but of course the lights I wired into are fused. I guess I'll add an update to this if my truck bursts into flames.Very good, but not a superb-quality picture. Considering the price and ease of installation, this is a no brainer great deal.
C**S
Worth it
Nice
K**R
Works well
On German cars requires a relay to work properly. Back up lights wire compleats ground and isn't hot. Independent power is required with a relay and fuse. This isn't a plug and play unit but properly wired works as well as any original back up camera's screen.
S**N
Good product for the do-it-yourselfer
It takes some understanding of electronics and the ability to work on cars (routing wires, drilling holes, soldering, etc.) but it's a relatively easy weekend job for the do-it-yourselfer. I wouldn't try it unless you're comfortable working on cars, soldering wires, crawling under cars, etc. Instead of trying to find my way to the reverse light in my camper van, I just decided to make use of a trailer electrical jack that was under the rear bumper. I found the right part at etrailer.com, plugged in the wiring harness (see pic), tested the wires to see which ones had power when the vehicle lights were on (white and brown), and used those to power the rear camera. Another alternative would have been to tap into the license plate light, which was easily accessible (easier than trying to find a way up to the backup lights), but using my method of the trailer jack, I didn't have to cut any existing wires. What this means is that I have to turn on my lights (even just the parking lights) to activate the rear camera. I like this because I can turn on the camera anytime, even when in drive or park. And, to keep the monitor from always being on whenever the light are on (like at night!), I installed a switch down near the parking brake release to turn off the monitor. Another handy tip is that the red wire that is part of the video cable actually carries power. The instructions say it is "not used", but another reviewer mentioned that it carries power, so at the camera end I hooked it up to power along with the camera. Then, on my dashboard I was able to connect the monitor's red power wire to the red wire on the video cable, and voila!, the camera has power without having to tap into another power source up front. You just have to connect the monitor's black power wire to ground, which I did by finding another wire connected to the sheet metal body under the steering wheel and unscrewed that and added my wire to it. Under the van I encased the video wire in 3/8" split wire conduit (available at auto parts stores) to protect the wire from heat and wear. Because I was working on a large van (1994 Dodge Ram 250), there was plenty of room to run the wire underneath, joining it up to existing cables and AC hoses where possible, avoiding hot areas such as exhaust, and snaking up through the engine and through a drilled hole under the steering wheel. So the install steps are:1. Attach camera to license plate.2. Attach camera's red wire to a power source (reverse light, license plate light, trailer power jack, etc.)3. Attach camera's black wire to ground (screw into any metal part under car)4. Attach video cable red wire to same power source as in step 2.5. Plug video cable into camera and route it to front of car and up onto dash. Encase wire in plastic split conduit if exposed under vehicle.6. Mount monitor on dash, plug video cable into it, plug power cable into it.7. Attach red monitor power wire to red wire on video cable.8. Attach black monitor power wire to ground.9. Install switch to turn off monitor (only if connected to non-reverse light source)10. Test system.
TrustPilot
1天前
3 周前