🌟 Elevate Your Environment with Precision Control!
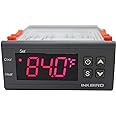
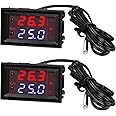
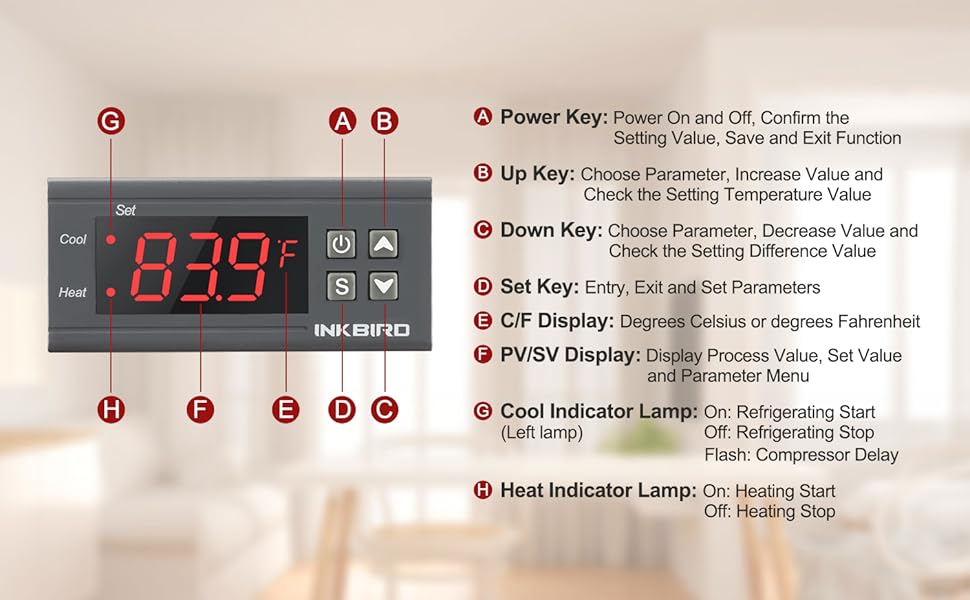
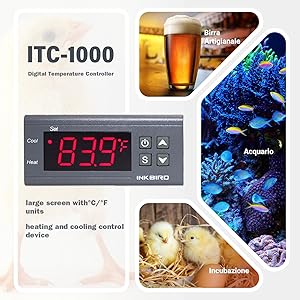
The Inkbird Dual Stage DV 12V Digital Temperature Controller is designed for enthusiasts who demand accuracy and versatility. With dual relay outputs, it allows for precise temperature management in various applications, from homebrewing to greenhouse maintenance. The device features customizable alarms for temperature fluctuations and a user-friendly display that supports both Fahrenheit and Celsius readings.
R**T
Thermostat for pet habitats
Works well , controller has many features
R**N
Great little thermostat
I have bought quite a few of these to use in various projects where I am either heating or cooling small spaces. They work very well for that purpose. There are YouTube videos available that illustrate how to use them, how to set them up.
N**.
Incorrect wiring schematic on control and in instructions!!!
I bought two temp controllers; one for a 12vdc water heater, and one for two 12vdc ventilation fans in my off-grid chicken coop. The wiring diagram printed on the back of both temp controllers I received is incorrect. When wired according to the included instructions, the temperature controller would power on, program and show cool or heat function working, but the fans would not run. This is because the drawing on the controller and in the instructions show the positive and ground wires going to the heating or cooling appliance each attached in turn to the two heat and cool terminals on the controller, this is incorrect. Both heat/cool terminals will be positive-in polarity; one constant, and one switched. The negative wire for the heating or cooling appliance does not have a circuit path through the controller; thus ground wires on the heating or cooling device will need to be connected to the negative/ground wire coming from your d/c power source(in my case solar panels and battery). To accomplish this I used jumper wires to the negative leads on my heater and fans. A positive supply wire will need to be supplied from your dc power supply to one terminal on both the heat and cool terminals if used. The relays in the controller then acts as switch across the heat/cool load circuit terminals, which are both positive in polarity when the controller operates the heating or cooling appliance. When controller calls for heat or cooling, across the terminals will test for impedance-when the controller is satisfied, the terminals will test as open.This may be a factor in the non-working units found in the Amazon reviews. I have attached a handwritten drawing of how I wired my devices to the temperature controller. If your controller does not work when wired per controller directions, you might try wiring according to my drawing. My temp controllers function as described in the product description once wired per my diagram. Happy heating and/or cooling.
W**J
Fantastic Temperature Controller at an affordable price
Just what I needed. I am using this to control the temperature of a peltier water cooling device I am building and it works flawlessly. It is fully programmable to heat or cool. I have it set to come on when the water reaches 68 degrees F and turn off at 65 degrees F. You simply set the on temp and the difference, which in my case is 3 degrees. It has a built in high temp alarm that engages and automatically shuts everything, except the alarm, down if for some reason it fails to to cool below the set high range....for instance a fan or water pump failure. It will protect the peltier from thermal runaway. I do recommend using an appropriate size fuse inline for the load. It comes with a wiring diagram affixed to the top as well as relatively clear instructions on how to program it. Another model I had of this same device had no instructions and I had to get on YouTube if learn how to program it. This one has clear instructions. Note that the orange clips slide off the back so that you can slide the controller into a panel and then slide the orange clips back in place to hold it securely in place. The instructions did not show this but it was easy enough to figure out.This model has the ability to select either F or C to display. The other one I had only had Celsius. It comes in 12v DC or 110V DC so make certain you order the proper one for your needs.The selection of Heat or Cool is carried out by which terminals you connect to. There are two terminals for heating or the other two terminals for cooling .No need to program the function. It automatically knows your selection by which terminals you are using. You need to make a wire shunt to run from the positive input to the cool or heat terminals depending on your needs.I can see where this would be a great method of providing temp control for incubators, brood boxes, or heat lamps for pets. Note that it has a 10 amp rating. If you need to carry a bigger load simply connect it to an appropriate sized relay. Know your load and stay safely under it or as I stated use an appropriate relay. I prefer using relays with built in diodes to prevent flyback voltage from knocking anything out.Get one......and have fun.
W**L
Perfect as a thermostat for my RV's Suburban SF-25 propane cabin heater
The 20+ year old Winnebago RV I purchased recently came with a Suburban propane furnace, whose "thermostat" has no temperature markings, and whose minimum setting burned a lot of propane, keeping the cabin hotter that I needed to prevent the plumbing from freezing in winter.I wired this thermostat in its place, and it have been able to reduce the propane usage dramatically.The instructions were a little confusing, but reading other reviewers' comments helped me to figure it out. Here's my two cents worth, with apologies to those who may not appreciate my epiphany: the TS, or Temperature Set Value, is the target temperature you want to have; the DS, or Difference Set Value, is at what number of degrees below the TS you want the unit to power the heat cycle; AND it is the same number of degrees above the TS that you want to unit to power the cooling cycle.In my case, I wanted the furnace to kick on when the temperature at the sensor dropped to 35 degrees F, and to shut off when it climbed to 45 degrees F. So I set the TS at 45 degrees, and the DS at 10. Note that this means that the cool cycle kicks on at 55 degrees. But I don't have anything wired to the cool cycle terminals, which, as Inkbird tech support has confirmed to me by email, is innocuous.I want to add one other note: although some wiring diagrams don't show it, other reviewers are right: the HOT power supply needs to be connected to the power supply terminal, and to the positive terminal for heating (and cooling, if you use it).
M**S
Works great, easy to use. Could be more intuitive but it's fine.