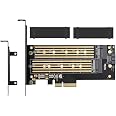
🚀 Elevate your storage game with dual M.2 power and pro-grade cooling!
This Dual M.2 PCIe Adapter supports one NVMe (M Key) and one SATA (B Key) SSD simultaneously, converting NVMe to PCIe 3.0 x4 and SATA to 6Gbps interfaces. It features an advanced heat sink with copper ventilation for superior cooling, supports multiple M.2 sizes (2230-22110), includes flexible mounting brackets, and requires no driver installation, making it ideal for professional-grade storage expansion.
Brand | MHQJRH |
Operating System | Linux, Mac OS, Windows |
Item Weight | 5.3 ounces |
Product Dimensions | 7.3 x 4.2 x 1 inches |
Item Dimensions LxWxH | 7.3 x 4.2 x 1 inches |
Color | YT-805 |
Manufacturer | YATENG |
ASIN | B07JKH5VTL |
Is Discontinued By Manufacturer | No |
Date First Available | October 19, 2018 |
J**S
Works Great! - But Needs More Explicit Instructions - Read Mine
I used the Yateng board to install a Samsung 970 EVO PLUS 1 Tb M.2 vNand SSD in a Gen 3 x4 PCIE slot. The result is that even though the Yateng board is sharing the PCIE bus with an nVidia GTX 1070 Super x16 graphics board, the Samsung 970 EVO PLUS performs close to its maximum specs and is faster than my 512 Gb KIOXIA (Toshiba spinoff) System drive on a Windows 10 Pro vers. 2004 computer.The instructions as far as mounting the heat radiator on the NVME drive board are clear enough BUT at least as first installed, the silica gel does not make contact between the back of the radiator board and the front surface of the Samsung SSD board-because the Samsung board is NOT flat! One can see air gaps between the radiator, the gel pad, and the Samsung board - so much for heat radiation - however when all was assembled and put into the computer, the Samsung Magician software says the board is operating at a normal temperature, 102 to 109 deg F in a house that's 82 to 86 deg F itself. Perhaps with time the gel pad supposed to absorb water from the air and swell to make contact????The next challenge was how to screw the left end of the Samsung SSD board to the Yateng PCIE board (see 1st attached photo). There's a packet of 4 screws in the Yateng box but no instructions. The bracket in the Yateng on the right to plug in the SSD NVME connectors elevates the SSD drive off the Yateng PCIE board. So you don't want to screw the SSD board flat down on the left or you might strain or break the NVME receptacle on the right or stress out the SSD drive itself. Looking around the Yateng board, there are TWO knurled knobs screwed onto the board with screws that come through the other side of the board (lower left of photo). It turns out that if you unscrew a knob, use its indented edge to prop up the left end of the SSD board, then insert and tighten the screw from the other side of the board, the SSD board is very nicely mounted and supported over the Yateng board, same height on both ends, parallel to Yateng board. The 2nd screw/knob combination in the lower left of the Yateng board I left in place. That's presumably for anyone who wants to mount a 2nd NVME SSD board in the upper slot and use it as a (much slower) SATA SSD drive with the supplied SATA cable, etc.Last problem with no instructions supplied was how to attach the mounting bracket to the Yateng board (if you open your computer and look at the space the board is going to go into, you'll know from the size of the filler bracket already there whether you need to use the large or small mounting bracket supplied with the Yateng board). I need to use the larger mounting bracket as I have a big computer case. If you look carefully at the 2nd photo I've attached, you can see that the mounting bracket attachment points GO BEHIND THE YATENG BOARD, not on the same side that the SSD is mounted. So if you put the mounting bracket behind the board, the two smaller screws supplied in a bag work nicely to clamp the Yateng board between the screw heads and the mounting bracket attachment points.Once I had inserted the board, closed the case, reattached all the wires, powered my computer up, I went to the Windows 10 disk management utility and allocated the drive as a GPT partition table and formatted the drive with NTFS as a simple volume. I then downloaded Samsung Magician and ran some performance tests. Ideally, the Samsung drive should be able to do 3,500/3,300 MB/s read/write performance. The performance I got in the PCIE slot was not quite there (see 3rd attached photo) but close enough for me (I was actually moving the mouse from time to prevent the screen from timing out and I did not shut down any normally running system processes, either and also as I mentioned, I have a HUGE graphics card using the PCIE bus, too). The performance is better the 512 Gb KIOXA system drive inserted directly into an NVME slot on the motherboard, especially 3x better for random reads and writes (see 4th photo).For anyone using Windows who wants to know why to make a choice for GPT partitioning vs. the more classic MBR, I found a nice article entitled "MBR vs. GPT: Which Should You Use for Your SSD?" on the makeuseof . com website. You can probably easily find it by a Search. There are some reasons for choosing MBR but GPT is usually the better choice.
S**Y
Works if you know what you're doing!
This thing works great if you're not inept. This is for ONE NVME (M-key) drive, and ONE SATA (B-key) drive. I happened to have a SATA B-Key drive that became available due to a dead laptop, and wanted to integrate it into my desktop rig. I only had 2 M-key NVME slots that were already taken, so this was the perfect solution.I was a bit worried with the sizing, as my board only has two PCIE slots - one is taken up by a GPU (Dual fan 2080 Super), the other PCIE slot is *right* underneath it. Luckily, this only blocks a tiny amount of one of the fans, for triple fan setups it may block a bit more.Overall I'm pretty happy with it. Works as it should, but I agree with others that the lack of instructions left me a bit confused on how the drive was supposed to be secured.
R**N
Works as expected
Works as expected. Easy to install. Works with both NVME and SATA. Just what I needed.
A**8
Awesome, no issues, working great in the lower X16 slot of my Dell Aurora R7!
Installed the dual adapter for SATA or PCIE NVMe and it works great with my Dell Aurora R7. It works plugged into either an x4, x8, or x16 slot. I put this in my lower x16 mechanical (x8 electrical) slot under my GPU. I’m getting 3500 read and 1850 write with an OEM Samsung 860 Evo Pro M2 NVME PCIE 2280 drive (see photos).This product does not include any instructions whatsoever. But installation is straightforward. This is all you need to know:The faster NVME SSD goes into the slot marked “M Key.” M means there’s only one notch on the right side of the drive where you plug it in, if you’re looking at it from the side the manufacturer’s label is printed on. No SATA cable is required or useful for this setup. The adapter is set by default to fit a 2280 length (80 mm) drive and the bolt for this connection is not removable. If you have a longer or shorter M2 drive, it includes 2x screws and 2x bolts for you to install and attach the drive. I attached a photo of this product with an M Key drive.A second drive, or a slower drive with two notches, or one notch on the left-hand side, gets plugged into the “B Key” slot. B referring to there being one notch on the left-hand side of the drive where you plug it in (the specs say it will also accept an M+B key drive with 2 notices). If you use a second drive, you will need to use the supplied SATA cable – i.e., plus side no x4 bifurcation needed in bios, downside, a PCIE drive gets downclocked to SATA speeds of 600.The temps on my drive aren't going above 35 C (I'm using this drive for weekly image backups) so I didn't bother attaching the supplied heatsink to the drive. Otherwise I'd question how durable the rubber band would be long-term considering the intended use of holding down a heatsink...
S**A
Works halfway
The device has 2 ports but only 1 is usable. It seems to have a bad molding on one that makes it not usable. It has nice extra parts to make it usable on different setups. It was easier to install than I thought. Would've liked it to have been fully operational but my son was able to do it today. Didn't have time for it to be sent back and wait for a replacement.
C**C
Excellent add-in card for storage expansion
I had a situation where I upgraded the 2 m.2 slots on my motherboard with 2x Samsung 970 Evo Plus 2 TB drives. This left the SATA m.2 and NVMe m.2 drives that occupied the space previously orphaned. This card was a perfect solution as it allowed me to mount the drives to the card and access them through the PCIe 4x expansion slot on my motherboard.Installation was simple enough and everything that could possibly be required was included. They even thoughtfully (and cleverly) included 2 m.2 mounting screws on the card itself that could easily be utilized to fasten the drives down to the board.I was able to boot to Windows off of my NVMe drive installed on the card without issue. Speed benchmarks matched the speeds that were previously reached when installed directly into the m.2 slots on the motherboard.Do be aware that the card does have red LEDs that blink as the drives are accessed.Overall excellent product for the money.
Trustpilot
2 weeks ago
2 days ago