🚀 Elevate Your 3D Printing Game!
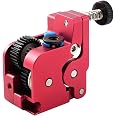
The Creativity Upgraded K1 Extruder is a full metal 1.75mm filament extrusion kit designed for K1, K1C, and K1Max 3D printers. It features a dual gear drive for stable and precise filament feeding, is easy to install without dismantling the motor, and is compatible with multiple filament types. Backed by professional customer service, this extruder enhances your 3D printing creativity and performance.


B**Y
It works great!! Way stronger and easy to install
I would say, it's great so far!! Original wore out. Decided to give this a try. Will update!! Update*** still the best thing I bought for it!! Works like a dream. Keeps up with the print!!
P**N
This is not a product review.
I’m going to give this Extruder a 1 star as of right now this extruder was delivered to me the other day but I didn’t have time to install it till now. Opened the box and everything looked fine. Till I tried to install the tensioner screw the holes did not line up. at first, I thought this was for a different printer, but when I checked the company website, this is the only style they make for the K-1 so it’s a factory defect. How did this thing make it pass quality control? I didn’t ask for a refund. I just want the right extruder and what’s even worse why I’m giving them one star is I gotta wait till Monday to receive it.
J**T
Creativity extruder
After installation was having issues with underextrusion. Took it back out to inspect and noticed filiment was getting shaved off. Ended up boring out the exit hole to 2.3mm and filed off sharp edges. Also lubricated the tensioner arm hinge because it was stiff and replaced the tensioner spring with stiffer one. Has been working well since. Not a bad product by any means. Just needs some basic machining to get it to perform as it should which can easily be done with a cordless drill and a bit. Took about 10mins to do. Not sure how the metal housing will affect long prints as it does get warm over time. Only used it with petg so far and was able to handle a 9hr print.
J**R
A rough start, but got better
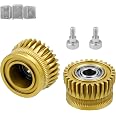
Read on for tips and instructions on the install and use:Install wasn't the easiest, but not hard either. Getting it to fit so I could get the mounting screws to thread in properly was the only real pinch point. There needs to be instructions provided or a link to instructions the least. I found that the extruder fits fine without any modification, if you ensure the extruder motor wires are out of the way, and not pinched or in the way. The clip that holds the wires in place is a common area it gets pinched.Had extrusion issues at first, but I believe I have that sorted. Just needed to figure out the tension needed and work out some kinks.First, the tension/lever arm will need some lubrication to allow it to move more easily. The tension arm can hang up a bit on the tension screw, so a drop of oil in the area it rubs on the screw may help, or file down that small 1/4in section of the thread so it can move easier.You want to use some light duty thread lock on the tension screw. (Purple type, not the green. The green type works/is used differently, if you use it like normal thread lock it is as strong as red thread lock, that screw is never coming out again... Use purple type thread lock) Make sure you coat both the inside threads of the hole and the bottom section of the screw to ensure good coverage. Thread it in until you see the screw just start to extend out of the hole. This is a good length for full use of the available spring pressure, and the thread lock will hold the screw in place even when you use the thumb wheel to adjust tension.The top part of the tension screw, add a small amount of the light duty thread lock. This will help the adjustment knob stay in place and not move due to the vibration. Work the adjustment knob around so it will not stick too much. The goal is to have the thread lock provide a little resistance to movement, not secure the knob in place.As far as tension goes, for standard filament types, you want the knob screwed down to basically completely compress the spring. You can use less tension for soft filament like TPU, and may need to test out different tension amounts for best function with those types of filament. The spring could stand to be stronger for more tension, but it is workable.The inner gears are the same as the original extruder, or appear to be so, but you may need to tune the extruder step count in the printer config file, or adjust your flow rate in the slicer. You will need to enable root privilege in the settings to make changes to the configuration file. If you don't know how to tune klipper configs, use the slicer flow rate to adjust.When loading new filament, you want to adjust the tension knob for minimum tension on the filament, then insert the filament into the extruder, and use the exposed gear to feed the filament past the extruder gears and into the hotend. Then adjust the tension to the desired amount for the filament type. When unloading, after you retract the filament from the hotend, you wlll want to adjust the knob to minimum tension, and then pull the filament out of the extruder the rest of the way.I ended up replacing the spring with one from an old Ender 3 extruder. This also required a slightly longer screw for the spring to fit. This is a much better way to go, as I do not need to compress the spring completely. Loading filament is easier with this change as well.Learning the particulars of how this extruder works, and just having a bit more knowledge of how a 3D printer works fundamentally is going to be helpful. This is not an upgrade for the set it and forget it crowd.I will update this review if i have any issues.
N**N
Broke after a month of use. Twice.
Works fine for a while, but the extruder gears chipped an broke on 2 that I've owned. Would be solid if the gears didn't chip and break.
J**N
very solidly constructed
very well built and solid machining, it does weigh a bit more than the stock plastic one so take that into account when purchasing. i have not installed yet, its a backup when my plastic one gives out which is usually about a month or so depending on run time
N**F
Absolute garbage
This does NOT fit the K1. The exit hole for the filament going out of the extruder doesn't line up with the print head stem, nor do the screws line up with the corresponding holes. This came with no instructions. I tried contacting the seller and the seller never got back to me. Stay away from this.
B**Z
works!
drop-in replacement
Trustpilot
1 week ago
2 weeks ago