🎛️ Patch Your Way to Perfection!
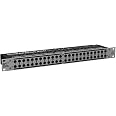
The Behringer Ultrapatch Pro PX3000 is a 48-point TRS balanced patchbay that enhances studio organization and connectivity. With modes for ultimate flexibility and a robust design, it integrates seamlessly with popular audio software, making it an essential tool for any professional audio setup.
| Maximum Sample Rate | 1.92E+5 |
| Operating System | Windows |
| Connectivity Technology | TRS, TS, XLR, MIDI |
| Number of Channels | 1 |
| Compatible Devices | Personal Computer |
| Supported Software | Ableton Live or Pro Tools |
| Item Weight | 4.63 Pounds |
M**G
Behringer Patch bay rocks
Like many others I dismissed the Behringer patchbay because it was tooooo cheap, how could it possibly be anygood?A BIT OF HISTORY: Back in the 90's I bought some of the Neutrik TRS patchbays, back then they worked pretty well but over the years the newer versions of the Neutriks have different jacks in them that are difficult to plug in and the normal connections have gotten flakey. Besides the jacks getting cheaper and cheaper in the Neutrik units the metal work has changed from year to year, now the face plate is held on with two little screws that barely engage the metal and if you lose one the whole thing becomes a flimsy mess.So I looked for a replacement and almost passed on the Behringer units again because of the low low price. I'm an electrical design engineer by trade and build a lot of my own gadgets. There are 96 1/4" TRS jacks on one of these patchbays, $50/96= just $.52-cents per jack (not including metal work, packaging or labor), how could they possibly be any good?Then I found a review online from someone who had been using the Behringer units for years without problems. He stated that the key to using them was to support the cables so they don't put a strain on the jacks. Recently we were putting a broadcast studio together and needed some patch capability so we decided to try one of the Behringer units. It was sort of a joke at first, everyone expected these units to be crap. Instead, we found a product that works fantastic, is super easy to configure (due to the 3-pos switches) and the jacks are like buttered toast, no more fighting to get the cable in or out. TRS plugs glide in and out smoothly, easily and most important of all, reliably!I measured the impedance from input to output of one channel (passing thru the normal connection path) using a Fluke DVM and found less than one-ohm of series resistance, this speaks pretty well for the normalled connection not degrading your audio sonically. On some old "mil spec" patchbays I've measured as much as 10 ohms thru the normal path, that's what happens when the contacts get dirty. On one of our Neutirks that was going flakey I measured 39 ohms in series, that's enough to seriously upset the CMRR of a balanced line which can be a big source of noise.We now have four of the PX3000 installed and no issues with a single connection. I've used them in all three modes (normalled, unnormalled and half normalled) and they are in use every day. We don't do a ton of patching on them (the normal connections run our studio) but when we need to insert something or do a quick reroute these tools get the job done reliably.Each channel of the PX3000 is built on its own little circuit board (I had to look inside) which slides into the metal frame. You never have to access these little boards to configure the patchbay (like on Neutrik, DBX, and others) but the little boards do have a very tiny amount of give in the chassis, this is what makes it feel a bit "unsolid" to some folks. It's not a flaw, it's just the way they are built and so far it has not affected my installation one bit. Several of my Neutrik patchbays act the same way (channel boards moving slightly when you insert or remove a cable).I'm very happy with these and ordering a few more before they raise the price.REVIEW UPDATE: MARCH 2013We're up to eight of these in our broadcast rig with zero problems, just ordered our 9th one. I make most of my cables myself using Canare and Mogami wire with Switchcraft plugs and have zero noise problems. I always clean my plugs with Deoxit prior to plugging them in for long use. I've know many people who just assume their connectors are clean, most have oil on them from manufacturing that can cause interference and distortion. Good music to everyone!
L**L
Lifesaver!
In my studio, I have mic/instrument inputs in my walls that run behind my desk. My interface inputs are on the back of the interface so this device, in normal mode, connects my lines on the back without me doing anything on the front. It seems to be solid and looks great in the rack. I will be buying more of these.
A**.
Cheap and easy to modify, rear jacks are especially tight, which is good!
I'll let the other reviews describe the functionality. No surprises there.The rear jacks are tighter than I would have liked at first, but that's grown on me to be a good thing! It keeps those mostly-permanent cords from pulling out while you're shuffling things around. Just be aware that fragile cords and connectors may not like the rear jacks. The front ones feel about right for regular use.I modified 6 adjacent channels to be half-normalled *horizontally*, instead of vertically as usual, so I could arrange things in a way that makes a little bit more sense to me:- Remove all the screws - allen/hex on the front, then phillips on top - and take 6 circuit boards out. These are going to be 3 stereo pairs, half-normalled to mono horizontally.- For 3 of them, drill a small hole in the middle of the big ground plane, so as not to disrupt anything, and away from the jacks and switch of course.- Feed two small wires through that hole, and solder them to the front jack of the same board, and its neighbor on the other side of the hole. (see note below) All of this plugs into the same mixing console, so I don't need to connect the grounds here - the console already does that - but depending on what you're doing, you might need to add a third wire for that too.- Reassemble.- Remember to keep the switches centered for all 6 of those channels. (no connection, as far as it's concerned, so it doesn't interfere with the one you just added)Note:Pay close attention to which pins you're soldering to! This defines the normalling function in the first place, and its direction:- For half-normalling, you want the direct contacts of one, and the switch contacts of the other.- For full-normalling, you want the switch contacts of both.For orientation, the traces from front to back connect to the direct contacts. The other pins of the front jacks are the switch contacts. The rear jacks don't have switches.
C**K
If you have a home studio, you NEED patch bays.
No one likes to have to move stuff around to plug something in in the back, so bring the connections to the front with a patch bay. This is a VERY useful device! you have 48 "channels" and 3 way switches for each channel. I like the "straight through" from the back to front option. With this I can permanently mount all my gear and access the plug ins from the front. THAN as a bonus, I can use some very short (and cheap) patch cables to go "point to point" to connect anything I want to connect. Makes life easier in the home studio!!!
A**R
Best 1/4" patchbay out there
Best patchbay out there, until you get into the soldered switchcraft ones. Only real flaw is the normal switches are on the top of the unit, real easy to knock 'em around when racking/unracking. Would be nice to have an option to set permanently. But otherwise, this is about as good as you'll get until you spend a lot more money.
Trustpilot
2 weeks ago
3 weeks ago