


Buy anything from 5,000+ international stores. One checkout price. No surprise fees. Join 2M+ shoppers on Desertcart.
Desertcart purchases this item on your behalf and handles shipping, customs, and support to Malaysia.
๐ ๏ธ Build Bold, Cool, and Unapologetically Open โ Your PC, Your Rules!
The PC Creative Assembly Frame Test Bench is a premium open-air aluminum chassis designed for DIY PC builders who demand flexibility and superior cooling. Compatible with EATX, ATX, M-ATX, and ITX motherboards, it supports dual water-cooling setups and both ATX and SFX power supplies. Its modular design allows easy customization and component swaps, making it perfect for enthusiasts who want a visually striking, high-performance build that stands out in any workspace.


| ASIN | B0CW632FNC |
| Antenna Location | DIY |
| Best Sellers Rank | #260 in Computer Motherboards |
| Brand | egowz |
| Case Type | Mini-Tower |
| Color | Black |
| Compatible Devices | Computer Motherboards |
| Cooling Method | Air, Water |
| Customer Reviews | 4.5 out of 5 stars 207 Reviews |
| Enclosure Material | Aluminum |
| Hard Disk Form Factor | 3.5 Inches |
| Internal Bays Quantity | 2 |
| Item Dimensions D x W x H | 8.7"D x 15"W x 15"H |
| Item Weight | 5.2 Pounds |
| Manufacturer | egowz |
| Material | Aluminum |
| Mfr Part Number | EATX |
| Model Name | PC Creative Assembly Frame Test Bench |
| Model Number | EATX |
| Motherboard Compatability | ['EATX', 'ATX', 'Micro ATX', 'ITX'] |
| Number of Fans | 2 |
| Other Special Features of the Product | Water-cooled heat dissipation support, Stable vertical structure design |
| Power Supply Mounting Type | Bottom Mount |
| Recommended Uses For Product | DIY |
| Supported Motherboard | ['EATX', 'ATX', 'Micro ATX', 'ITX'] |
| Total Expansion Slots Quantity | 2 |
| Total USB 2.0 Ports | 2 |
| Total USB 3.0 Ports | 1 |
| Total Usb Ports | 3 |
| UPC | 733723195875 |
| Unit Count | 1.0 Count |
| Warranty Description | 1 |
J**E
Love this open frame concept - fun build and looks very cool!
This open frame concept case is actually really cool - been building customer PC's for 20+ years and I really enjoyed assembling the frame and putting the system together in it. I also really like how it looks now that it's all assembled, absolutely a conversation piece and have already been asked if I would build some for other folks. First of all, everything was very well packaged. It took about an hour or so to assemble and it came with everything needed for assembly - even a little partitioned box full of various screws and nuts that slid into the channels, etc. A ruler looking strip of plastic exactly cut to mount the motherboard mounting headers which made that a much easier process than I was expecting. With the design and extra mounting components the re-configuration options of the frame layout are almost unlimited. I am thinking now about a vertical mounting of the GPU from the bottom with a PCIe riser/extension cable. I only have some very minor observations that could be better. I wish the eatx came with one additional (for a total of 3) PCIe mounting brackets. The paper assembly instructions identified the hardware components one way and the online (more detailed) instructions from the QR code identified them a different way so that caused a little confusion - no biggie though. And lastly, I had to modify the plastic U-shaped PSU mounting bracket since my power supply has a switch directly adjacent to the power input (as many do) and covers up the 110/220v switch on the other side of it. Overall, I highly recommend this product to any PC building hobbyists/enthusiasts. It was a very fun build and I think it look cool as heck.
K**L
Only if you enjoy building things.
Had a good time putting it together, minor trial and error. Included tools were all I used for assembly, and worked well. The frame feels sturdy once everything is tightened correctly. Definitely requires some patience during assembly. The instructions were fine, not hard to follow. Overall had a blast, works as advertised.
J**Y
Solid Test Bench/Case
It was a little more difficult to put together than I expected, but a 10/10 motherboard case.
S**2
Open frame. Temporary assembly
Great for temporary assembly
J**Y
Test bench is ultimate airflow case
This was my first build. I really liked this test bench that it is now for long term use as my main case ๐ค the parts I used fit perfectly no trouble mounting anything. the aluminum frame is solid. I used Loctite 242 blue but if you do use it just keep in mind that it will be hard taking the bench apart, I also only used it on the bench screws. Even before that I was surprised by how stable the whole thing as after set up. Cable management was easy to deal with. If you want to test different batteries, aio coolers, gpu, cpu, then this test bench is going to make it easier and less time consuming moving parts in and out. The price for the case imo is worth it. Not too cheap and not expensive either. If you like building this test bench is the one for you.
M**L
Simple & Cheap
This frame is โfineโ. It does the job, and is meant for as a test bench frame. Iโm using it for my main (mini) ITX computer though. It took me a long time to put together lol, probably an hour or two, the tools are small. I have a 3 slot GPU which this does not work with unless you raise the top frame slightly so itโs not flush. It doesnโt look the best but it works barely. If you have a 3 slot GPU do yourself a favor and get the MATX version and not ITX. Overall Iโm happy with the small footprint, but this is a very basic open air frame.
B**N
Fun little thing, but could be better
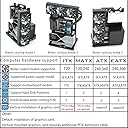
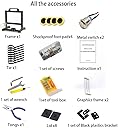
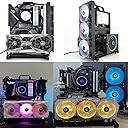
TLDR Pro: - Open platform; versatile (ish) - Plenty of parts/mounting hardware TLDR Con: - GPU bracket weakness (lack of support bracketry) - Overall dimensions too small (more in "notes" section) - Materials scratch easy Experience: - The instructions are online via QR code. They aren't the best. Iffy English but you can follow it well since there are pictures. You do get all the parts listed. I ended up with a lot extra since no sata SSDs or remote cooling. - ** When they say to plan out the build before hand, DO IT. The kayak-track mounts need to be inserted into the beam groovesbefore the main frame is secured - you'll be taking taking it partially apart a lot otherwise (ask me how I know). - For a purpose built mATX chassis aimed at versatility in mounting, it's a bit limiting (more in "notes" section). - More of a gripe, they provided this nifty little piece of (laminated?) construction paper with a few holes punched out that align with the 3 left-edge screw holes of a mATX motherboard so you can properly align those motherboard posts on the beams. This was nice! ... but only for those three posts. Would have been way nicer to have a full template because I had to eyeball the rest. Build quality: - I'll say middle of the road as a whole. The metal beams are quite nice, but scratch REAL flippin' easy. The plastic mounty bits are gloss black with protective peel-off stickers. They seem fine. Screws and all threads were solid, no stripping at all. - The two buttons are momentary, non-clicky. Stupid easy to put those on and wire in (they have a dual pin connector). - The plastic end caps to the metal beams don't really work/fit. As seen in my last 2 images, I banged HARD to try and get at least one in and it still didn't sit even nearly flush. The last picture shows the plastic damage afterwards. So I won't be using them. - The GPU bracket is, I guess fine on its own but they didn't make clear how to best support the GPU on the opposite end. In the vertical position, the bracket can absolutely NOT hold up any more than a single fan GPU without extreme bending. That said, they do supply enough of the plastic mounty things to act as a "shelf", or "support finger?" lol. In horizontal position, it seems JUST ok. I trust it enough but it's not confidence inspiring. It's technically only supported by the two screws at the top of the bracket and the PCIe socket. So... handle with care. Notes: This may be partially subjective as parts and needs may vary, BUT, I think it is 1-2" too short, and 1-2" too narrow (depth wise; width is fine) for most modern parts. My particular issue is with the GPU and PSU intercompatibility. In a typical horizontal GPU configuration, my AMD ASUS Strix 5700XT extends 2-3" past the front edge of the chassis (aka, out from the face of the mobo), and this is even while the PSU is overhanging 1" on the opposite side (an SFX PSU would probably help, but still result in overhang). It's not the end of the world but surprising since this is the ONLY way "CPU air cooling" is supported (their chart says vertical GPU doesn't support CPU air cooling on this chassis). This is a little nuts to me since the dimensions *should* allow for the PSU to be fully within the frame without such a crazy GPU overhang. Which does also lead me call BS on them saying vertical mounting works without air cooling (insinuating AIO/custom water cooling. I have a AMD Stealth here. It is the EXACT same height of my NZXT Kraken X62 pump (popular Asetek AIO; 55mm). I could not imagine ANY way to mount the GPU vertically unless I maybe used an SFX PSU AND made it overhang 2" MORE (idk if that's even possible to do with the brackets). I have two images with red boxes to showcase; one where the backet is mounted on top of the beam at the furthest point, the other mounted under the beam (not in instructions, I was just trying different stuff). For the 'top' mount, the GPU is too tall and interferes with the CPU cooler (and as I mentioned, it would also interfere with most Asetek AIO pumps). For he 'under' mount, it clears the cooler but is then colliding with the RAM (and I have faily low profile ram). I used a standalone verital GPU mount to secure it in the vertical position (not in images since unrelated to the product). So it IS possible and doesn't impede airflow to the CPU, it sits in front of the fan shroud.
A**E
Good value
Just what I needed for an all-passive build. Not the fastest or most intuitive build, but follow the instructions and it works fine. The only other real competitor for high-powered fanless builds are the Streacom cases, and theyโre $$$$. Mesh cases like the AP201 are all right for low power builds but arenโt as suitable for medium power, completely fanless builds as the convection just isnโt there. Note that my build has an air cooled cpu and gpu, the only drives are NVMe on the motherboard, and Iโve made do with only the back panel USB ports for a minimal build. It looks like there are technically provisions for mounting water cooling radiators etc, but that looks a bit janky to me and I think at that point youโre better off with a real case. For my purposes, this has worked great.
K**T
Produit solide et bien conรงu
Le produit est parfait. Montage un peu long mais รงa vaut le coup. Gain de tempรฉrature significatif et beaucoup moins de bruit car pas de boรฎtier fermรฉ.
R**R
The quality is very good
I've built tons of pc's and have worked with them. I will say the assembly took a bit only because of how it goes together but the quality is very good!!! It came screws, screw driver set, allen wrench, all of the parts to assemble it and so on. Very pleased with the quality for the price!!
M**S
Best frame for itx PC
Very easy to build and very good looking frame for mini itx. Strong ang good quality, all tools is included in package! 100% recommendation!
D**N
Good quality
Really good open air chassis. Construction is sturdy and feels high quality.
S**N
Well worth the time to assemble/Infinite expansion options for mounting add-ons
Took quite a while to assemble, but having experience with the frame on my ender 3 printer was helpful. Didn't need the video instructions, the assembly photos from their website was sufficient. Everything I needed was included in the kit, and was impressed to find a full cheezy mini screwdriver set as well as all of the small parts in a parts bin. More than happy with the outcome, including a 3D printed top shelf which was super easy to design in tinkercad.
Trustpilot
2 months ago
5 days ago