Description
🪱 Turn kitchen scraps into black gold—compost like a pro, no fuss!
- QUICK EASY SETUP - Assemble in under 5 minutes—no tools, glue, or confusing instructions needed
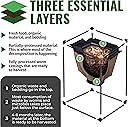
- CONTINUOUS FLOW DESIGN - Worms stay happy and reproduce with zero interruption during harvest
- DURABLE 900 D OXFORD FABRIC - Moisture-resistant, breathable material keeps your worm farm thriving
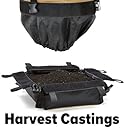
- ZIPPER FREE BOTTOM HARVEST - Effortless castings collection without disturbing your worms
- SPACIOUS 5 3 CUBIC FT CAPACITY - Process up to 3-4 lbs of organic waste daily for high-yield compost
The Urban Worm Bag Version 2 is a premium worm composting bin featuring a patent-pending zipper-free bottom for easy harvest, durable 900D oxford fabric for moisture control, and a lightweight iron frame. With a spacious 5.3 cubic feet capacity, it supports up to 8 lbs of worms and processes 3-4 lbs of household waste daily. Designed for quick assembly in under 5 minutes, it offers a continuous flow system that keeps worms happy and productive, making it the perfect eco-friendly solution for millennial professionals seeking sustainable gardening and waste recycling.