
DOWNLOAD THE APP


Customer Services
Copyright © 2025 Desertcart Holdings Limited
DOWNLOAD THE APP


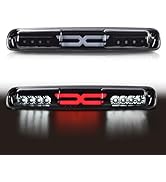
🚦 Light up your ride, lead the pack with PIT66!
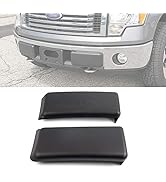
The PIT66 3rd Brake Light is a brand-new, OEM-compatible high mount brake light designed specifically for 2004-2008 Ford F150 trucks. Featuring a bright 16-watt LED light with waterproof construction, it enhances rear visibility and safety by illuminating faster to prevent tailgating accidents. Easy to install with factory-standard fitment, it comes complete with packaging and a user manual, backed by a strong 4.5-star customer rating.


| ASIN | B08PBK9L96 |
| Brand | PIT66 |
| Customer Reviews | 4.5 4.5 out of 5 stars (1,516) |
| Date First Available | 11 Aug. 2023 |
| Exterior | Chrome |
| Item Weight | 580 g |
| Item model number | Compatible with 2004-2008 Ford F150 |
| Manufacturer | Speedmotor |
| Manufacturer part number | 02HLA1217AWR-FBA |
| Model | Compatible with 2004-2008 Ford F150 |
| OEM Part Number | FO2890103, 7L3Z13A613B |
| Position | Rear Upper |
| Product Dimensions | 37.54 x 12.01 x 7.98 cm; 580 g |
| Special Features | Waterproof |
| Wattage | 16 watts |
I**L
Se siente de un material grueso y duraderon
J**O
This is a great part for my Truck it’s bright and clear and works perfectly . no leaks , fits properly, i love it.
M**R
Easy install in 20 minutes. Comes with new bulbs, bulb holders, and pigtail harness. To make install easier, remove the two christmas tree fasteners holding the rear of the headliner and access the wiring harness from under the headliner. The part itself is cheap and cheaply made. But it will serve nicely on a 20 year old truck.
B**N
Perfect replacement lens. Looks good.
H**N
I have a 2004 F-150. When i took off the old light housing noticed that the connector was not accessible. Even gently pulling on it. I searched a popular video share site to get help and found a great video which i cannot post here. As an over-60 woman was impressed that i could take care of making that connector more accessible. Basically you do need to access the space from inside the truck. A small pry bar to pull off the two circular plugs on the very back ceiling panel. Gently pull down to see the connector. My connector was anchored to a subframe, again using the pry bar carefully - i was able to dislodge the connector and push it outside through the hole. Connection was perfect. Reverse to replace the ceiling panel usually just pushing the plugs in by hand or tapping with a soft mallet (make sure you finish connecting first, my wire was not very long and had to hold on to it while disconnecting and connecting). As other reviewers have said, it does fit perfectly, comes with a gasket and actually looks/works like a factory install.
Trustpilot
1 month ago
5 days ago