


⛓️ Grip the road like a pro—because winter waits for no one!
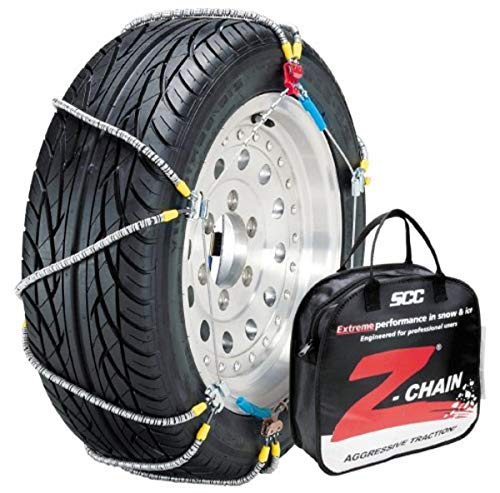
The SCC Z-Chain Extreme Performance Cable Tire Traction Chain set delivers professional-grade winter traction with manganese alloy cross members for superior durability. Designed for fast, no-move installation, these chains are fully compatible with ABS, AWD, and traction control systems, meeting strict S.A.E. Class “S” clearance for vehicles with limited space. Trusted by emergency fleets for over 10 years, this set ensures reliable, aggressive grip in snow and ice while minimizing vehicle damage.


| ASIN | B001H9ISL6 |
| Automotive Fit Type | Universal Fit |
| Brand | SCC |
| Colour | Silver |
| Customer Reviews | 3.8 3.8 out of 5 stars (124) |
| Date First Available | 5 September 2012 |
| Exterior | Smooth |
| Global Trade Identification Number | 00044182005545 |
| Item Dimensions LxWxH | 32.3 x 31.2 x 10.7 Centimeters |
| Item Weight | 2 kg 270 g |
| Item model number | Z-555 |
| Manufacturer | Peerless |
| Manufacturer Part Number | Z555 |
| Material | Manganese Steel |
| Net Quantity | 1.0 Count |
| OEM Part Number | Z555 |
| Product Dimensions | 32.26 x 31.24 x 10.67 cm; 2.27 kg |
| UPC | 044182005545 |
| Vehicle Service Type | Cars, SUVs, Light Trucks |
M**.
There are a confusing array of tire chains/traction control devices on the market, and even this particular company makes so many different models that it's hard to tell which ones are the best. Here's what you need to know about chains and traction control devices, and why I like the ones made by SCC. I also include some installation hints at the bottom of this review. There are two broad types of traction control devices: Tire chains and traction control cables. Tire chains are actual chain links. Traction control cables are long pieces of metal cables, covered in a plastic coating, and designed to form a Z-pattern over your tires. The plastic coating is then surrounded by hundreds of tiny, round, metal springs. Cables are generally regarded as better because they are easier to install, last longer, are less damaging to roads, and work better with vehicles equipped with ABS. Also, according to SCC, you can safely drive with cable devices up to 30 mph, even on roads with no snow, without damaging them. You should normally install traction control cables on your drive wheels, i.e. the wheels that actually push or pull your car forward. If the snow is really bad, though, you may have to install cables on all four wheels. Read your vehicle's owner's manual for more details on where to install your cables. In any case, it's a really, really good idea to have TWO sets of cables in your car at all times. That way, if something breaks (murphy's law), you won't be stuck. Within the traction control cable category, there are two general types of cables: Self-tensioning cables tighten themselves using a tensioner (which looks, feels, and operates like a rubber band) that you install when you put the cables on. Manual tensioning cables are tightened by you, and have to be re-tightened after you drive for a couple hundred feet or so. I've heard that emergency vehicles tend to use the manually adjustable models because they are allegedly safer at speeds above 30 MPH, but driving above 30 MPH for any non-emergency personnel is illegal with any kind of traction control device. There are several advantages to the manually adjustable models. They tend to have more slack, which can make installation easier. Also, the tensioners (i.e. rubber bands) on self-adjusting cables can and do break (it happened to me today) and if they break, you can't use the cables. So, if you get a cable that has a tensioner, get extra tensioners, or better yet, an extra set of cables, just in case. Here's a breakdown of SCC's cable products: Z-Chain- Manually adjustable Traction Control Cable. Easy to install, but must be retightened shortly after you start driving. Very easy to install because they come with lots of slack. Often used by police and fire personnel. Shur Grip Z/Super Z LT- Self adjusting cable. Tensioners can break so buy extras. Less slack, so can be harder to put on the car, but generally easier than Z-chains because you don't have to manually tighten and re-tighten them. Super Z6/Z8- Newest Self adjusting cable, designed for vehicles with very little sidewall clearance. They have all the advantages and disadvantages of the Shur Grip Z. In addition, however, the connectors are a little harder to work with on this model because of their low profile. On all of these models, the metal rings are made of a spring-like material, SCC says that you don't have to remove the chains as soon as you reach a paved road. Rather, as long as you drive under 30 MPH, SCC says that you can drive with the traction control cables on your car, even as you switch between plowed and non-plowed roads. Because each of the hundreds of little springs are separate pieces, even when one breaks, it just falls off, and the others work to fill-in the void. Installing the cables is relatively easy, and I'm definitely not a hands-on kind of guy. It took me about 15 minutes the very first time, and now that I've done it several times, I can get it done in under a minute per wheel. You should always do a test-installation of cables before you need them to make sure that you purchased the correct size and know how to install it. It's also very useful to have some waterproof gloves handy and a towel with you, as it is often wet and cold when you need to install chains. A good choice for gloves are the long wristed rubber gloves that you can buy at the grocery store for washing dishes, or some disposal latex gloves. After you use the cables for the first time, fold each cable separately and then use a trash bag tie to keep each one together. Otherwise, the next time you need them, they'll all be tangled together. Here are some hints on how to install these chains. 1. Read the instructions from the manufacturer and pay close attention to the safety instructions. The basics of the instructions are (1) stay safe, (2) position the cables correctly, (3) connect the upper rear connector, (4) connect the upper front connector and tighten it, (5) connect the lower front connector and tighten it, (6) drive for a bit, (7) retighten the front upper and lower connectors. The instructions are quite good, but they leave out a few helpful hints, which I will now share with you. 2. Put on some rubber dishwashing gloves and lay a towel down wherever you're going to work, or you will get very, very dirty. BEFORE YOU START, MAKE SURE YOU HAVE THE CORRECT SIDE UP! There are markings all over the cables which indicate the correct orientation. Look for them! 3. When you slide the cables under your tires, start from a point between your front and rear tires. Slide half of the chain under your car, and then reach around from the other side of the tire to pull the cable around. Although the instructions describe a swinging slide motion, I've never seen anyone who could do that without twisting the cables up. Just pull them and things will be much easier. 4. Once the cables are around the tire, DO NOT pull the bottom connectors that hold the cables together at the bottom of the tire towards one another. Keep them as far apart as possible. If you pull them in tight, you won't be able to pull the chain high enough in the back to connect the rear upper connector, which is what you are supposed to do first. 5. When you are connecting the rear upper connector, if you can't get the rear upper connectors up above the tire so that you can see them, push the part of the cables that surround the bottom of your tire backwards and under your car a few inches. This will create slack behind the cables and allow you to pull the cables up in the back. 6. Once you have the rear upper connector connected, hooking up the front upper connector may be difficult. Try pushing the rear upper connector back so that it is laying against the inside sidewall of your tire and then pull the front upper connectors towards you as hard as you can. Don't try to pull them towards each other. While sitting, just pull them straight out, towards you, and the rest of the chains should fall into place. Then they should be easy to connect. With this chain, there are multiple connector notches. Get the chain connected to whichever notch is easiest, and you can pull them tighter later. 7. Gently pull the parts of the chain that criss-cross your tires down towards the ground so that they aren't all bunched up at the top. Look at the chain and make sure that the parts you can see, and especially the blue cable, is evenly distributed around the tire. 8. Then pull the bottom front connectors towards you (out, but not up or down) to create slack. Then connect them. Again, don't try to pull them towards one another as that makes it almost impossible to create slack. With this chain, there are multiple connector notches. Get the chain connected to whichever notch is easiest, and you can pull them tighter later. 9. Now, pull the top connector, which you attached in step 6, towards you firmly to remove the slack and tighten the connector. Repeat with the bottom connector. The top and bottom connectors should be within 1 notch of each other. 10. Drive your car a few feet and repeat step 9, above.
A**X
Installed on my FWD 2017 Hyundai Sonata Hybrid for a 60 mile descent out of the Lake Tahoe area during a snow storm. They definitely caused some concerning vibrations at times, but I think that’s just the price of admission with chains. I would not have made it home that night without these chains. They absolutely got the job done and stayed attached securely. After rinsing them off and spraying with WD-40 (a must), they looked to be in good shape and didn’t rust (again, use WD-40). I’ve used them only once, so I can’t comment on durability but they seem to be holding up fine.
T**L
These were the first set of chains I ever bought for my car. They're simple to install and take off, but it's a bit confusing if you've never done it. Once you get one on, the other is easy, and removal is more straightforward.
A**N
I had never used snow chains before and figured I should probably not get the cheapest ones I could find. I bought this set because of the traction rating and low likelyhood of damage to the wheels of our 2008 Nissan Altima. We went to Salt Lake for a ski trip and couldn't make it up the driveway to the cabin we were staying at. I had watched the how to video once and felt confident that I knew how to put the chains on. They are very well designed and the gloves included have sleeves to cover your arms up passed the elbow. (BIG plus it turns out) First time I used them the wheel spun inside the chains a bit because I thought I had them tight enough but didn't. After tightening them one more notch they worked amazingly and it felt like the car had teeth instead of front tires. This kit is extremely worth the money. Thank you for the wonderful product.
K**R
I put a lot of miles on these over the holiday weekend (over 70!). The Z-555 chains were the correct size for my 2017 Toyota Camry XSE. They were very simple to assemble on the tires after giving the directions a quick look. These did scratch and ding my wheels as another reviewer mentioned, but I believe that's due to the fact I have low pro wheels/tires. Despite the damage, the chains performed as they should have driving up to 33mph at times, and while I came across many accidents on the icy roads, these kept me from being one of them. Thanks!
Trustpilot
1 week ago
5 days ago


