Desert Online General Trading LLC
Dubai, United Arab Emirates
Desert Online General Trading LLC
Dubai, United Arab Emirates


🚀 Elevate Your Mac Experience!
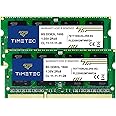
The Transcend 480GB JetDrive 520 SSD Upgrade Kit is designed specifically for MacBook Air models from Mid 2012, offering a seamless upgrade with impressive read/write speeds and essential installation tools. With a sleek 2.5-inch form factor and lightweight design, this SSD not only enhances performance but also ensures portability for the modern professional.


| Brand | Transcend |
| Product Dimensions | 13 x 1.09 x 2.82 cm; 58.97 g |
| Item model number | TS480GJDM520 |
| Manufacturer | Transcend |
| Series | TS480GJDM520 Jetdrive 520 |
| Colour | Black |
| Form Factor | 2.5-inch |
| RAM Size | 480 GB |
| Hard Drive Size | 480 GB |
| Hard Disk Description | Solid State Hard Drive |
| Hard Drive Interface | Serial ATA-600 |
| Hardware Platform | Mac |
| Are Batteries Included | No |
| Item Weight | 59 g |
| Guaranteed software updates until | unknown |
J**A
Fantastic product
Thoroughly satisfied customer!!I think the product is fantastic, its what my 3 1/2 year old MBP with maxed out RAM but only 250GB SSD needed. Colossal 960 GB SSD and a fantastic USB 3 enclosure for my previous hard drive.Product quality and packaging is great, the enclosure is sturdy. New SSD is faster than apple proprietary samsung hard drive. The process of swapping drives physically is straight forward and well explained. The problem I faced on 2 occasions was the inability to clone the new hard drive. For some reason OSX El Capitan (Version 10.11.3) would not let me clone the drive and there was ambiguity of enabling trim.I used a software called SUPERDUPER ( not kidding) to clone my SSD and then performed the straight forward swap.SSD is not cheap, but I was willing to pay to max out my MBP internal storage capacity.Very happy indeed.
M**W
A great upgrade
Like many, I’d assumed that I was stuck with the installed SSD in my MacBook Air. OK, 256GB isn’t too shabby, but I did have to keep my music and photos on an external drive. This 960GB SSD drive is redesigned to replace your installed memory - this would enable me to move more of my documents from my external drive, making my life a lot simpler, especially when out and about. Installation is pretty simple. Being picky, I’d say that the installation guide is a bit too simple - if you’re not used to opening up computers I can imagine it feels like you’re a bit unsupported. A quick trip to YouTube helps. It’s just a case of unscrewing the back of the Air, popping it open, unscrewing the memory and replacing it. (The supplied instructions take a different route as they assume you’ll clone the current drive but I wanted a clean install.) Close the case, reboot and reinstall OS X. It’s easy to do and works like a dream. A highly recommend way of getting more space on your MAcBook Air without too much hassle. The item and packaging are top quality - it feels like an Apple product.
J**H
Excellent
I purchased the JetDrive 520 960 GB SSD upgrade for my MacBook Air (mid 2012 model). The installation process was straightforward, the instructions provided were sparse but perfectly adequate. One thing the instructions did not include was information on enabling third party SSD TRIM support, which is supported by El Capitan and is a desirable feature. This is accomplished via the OS X terminal by means of the trimforce command (sudo trimforce enable).One unforeseen consequence of the SSD upgrade was that my copy of MS Office 2011 stopped working and I was prompted to reactivate that product. My (legitimate) product key was rejected, which resulted in a load of hassle with Microsoft, which was eventually resolved after I convinced them that I wasn't trying to install Office onto another Mac.Apart from the MS Office annoyance, I've had no problems. My computer appears to run marginally faster, I have loads of extra space, and being able to reuse the old drive in the supplied case is a huge bonus too.
P**H
Well put together package
I bought this drive as an upgrade to the 256GB Samsung SSD that came with by 2012 15" rMBP.The package contains everything you need. It includes 2x screw drivers with the relevant heads. I particularly like how the screwdrivers are magnetic which helps in removing the old screws.The drive is very easy to install and it took me about 10 minutes to do it all. It took far longer to restore everything from Time Machine.The drive seems to work well and doesn't suffer any slowdown when dealing with incompressible data, e.g. when FileVault is enabled.Running the BlackMagic disk test, the old Samsung scored 326MB/s write, 340MB/s read. This Transcend JetDrive scored 424MB/s write and 507MB/s read, so this is a pleasant surprise.This is an excellent upgrade as it's improved both capacity and speed, though I don't actually notice any difference in speed as the old drive was fast enough for my needs.edit:After 4 months of daily use (loads of VM work, building software, etc) I can say that my feelings about this drive is mixed. I ran into problems when I upgraded to Yosemite and enabled "TRIM" using Transcend's JetDrive toolbox. I had to wait initially for Transcend to update the JetDrive toolbox to support Yosemite. Then once it did and TRIM was enabled, I noticed a lot of instability and a number of times when the drive would fail to boot. Wiping the drive and restoring images from Time Machine did not help.Reinstalling everything manually and re-enabling TRIM also seemed to cause problems. However, fully reinstalling everything and not re-enabling TRIM appears to have solved my problems. I suspect that the changes to drivers in Yosemite (look up kext signing on the Internet) is at the root of this and the Transcend have not properly tested their drivers. So for now, I've not bothered with TRIM and have had no issues.I'm knocking off one star off the review for this, and I would have been a lot happier if Transcend had bothered to get their drivers approved and signed by Apple.
A**R
Great upgrade!
My original SSD died and I bought this to replace it. Instructions were clear & easy to follow. Doubles the capacity of my 2010 MBA and gave it a new lease of life.The kit comes with everything you need, just make sure you use the screwdrivers at the correct angle.Sadly, the data off my original SSD was unreadable, but running the mac’s Repair Tools allowed me to format the drive and I downloaded the OS and burnt a boot USB with the latest OS on another Mac. Installed a charm and working perfectly ever since.It’s overpriced, compared to most SSDs with the same capacity, but it does allow you to keep using a great laptop, which is the objective.
Trustpilot
2 weeks ago
2 months ago