
DOWNLOAD THE APP


Customer Services
Copyright © 2025 Desertcart Holdings Limited
DOWNLOAD THE APP


🥄 Cultivate your gut health with every creamy batch!
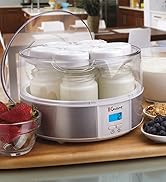
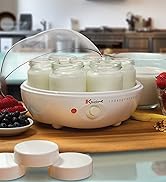
The Euro Cuisine Yogurt Maker YM360 empowers health-conscious millennials to effortlessly create up to 2 quarts of fresh, probiotic-packed yogurt at home. Featuring precise temperature control (68°F-131°F) and a customizable fermentation timer (up to 99 hours), it guarantees optimal probiotic growth tailored to your taste. The BPA-free glass jar, included thermometer, and cotton strainer bag make it easy to produce thick, Greek-style yogurt while saving money and boosting wellness. Compact and stylish in green, it’s the perfect kitchen companion for those prioritizing gut health and homemade quality.


| ASIN | B00NI5B3P0 |
| Brand | Euro Cuisine |
| Capacity | 64 Fluid Ounces |
| Color | Green |
| Customer Reviews | 3.6 3.6 out of 5 stars (102) |
| Date First Available | 24 November 2014 |
| Item Weight | 1.81 Kilograms |
| Material | Plastic |
| Model Number | YM360 |
| Power / Wattage | 25 watts |
| Product Dimensions | 19.05 x 19.05 x 26.67 cm; 1.81 kg |
| Special Features | Manual |
| Voltage | 120 Volts |
E**N
ممتازة في صنع الزبادي ونقول وداعا للطرق القديمة
H**E
I needed to find a yogurt maker where the temperature and time can be set, so I settled on this one. For anyone who wants to make L. Reuteri “Super Yogurt”, you know it needs to be kept at 99f for 36 hrs. This can do that and after several attempts, I’m getting very good results. My first attempt separated into curds and whey very badly, so I wanted to see if it was because of this maker. I have a wireless meat thermometer, so I taped it to the edge of the jar. What I noticed was, every time I messed with the settings, it would get hotter. What I think is happening is this does not have a thermostat, so its not kicking in/off based on the content’s temperature. When you set the temp and time and hit “start”, its assuming the contents is cold, so it does some heating right away. So, even though I had it set to 100f, and the contents was at 100f, if I then turned it down to 98f, the contents would rise to 104f. ✳️ When I set the temperature and didn’t mess with it at all, it kept it right in range…and I watched it closely…until the battery in my thermometer ran out. ✳️ I was going to return it after the first batch but going on what I learned, I tried a second time (using the curds and whey from the first batch) and the second batch still separated a little, but much less. The 3rd, and subsequent batches, were perfect. L. Reuteri needs to be awakened and it might take you a few batches. What you see in my picture is my 5th batch. ✳️ I suggest when you make a batch, fill it up all the way (just under 2 quarts of scaled half and half – very important) and make sure its around 80f. Set it, forget, and harvest a perfect yogurt 36 hrs later. ✳️ Other comments. The thermometer it comes with is useless, but I used the cheese bag and that worked well. I love the size and convenience of this. It doesn’t take up much counter space and if I’m going to make a batch, I’m going to make 2 quarts every time. I was also very successful making this yogurt in my Sous Vide and InstaPot but I’m afraid of burning out my Sous Vide and the Instapot takes up too much room. That’s why I’m keeping this.
C**R
This unit works very well, I do like the large glass jar for making one big batch at a time. The entire kit is very nice, with good instruction manual, strainer bag, large glass jar (2qt), thermometer with red and green marks for heating milk and adding starter. I would like to experiment with different recipes and incubation time settings in the future. My first batch turned out great using the euro cuisine starter culture pack. save a lot on not buying store bought yogurt. Highly recommended
L**S
Pros: * I really wanted to like this as the form factor and amount it makes is ideal for our counter space. * Great temperature and time controls. * Made great yogurt, despite the extreme temp gradient mentioned below. Cons: * Poor Actual Control. Temp gradient was extreme and varied from about 115ºF at the bottom to 85ºF at the top. These measurements were taken after steady state should have been reached after more than 10 hrs and taken at the same time. * Unit stopped working after about 3 weeks of making yogurt returning an E01 error code. * Error Codes are not mentioned in the manual nor could I find during internet searches. I also tried contacting the company but couldn't get through during normal office hours. The manual says this is out of Los Angeles...so I am going to say this may be related to the fires and I can let this go...but it is still going back because my return window is closing!
C**.
Temperature was all over the place and stopped heating up at all to make yogurt. I am returning after 3 tries.
M**O
I love the large glass jar. Half-gallon size makes it worth the thirty minutes to get the mix ready to do whatever it does in the yogurt maker. The little thermometer is marked in red for the high temp (so you heat your milk just enough) and the low temp (green) when it is safe to add your cultured starter. Wish I'd gotten one of these years ago! No squinting at the tiny little marks on the dial. Just red and green. We have a special child. His yogurt needs to be extra creamy so it is easier to keep on the spoon. This recipe works every time for me: Assemble: Yogurt maker & thermometer, 2-cup Pyrex measuring cup, small ladle, one 6 oz. container of plain or vanilla store-bought yogurt with live culture, one envelope Knox unflavored gelatin, honey or sugar, milk, powdered milk, some kind of double-boiler set-up, something to stir the milk 1. Measure 56 ounces of any kind of milk into a double-boiler. I use a large saucepan seated in a short stew pot. Add two or three tablespoons of sugar or honey. Stir in about a half to two-thirds cup powdered instant milk if you want more protein in your yogurt. Makes it a little thicker, too. Stick the yogurt thermometer on the side of the saucepan. Begin heating. 2. Sprinkle the gelatin on top of about 1/3 cup of cold water in the measuring cup and let it soften. 3. Stir the milk gently. When the thermometer reaches the red mark (about 180), remove from heat. Pour out the hot water and add cold to cool the milk. I do this twice to speed things up. Stir the milk just a little while it's cooling. 4. Ladle about a cup of the warm milk into the gelatin in the Pyrex cup and stir to thoroughly dissolve the gelatin. Pour the gelatin mix into the milk and stir to mix. 5. Scrape the yogurt into the Pyrex cup. When (and not before!) the milk mixture cools down to the green mark (about 110), add several ladles of the cooled milk to the yogurt and stir to get the lumps out. Now add this thinned yogurt to the milk mix and stir gently. 6. Ladle/ pour the yogurt mixture into the glass jar. (Note: I removed the styrofoam liner in the top of the jar). Gently screw the lid on. Fits a little wonky, but it works. With one hand on top and one hand under the jar, move the glass jar to the yogurt maker. Plug it in. Figure eight hours for warming, and set the reminder using the marker on the lid. 7. At the end of the eight hours, unplug the unit. Remove the jar of yogurt and stick it in the frig to cool. I always make sure I get a good grip on the jar because the jar lid just has a personality of it's own. Not bad, just a little tiny cantankerous about getting in the groove - though not enough to be a complaint. This makes a creamy, smooth yogurt. Always works. My guys like it with a squirt or two of Nestle's Nesquik chocolate or strawberry syrups (no HFCS). Serve with some Fiber One cereal on top for crunch. Wonderful! You may also put jam in the bottom of the little wide-mouth 8 oz. canning jars and spoon yogurt on top. Seal with the plastic jar lids. You'll have single servings ready to go. Some folks save several ounces of the batch they've just made to start the next batch, but. . . . . it would get lost in my frig. Just easier to buy a 6 ounce container and know it's fresh.
Trustpilot
2 months ago
1 week ago