Description
✨ Fix it fast, fix it flawless — your countertops’ new best friend!
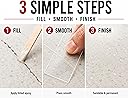
- FAST TRACK FIX - No waiting, no sanding, no taping—ready to use in under 30 minutes
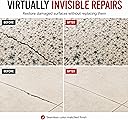
- CUSTOM COLOR MATCH - EZ-Tint pigments let you blend repairs invisibly with your stone’s natural hues
- ROCK SOLID BONDING - Creates an unbreakable, drillable, and sandable bond on even the slickest surfaces
- UNIVERSAL STONE SAVIOR - Repairs chips, cracks & rebuilds on any countertop material from granite to wood
- LONG LASTING BRILLIANCE - Sustainable tinting prevents yellowing or discoloration over time, keeping your counters flawless
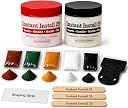
The II29 Complete 4 oz. Stone Kit is a professional-grade epoxy repair system designed for seamless restoration of chips, cracks, and breaks on virtually any countertop surface. Featuring a rapid 29-minute dry time, customizable EZ-Tint pigments for perfect color matching, and a durable, unbreakable bond, this kit delivers mess-free, no-sanding repairs that resist yellowing and maintain a polished finish.