Buy anything from 5,000+ international stores. One checkout price. No surprise fees. Join 2M+ shoppers on Desertcart.
Desertcart purchases this item on your behalf and handles shipping, customs, and support to Malaysia.
💖 Elevate Your Nail Game with Gelish!
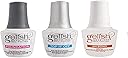
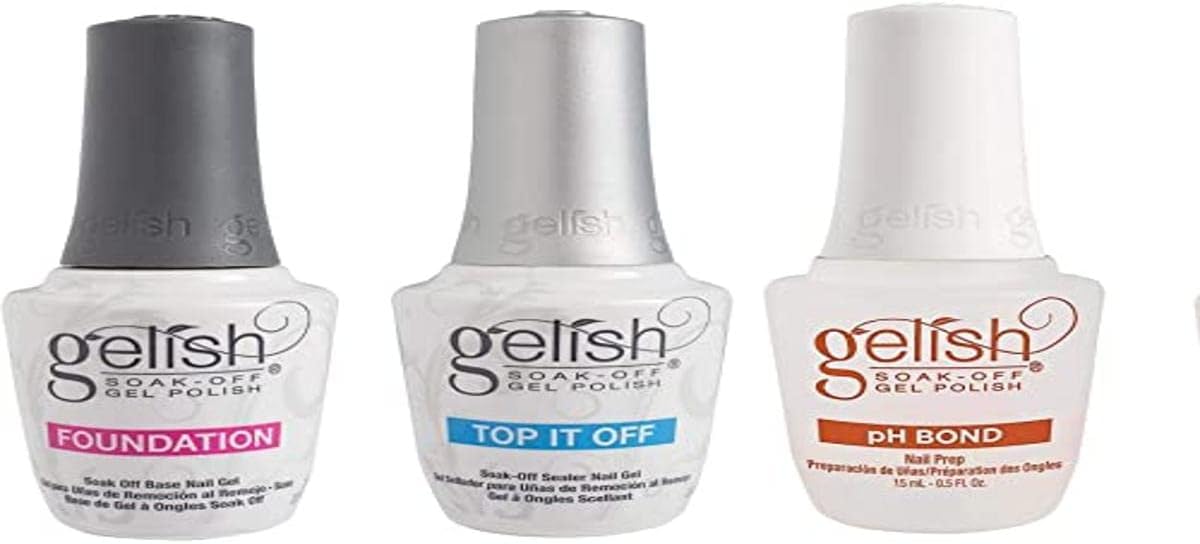
The Gelish Terrific Trio Essentials is a 15ml manicure gel nail polish kit that includes a foundation, pH bond, and top coat, designed for easy application and long-lasting results. Perfect for achieving salon-quality nails at home.


| ASIN | B007AU0FXA |
| Additional Features | Long Wearing |
| Age Range Description | Adult |
| Best Sellers Rank | #209,292 in Beauty & Personal Care ( See Top 100 in Beauty & Personal Care ) #2,575 in Nail Polish |
| Brand | Gelish |
| Brand Name | Gelish |
| Customer Reviews | 4.6 out of 5 stars 3,427 Reviews |
| Finish Types | Glossy |
| Global Trade Identification Number | 08851945047375 |
| Item Dimensions | 0.79 x 0.79 x 3.94 inches |
| Item Form | Gel |
| Item Weight | 15 Grams |
| Item dimensions L x W x H | 0.79 x 0.79 x 3.94 inches |
| Liquid Volume | 61.5 Milliliters |
| Manufacturer Part Number | HMYG0010 |
| Material Features | Cruelty Free, Non-Toxic |
| Model Number | HMYG0010 |
| Nail Polish Type | gel |
| Number of Items | 1 |
| Number of Pieces | 3 |
| Special Feature | Long Wearing |
| Type | gel |
| UPC | 885204584316 |
| Unit Count | 1.52 Fluid Ounces |
S**N
Gelish Makes a Great Product
Sorry this review is so long, but I made almost all of my gel polish choices based off of reviews on Amazon so I wanted to be detailed enough to help the next person. :) This three pack is great for those new to DIY gel nails. I ordered this set together with another Gelish color, my UV light nail dryer and a couple of other gel colors from different brands to do my nails at home for the first time. It arrived within the shipping time estimate. The PH bond is very thin and evaporates almost instantly after applying. It helps hydrate and clean the nail for the gel base. The Foundation Base is very thick and comes with a short stubby brush. It goes on smooth. After curing, it's very tacky and requires cleaning. Tips: After applying the base, go over the whole nail a few more times with the brush to make sure the coat is thin and even. If I don't do that, after curing the polish and cleaning the nail, I find random spots on the nail that don't have the base on it. When I find them, I just touch up those spots and cure them again, and I haven't had any issues with the manicure after, but it's just easier to prevent it in the first place. Regarding cleaning the nail after curing, the instructions on the bottle call for a "dry clean of the surface" with a lint free wipe. No matter how hard I tried, I could never get the surface clean with a dry wipe. It would leave smear marks and stay tacky. Rubbing alcohol works perfectly and I haven't had an issue from using a cleanser. The Top It Off has a more standard nail brush and liquid consistency. The liquid is very smooth, almost slick. This coat is also tacky after curing and requires cleaning with rubbing alcohol. No matter how many coats of polish I put it over (I've done up to 6: 1 base coat, 3 coats of color and 2 coats of chunky glitter), I've only needed one coat to make my nails perfectly smooth and shiny. When you rub them together, they even make the clacky noise you get with professionally done gel nails or acrylics. Every time I do the final cleaning, it's still hard for me to believe that 7 coats of nail polish dried in less than 2 hours. When you add in how long that manicure is going to last, it's pretty awesome. So far, I've made it to 2 weeks with only a very small chip that was just in the shine, not the actual polish color, so it was almost impossible to notice. My biggest problem is that I get bored with colors on my hands pretty easily. When the nail grows out too much, I just start over, instead of trying to do upkeep so I don't know how long I could try to keep the same manicure going. When I get brave enough to try French manicures, I'll probably try to extend it. Other tips: This process does take time. I didn't do regular nail polish manicures that often because of how long they didn't last, so I wasn't very handy wielding a nail brush, especially with my non-dominant hand. But I've already seen a marked improvement since I started doing gel nails, and the time it takes is going down. So don't start this if you don't have a chunk of time without interruptions to do it. Also, because your nails are supposed to be a clean, oil free zone, eat before you start. I have a drink with a straw on the table ready to go so I can stay seated once I start. I do my cuticles directly before starting each hand to make sure I can cover as much nail as possible. I soak my finger tips in warm water for a bit, dry, then push back and trim my cuticles. When applying the gel, you don't want any on your skin before you cure it. Having polish on your skin can break the seal on your nail and lift up the polish after a few days. I use a wood stick to clean up the nail edges. I was doing my entire hand at a time when I saw a comment from a nail technician that stated it was easier to do the four fingers and the thumb separately and she was so right. I like to fully complete the four fingers on each hand first so I can use the thumb on either side to pull back skin on other fingers to fully paint the nail or to tidy up an edge I'm afraid to use the wood stick on, then I do my thumbs separately. Gel polish can shrink, some more than others, so it's important to make sure to cap the tip of your nail with each coat so it'll fully shrink onto your nail. I start painting my nail doing this step so I can smooth out the edge after. I also come up a little under my nail tip to help solidify the color. You're supposed to cap the nail with each coat from base to top coat, but I've found that if you are using a chunky glitter and you cap the tip, after it cures it feels like an uneven nail edge. I learned that on my first hand, so on my other I didn't cap it as much, didn't go under the nail at all and pushed back any glitter pieces that were on the edge and it turned out perfect. I wouldn't buy this particular set again, but only because of the Ph Bond. There's nothing wrong with the product, but you can do the same thing with rubbing alcohol (which is the main ingredient in the PH Bond) and you can buy it in a large bottle for a couple bucks. So next time, I'll definitely just buy the base and top coat. But the Gelish brand hasn't let me down yet. I've also been able to use the Gelish products with IBD and Fingerpaints gel polish with no problem.
A**I
Great started Gel polish set
Perfect starter set. Has everything you need to paint gel nails at home. I have tried a few other brands and Gelish is a consistent favorite at a reasonable price.
L**R
Gelish ph bond, foundation, top it off.
Love it! I use them with all my gel products not just gelish. This is my manicure routine for gel polish n regular polish. 1. Remove all cuticles, I use Sally Hansen "instant cuticle remover" by far the best hands down. After applying this I soak my hands in some warm soapy water leaving the remover on for about 3-5 minutes n than I use a spoon metal cuticle pusher to push back my cuticles n remover the cuticle that has grown on my nail plate all the way around my nail, sides included...do not cut your cuticles or the skin around your nail plate, that's what causes them to split and become callus. Should NEVER touch any of the skin around your nails. 2. Wash hands good to remove all the cuticle remover. 3. I use my electric nail drill "very gently" to remove the shine on my natural nail n any remaining cuticle on the my nail plate only. This does not damage the nail plate n by using the E Drill it's much easier to buff the nail without using a block buffer or the 100/180 file that's very hard to use without touching the skin around my nail...I will NEVER use a block buffer or file on my nails ever again. Since giving up the buffer n file and using the E file only, my nails n the skin around my nail plate has never been healthier. There is a video on YouTube on how to do a proper manicure prep before applying gel polishes n regular polish. 4. Shape nails with a OPI crystal file, filing in one direction only. Do not file side to side this will only rip your nails and do not file the sides of your nails at all, this weakens the nails support causing them to break. Tips only. 5. I use a brush or nail duster to remover the nail dust. 6. I apply 91% alcohol, let air dry...than I use EZ flow nail primer being careful not to get any on the skin as it does burn, let air dry...than I apply the gelish ph bond air dry. The trick to gel polishes is very thin coats, keeping the foundation, color n top it off sealer...off your skin...if you do get any on the skin around your nails, take a paint brush n dip in alcohol and clean it off before curing it...so alway check all nails good before curing. 7. Apply a very THIN coat of gelish foundation, cure in LED lamp for 1 minute. 8. Take a dry paint brush that u would use for applying nail polish or makeup not the ones for removing the dust n wipe each nail down with it, this helps smooth out the cured foundation n removes the moisture. I got this tip off the gelish web site. 9. Apply a very thin coat of the gel polish color you have picked out n cure for 1 minute, 2 minutes for dark colors. 10. Apply another coat of your color, again cure but I cure the second coat for 2 to 3 minutes depending on how dark it is, if u are gonna apply a 3rd coat only cure 2 mins n cure your 3rd coat 3 minutes. 11. Now it's time for your gelish top it off top sealer. I usually put 2 coats of this on curing the first coat 2 minutes n curing the second coat for 3 minutes. 12. Take the gelish cleanser or just alcohol on a lint free cloth or a paper towel will work as well...never use anything cotton with your gels or regular polish it's your worst enemy. And now you have beautiful nails with color that should last 10 days or more :-) and are fully dry.
K**.
Perfect for DIY gel!
I recently started doing my gel nails at home in an effort to save money. My lamp is cheap but I don't like to skimp on the actual formula I put on my nails. I was looking everywhere that only sold these 3 things and this happened to be at an awesome price point! This honestly makes my nails last SO much longer, makes them shine like the salon and doesn't tear up my nails. This is how I do it: - Prep: Trim/File your nails. Push your cuticles back. Buff your nails with a fine buffing block so that there is no natural shine. Wipe very well with 91% alcohol. Apply the PhBond. It evaporates instantly. Repeat on other hand. - Foundation: Apply a THIN layer of the foundation. Be sure to get all of your nail or else the color will not stick. Wipe any excess off your skin, along the side of the nail (I use an orangewood stick). This is important to do BEFORE curing because if it bonds to your skin and not the nail, it will lift! Cure this in your light for 60-90 secs, depending on your lamp. - Color: Apply a THIN layer of color. Follow the steps from above, especially cleaning up the edges/skin. Cure for 60-90 secs. Repeat with another thin layer until you get the true color (usually 2 coats). - Top Coat: Apply a THIN layer of the top coat. I go over it a couple times with very little product on the brush just to smooth everything and ensure full coverage. Clean up edges. Cure for 60-90 secs. Immediately wipe clean with alcohol and a paper towel (do NOT use tissue, cotton pads, etc. because the fibers will stick!) If you don't do this, it will not cure correctly and will still be sticky. I like to complete the painting process on one hand before I do the other. My nails last just as long as the salon. To get the gel off, I use "nail mates" with pure acetone. It only takes 15 min and comes off after pushing the gel with a cuticle pusher. No peeling/breaking nails like after the salon! This product is high quality and is a great value. Must have for a DIYer!
A**L
Highly durable trio.
While my taste in polish may not be totally loyal to the Gelish brand (I like to mix my own with a transformer and have a couple other brands I like), I firmly believe this little trio is the only gel prep/base/top set that I'll ever buy. Here's my routine using this trio. I scoffed at it at first, but now I do feel like I need the pH bond. I've tried just scrubbing my hands with soap and then swiping my nails with alcohol beforehand and it does not seem to prep as well as whatever's in the pH bond as far as getting me the maximum number of days before the gel starts peeling at the cuticle. And I do have oily nails and hands, so I'm sure that plays into it. I rough my nails up just a little with a file before the pH bond, which I apply messily...I figure it doesn't hurt to de-oil the skin around the nail as well. You don't need to cure it, just go on to the base coat next and do NOT touch your nails with your fingers in between pH and base. Otherwise you might as well not even do it, because you've just 're-oiled' wherever you touched, even if you don't think you have oily hands. The base coat is really interesting in that it's very thick and you can't be too careful about not getting it on the skin around the nail. If you do and then cure it, you're very likely to have peeling-up of the entire polish down the road. Start in the middle of the nail and push the base coat towards the sides and back of the nail -- it evens itself out. I don't do a very thick coat, and I tend to leave just a tiny gap of bare nail around the edges of the nail...not enough to make it look like it's growing out, but enough for it to not touch the cuticle. I have very steady hands though so if this is hard to do, you might want to just get a tooth pick or something to swipe around the edges of your nail to make sure you're not connecting your nail to the skin before you cure your base coat. After curing base coat, I just put on a few coats of whatever polish I like (usually it's one of my regular polishes mixed with equal parts of the Hydracol polish-to-gel transformer), cure them, and then it's time for the top coat. At first I didn't like the Gelish top coat because it was SO slippery. It felt like it ran down onto my skin and cuticle and fingertip and pretty much everywhere I didn't want it! It takes a lot of brush-wiping onto the bottle to get the excess off, and now I just do a very thin coat of the top coat, maybe even two with a cure in between if I want my nails to have that thick jelly look some salons do. Make sure to use your thumb nail or a toothpick to get off anything that has run down onto the skin *before* curing, or again you risk losing the entire bonded surface to peeling a few days down the road. The shine is unparallelled and long-lasting! I hate how people grouse about it still being sticky after curing: if it's still sticky, you don't know what you're doing with gels and should watch some more YouTube tutorials. You MUST MUST MUST wipe down the cured top coat with rubbing alcohol afterwards to take the tackiness off. I find that alcohol on cotton balls is a mess and you'll get some fibers stuck to the top coat...but alcohol on a baby wipe is fabulous. The little medical alcohol wipes, or even restaurant 'towelettes' like you get in BBQ joints are awesome and don't need soaking with any extra alcohol, but I don't know if everyone can get hold of those easily or not. When removal time comes around, it is very difficult to get the whole combo to soak off unless you break the top coat's seal by filing it all over before you soak. If you can do that, the acetone has a better chance to sink down into the polish and base layers so it can peel up naturally without damaging your nails by picking. I don't "cap" the tips of my nails like some other reviews have said. I am not able to cure the nails fast enough to prevent the color or Gelish top coat from shrinking a tad, even if I do a 'flash cure' for 10 seconds on each nail as I go before curing the whole hand, so it's not worth it to me. The top coat is just too slippery for that, in my humble opinion, so don't freak out if you can't get a good cap going...your manicure should still last a good long time. Picture is after 4 days' wear...looks fresh as the day it's done and it pretty much looks like that all the way up till I have too much growth or get a chip after a week and a half (am outdoorsy and put my hands through a lot, otherwise I doubt I'd even get chips).
S**8
Good gel polish overall
I had no previous experience with gels, I've never had my nails done in a salon nor have I ever attempted using a gel system at home. I had to switch to gel polish because I started swimming and regular nail polish started chipping on me way too fast. So I read a little about it and chose Gelish because they claim easy removal through soaking off. === FIRST IMPRESSIONS === Upon arrival, I noticed a few issues but nothing of major concern. The base and top were packed together in a box and the pH bond was separate. That led me to believe that the trio sold was probably not intended to be a kit by Gelish originally as the top and base are (and also the larger kit that includes a nail oil). Also the small box of the top and base was a little crumpled and torn in places - like it had already been opened harshly before. Personally, I didn't mind the outer appearance as the polishes didn't seem to be used too much so I decided to keep it as is. === HOW I USE THE GEL === Before I comment about the performance, I should make clear how I do my gel nails. First I buff my nails a little and prep them with the pH bond. Then I apply a thin layer of the base (I might go for a second layer if I feel like it but most of the time 1 layer is enough). I use REGULAR nail polish as color, sometimes I do nail art, etc. and wait for it to completely dry (this is important). Yes, I realize that sandwiching regular nail polish with gel base and top might not give me the longest wear but it works well for me so far and I don't feel like investing in gel colors when I already have a ton of regular nail polishes that I want to use. Next, I put a thin layer of gel top coat (and again I might go for a second one) and finally I clean the sticky layer with rubbing alcohol. === APPLICATION === Using the pH bond is a breeze. The base has a very short brush which makes the application of thin layers surprisingly easy and precise. The top is to me the most tricky to apply due partly to my inexperience with gels. It feels a little goopy and thick but I think that's normal for gels and it's something I need to get used to. === WEAR === I have done my gel manicure about 4-5 times already and so far I am pleased with the results. Swimming seems to not affect the longevity of the polish so much and again I am able to go with about 10-12 days of wear. I do notice, however, that my tips chip more (even when I wrap them around and under) in comparison to my favourite regular top coat but for the most part my nails stay intact and pretty. === REMOVAL === Removal is so-so for me, that's why I took one star. Soaking my nails successfully removes the top layer which just falls off in chunks. Rubbing the nail with acetone removes the regular nail polish. The base, however, doesn't get removed with just soaking. I've tried soaking the top off and then soaking just the base for quite a while and nothing. The only way for me to remove it is with a nail file. Is this normal or am I doing something wrong?!? I'd appreciate some tips as I wish to skip buffing my nails with a file absolutely every time. === FINAL THOUGHTS === I like it, I'll keep learning and keep using it!
D**X
This stuff is a miracle. I have beautiful nails all the time!
Terrific products. My nails are very thin and flexible and I could never get regular polish to stay on them for more than a day or two no matter how careful I was. I had given up on having nice nails since I wasn't willing to pay $40-$50 every three weeks at the salon. For this to work proper prep is key. Look online, there are plenty of sites/blogs with step by step instructions on how to do a gel manicure. Now for me usually a manicure lasts around 3 weeks before I want to redo but when applied to well prepared, clean, buffed nails I have had a Gelish French manicure (using just this set with Sheek white for the tips) last 5 weeks by lightly buffing and reapplying another coat of top it off/topcoat on the entire nail to mask the grown out area at about 2.5 - 3 weeks. The second important thing is to avoid careless painting. If you let any of the coats run up to the skin at the side or cuticle so it forms a "ridge", it will lift. You must start at the end of the nail and work your way carefully toward the cuticle and sides stopping just short of touching the skin. Since it doesn't dry quickly without putting it under the light, you have time to be careful. I only had a nail lift once when I was helping my bartender husband at an event and was washing glasses nonstop for nearly six hours without gloves. So, if you have your hands in water a lot, you should wear gloves. This stuff is an absolute miracle!
D**M
I finally have a French Manicure
In the last 2-3 years my nails have been extremely brittle, thin and could not grow them at all. I have been using Gelish for 3 weeks now and finally I have a French Manicure without destroying my nails with tips or acrylic. I refuse to pay the salon prices for nails that only going to make them worse once removed. Years ago I used a similar Sally gel-like product and I loved it but it was no longer available. So when I found out about Gelish I instantly bought the basics for French Manicure. - I bought The PH Bond, Foundation, three colors: Light Elegant and Simple Sheer, Sheek White and Top It Off. I really did not need the Light Elegant as I could easily sandwich another color of regular polish before I apply white for tips. Just to compare; my nails with and without Gelish: I started with no nail growth at all, because I they constantly broke as they grew. With Gelish, I had no chip on my natural nails for the past 3 weeks. Once I removed Gelish and let my nails breathe for a day, I instantly broke two of my nails completely. LAMP: I use a 9Watt UV lamp I had for years. It works perfectly, but it will cure slower. Instead of 30secs I cure each layer for 4 minutes. Once this lamp goes I will switch over to a 30 watt lamp. Right now it takes at least 1hr to get my nails done. SOAK OFF: Buff the surface then I use foil, cotton ball soaked with the Soak Off remover. I leave it on for 30 minutes (not 15 as recommended) just because my nails are so weak I do not want to rish the chance of hurting them. - After 30 mins I can easily and completely remove them with the tip of a nail file or a cuticule remover. My nails will look healthy and clean. DO NOT PRY OR TEAR IT. It will remove the top layer of your nail. - I do clean the cuticles and apply oil and cream to nourish the natural nails. Then let my nails breathe for a while before putting Gelish on again. PRICE: At the beauty store you buy a small bottle for almost the same price so these big bottles really worth it. Knowing what I now know about the Cleanser and the Soak off remover, I will probably not reorder refills. I will get 100% acetone for a cheaper price at stores it does not have to be brand name. It goes very fast. I used 1/3 already and had 3 manicures so far. I use regular oil free nail polish remover to clean off the tackiness from the Top it Off. It does not solve Gelish at all, which is great because if I decide to put a coat of different color regular polish on during the week I can do that, removed it with regular polish and go back to a French manicure. - While I did not try yet, I read you can sandwich regular polish in between layers. DURABILITY: They go about 1-2 weeks before they start to grow down and lift at the edges. However I think they were lifting for me because I applied a bit too much at the edges. It took a little while to get the hang of it. They may last 3 weeks with these but I do a lot of housework so they do go through a lot of wear and tear. TIPS: - Soak off: 30 minutes. - White tip. - Though technically you should not, I find that I need to remove tackiness from the layer on which I am putting the white tip of Sheek White on. For some reason applying on top of the tacky surface Gelish Sheek White will run and turn milky instead of solid white. - Less is better. Do not apply close to the sides and cuticles of your nail. If you do, you will not only have thick edges tuck to your skin but will have lifting on the top and sides sooner or later. The product will level a bit during curing.
M**M
Incroyable
Ces produits sont qualitatif et le vernis tient 3 semaines sans bouger
E**.
Great nails for weeks and weeks!
Wow!! This is an excellent product! My nails never fall off, they stay strong and pretty for about 3 weeks. The gel isn’t thick so you can add layers for thickness and control how you want them to look. My nails are strong and healthy underneath from the protein bond. The top coat can get a bit sticky but it cures so well that you just have to wash your hands and the stickiness will go away. I am super impressed by this product. I will no longer buy any other brand. Try it out!
M**H
Super
Mon marque préféré pour les ongles 👌
J**8
Makes nails last longer
Love it!!! Before this product my nails use to only last 3 days before it chipped. Now it can last 8-10 days (but im a nurse and wash my hands +++) and i combine it with the gelish nail surface clease to remove sticky residue at the end. Will deffinatly buy again
E**A
Excellent product!!!
I been using this set for a 1 year 1/2 I do my nail my daughters and family members. I still have some and I just order my second set. EXCELLENT PRODUCT!! IT LAST 2 TO 3 WEEKS NO CHIPPING.
Trustpilot
1 week ago
2 days ago