✨ Transform your kitchen walls in a snap—no pro needed! 🔥
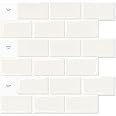
Art3d’s 10-sheet peel and stick backsplash tiles offer a premium, eco-friendly vinyl solution with a 12"x12" size that covers 40% more area than standard tiles. Heat and water resistant, these off-white subway-style tiles never yellow over time and install easily without glue or grout, making them perfect for stylish, hassle-free kitchen or bathroom upgrades.


| Brand | Art3d |
| Material | Vinyl |
| Size | 12" X 12" (10 sheets) |
| Color | Off-White |
| Finish Type | wood |
| Style | Subway tiles backsplash |
| Installation Type | Peel and Stick |
| Product Dimensions | 11.81"L x 11.81"W |
| Pattern | subway backsplash |
| Item Weight | 3.2 ounces |
| Shape | Square |
| Item Thickness | 0.06 Inches |
| Edge Style | Square Edge |
| Unit Count | 10.0 Sq Ft |
| Item Display Dimensions | 12 x 12 x 0.06 inches |
| Recommended Uses For Product | Wall |
| Coverage | 8.5 square feet |
| Form Factor | Flat, square tile with a thickness of 0.06 inches |
| Water Resistance Level | Water Resistant |
| Special Feature | Heat Resistant |
| Manufacturer | Art3d |
| Part Number | A17000P10de |
| Item model number | A17000P10de |
| Is Discontinued By Manufacturer | No |
| Finish | wood |
| Item Package Quantity | 10 |
| Number Of Pieces | 10 |
| Mounting Type | Wall Mount |
| Special Features | Heat Resistant |
| Usage | Home Décor |
| Batteries Included? | No |
| Batteries Required? | No |
A**A
Put these on our SailBoat
We decided to try these in our boat and I’m still in between finishing this project. I definitely feel like having a straight edge to cut it with is handy. I tried using a knife and scissors and it’s hard to get the line on them cut right. The good news is that these kind of stretch so if you don’t get your cut perfect then it can be somewhat forgiving. I also saw on a few other forums that people caulk the edges so then it looks pretty authentic all around. Aesthetically we really like these and I hope it will withstand any condensation we might get from this product being on the hulls.**Update 29 June 2020Okay so I had to order another set to finish this up. I did notice the tiles were slightly different so if you order some I’d order what you need for your project all at once to avoid getting different types of materials. I wasn’t planning on needing more but I loved this look so much that I decided to install it on both the top and bottom panels of our boat.This is a product that you have to follow the directions for, to get the tiles match up correctly. To start you will be cutting tile on the first piece to line it up on the edge and then work your way out from that point.If you are going to use adhesive countertop paper I suggest doing that first then to overlap the tile on the top. It sealed up well for me when I did that.Lastly it’s okay to mess up. I found it easiest to cut the pieces I needed to cut with scissors (leaving the clear protective layer on top and the non adhesive on bottom) then removing the clear top and then the non-adhesive part. Then I focused on lining it up and sticking it on. The most important thing with doing this is having a plan with how you’re going to start (lay it out) and then start.***The boat has had a lot of condensation and the adhesive is still sticking great. So far so good!
J**D
Changes colors!
Bought these for a quick fix in my kitchen until I could decide what I wanted more permanently and initially, I loved them, super easy to put up, cut to piece together, but that's all they all- quick. They do not hold up, I thought it may be heat from my microwave, and oven turning them but no- it's age. I have a box with a few extra sheets that have been kept in my building and they're all yellow. What's on the walls and in the package. Yellow. I don't know why they turned but they did and I hate it.
L**5
Not white! Beware of faulty color
Spent $100 for 5 packs of the white on white for my kitchen remodel. About halfway through it became very noticeable that the product is very pink up against a white wall. Straight out of the package it looked white, but up against a freshly painted white wall, it is not. I tried to remove thinking I could just return and get something different but I got one piece off and realized that it tore the wall up so bad behind it that if I removed it, I would have to refinish the entire wall area I had already done. So I hoped that it was just due to it being dark and having lights on at night and that my lights were maybe making it look pinker than it was. However, upon waking in the morning to natural sunlight, it was even clearer that it has a pink undertone. I had no choice but to finish what I had started or have to refinish a huge portion of my wall.So now, I’m stuck. I don’t have extra time or money to redo this huge project.I read so many reviews and no one mentioned this so I don’t know if I got a faulty batch but I’d hope that five packs wouldn’t all be bad which leads me to think this is how they are made.Function wise, it’s a great product. It doesn’t not come back off easy, like I said, it took the paint and drywall with it when I removed one piece. Easy to work with as cut. But once it’s on, it isn’t coming off… even if it’s not the color you bought!
K**S
You can do it!
So this was my first time attempting to do something like this on my own. My husband and I recently spent about $1200 on our primary kitchen porcelain backsplash for supplies alone and he did the install (came beautiful). We have a second kitchen and I really wanted to try this on my own, as he has a really busy schedule. I purchased 2 packages of 10 square feet and I had the perfect amount, with several cutting mistakes included. I used an exacto knife to cut out the outlets, a sharpie to mark points, a measuring tape, a level, and a paper cutter(level type). First I tried to scrape any bumps in the wall and then I wiped the walls with alcohol and an old washcloth. Then I measured and drew a level horitzonal line. I worked from the very left to the right. If I were to do this again I would start at the TOP left and work my way like you read a book, top down and left to right. I had to work in a shadow and work against gravity the way I did it, don't make that mistake!I hesitated for a couple of days to start this task and almost passed the job off to my very handy husband, but then decided my outlay was only about 60 or 70 dollars and I just needed to try it!In the end, It's not perfect and took me about 4 hours, but it really updated the kitchen look and I feel totally empowered by completing it. So if you are a beginner, watch some youtube videos, make sure you use the alcohol on the walls, and remember to start from the top left. I am not the handy type, the most I do is paint the walls and honestly if I could do this, so you can too!One more thing, I am SO HAPPY that I chose the white tile WITH the white caulking lines because I think it camouflages many of the mistakes. I think the darker grout line would really highlight all the mistakes. So I recommend white with white for beginners (or maybe a very busy print) Good Luck!PS I rated four stars and will update when I see how it holds up over time.
J**A
Changes color over time
Changes color over time. Love these when we got them. After 5 years thry have changed color... From white to yellow. Only use if you want a temporary wall.
Trustpilot
4 days ago
2 months ago