Some deliveries may take a little longer than usual due to regional shipping conditions.

下载应用程序


🌱 Elevate your space with fresh flavor—grow smart, live green!
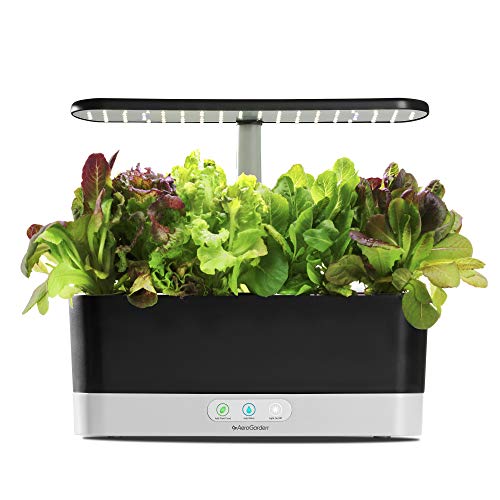
The AeroGarden Harvest Slim is a compact, hydroponic indoor garden system featuring a 20-watt full-spectrum LED grow light and a 6-pod gourmet herb seed kit. Designed for effortless year-round cultivation, it automates watering and lighting schedules to deliver fresh herbs and greens up to 12 inches tall without soil or mess. Ideal for millennial professionals seeking a stylish, low-maintenance way to grow fresh, local ingredients right at home.


| ASIN | B07DGMZMZM |
| Best Sellers Rank | 398,424 in Garden ( See Top 100 in Garden ) 213 in Plant Germination Kits |
| Customer Reviews | 4.2 4.2 out of 5 stars (469) |
| Date First Available | 1 Jun. 2018 |
| Item model number | 200694-BLK |
| Item volume | 2200 Millilitres |
| Manufacturer | AeroGrow |
| Part number | 200694-BLK |
| Product Dimensions | 11.7 x 38.1 x 43.43 cm; 2.83 kg |
E**Y
Actually got me interested in growing things
I bought this because I wanted an easy way to grow some salad over winter, because it was on offer & because I was curious. I have had my 1 st one for 5 months & was later given a 2nd one for Xmas. Pluses: It has more than exceeded my expectations. I didn’t want the herbs it came with ( we have a garden) so I bought the heritage lettuces & although only 5 pods grew, they have provided 2-4 portions of salad/ week for 4 months, so although I thought it would be an expensive novelty; relative to buying bags of ready salad in winter, it has worked out. It has also given me a lot of pleasure, required no digging & no slugs nor braving the elements! It was just so easy & gave me interest during lockdown. I was able to piggy back other ordinary plants onto the light ( this worked even better for straight upwards growth when I was given the 2 nd aerogarden) So I ended up experimenting growing micro herbs ( peas & beans for cut & come again shoots tasted the best) & thus making more & more interesting salads It would be a very exciting project for family as the salad pods germinate within a week! Learning: After about 5 weeks the leaves were growing so fast that they got “ tip burn” - this was solved with a mini desk fan I happened to have already. I don’t know if a programmable version allows a shorter light period so growth not so fast & so don’t get this. I bought the slimline as I thought it would fit nicely in kitchen - unfortunately I found the light just too irritatingly bright. I even contemplated making a screen. In end, all solved by moving it into the hall. It wouldn’t do for a bedroom! The timer light is set by pressing it until it blinks & it is set from the time that you do this. So if you want it to be on when you are awake then you have to set it when you get up. A few times I accidentally turned it off later in day, whilst cleaning as it’s quite sensitive. This is fine as can turn it back on but then have to manually turn off & in order to get the time window back to match - you have to wait til the next morning & turn it on/ reset it until it flashes then. I accidentally only gave it half feeds near the end but surprisingly the plants did ok, although they did look less sprightly by the time the feed light was flashing. The bigger the plants are the more often it needs watering - possibly 2x week. If one went away, I’m not quite sure what would do - perhaps cut the plants very small ? It does get crowded - in a way it was helpful that only 5 pods germinated. I tried growing a couple of my own seeds in the failed pod but even though they were meant to be fast growing, they weren’t as successful, so they clearly choose varieties that work & there are several salad plants in each pod. I covered the non used hole. When I got the 2 nd aerogarden I grew the herbs. The dill & Thai basil were extremely fast & prolific. I had to repot the Thai basil & it flowered! See photo. The other herbs were fine & I have used them. A coriander would have been nice but I was able to grow a large pot of this next to the aerogarden using it,s borrowed light. I did umm & ahh whether to get a bounty initially, as it has a taller light & more spaces but actually I think in reality it would be hard to grow plants in all of the spaces. The height of mine was perfectly fine for salad & herbs ( latter need trimming shorter) I’ve done well with 2 smaller aerogardens & it’s created a piggyback pot garden between them anyway. I’m also glad I didn’t get a programmable one as I hate faffing about & this was a simple thing, albeit a bit of a nuisance if had to remember to reset next morning if accidentally turned off & then on - maybe programmable would have been better for variable growth periods - I don’t know. I ve been waiting to retire it for the summer, for a while, now we can grow outside, but it’s taken ages for the lettuce to finally taste too bitter & start to fail. Amazed that they lasted 4 months!
S**A
4 weeks in - still amazing
Update at 4 weeks: This is amazing. I have franken-plants! They're growing at a rate that I imagine they would in tropical countries, but here in the UK in the middle of winter. The heady scents of basil and tomato plants are right at my fingertips whenever I pass by. Amazing. I bought the Aerogarden Harvest Slim as I wanted the pleasure of growing plants in this bleak, eternal grey season that we in the UK experience for 6 months of the year. I thought the pump gave it an edge over the click'n'grow rather than the passive uptake system - I know that this doesn't matter for most plants as they seem to thrive anyway, but as they are a similar pricepoint, I decided to go for pump rather than not in the hopes that this gives me the ability to grow a broader range of plants. Although I thought the click and grow looked nicer (trans: less like a spaceship). My Aerogarden was delivered 10 days ago, and of course I set it up immediately! It was super easy to do - add water and solution, plug the adaptor in and turn it on. It's very easy to use. Turn it on and the lights will be on for 15 hours continuously from that point, and will turn on again at the same time everyday (easy to change the start time). I had leaves within 4 days (signs of life in 3) - I started tomatoes and basil. The mint hasn't germinated yet so I guess that's a dud; hoping to get these replaced. If you're thinking of keeping this in a bedroom (as I did), think again - the lights are ridiculously bright, and unless you're happy with 15 hours of lab-like illumination, maybe try to put it somewhere else. It's difficult to cover and contain the light hence my suggesting it be put somewhere else - mine ended up in the kitchen. The pump is virtually silent - just a small trickle that is barely noticeable. It rather wonderfully directly pumps the water against the base of the pods for that consistent boost of nutrients and moisture. In terms of value for money - I don't think it is, at this point. The pods are expensive, the unit is expensive, and there's no real way for me to capitalise on the light, which I think is the real draw here. It chafes a bit to know that it can only go to a fixed height, thus limiting the kinds of plants I can easily grow. If it were to be detachable, then it would be easier to add plants around the base and distribute the light. All-in-all though, I paid to start the experience, and it's delivering so far. A good buy, if you can afford it.
K**H
Innovative product
It’s early days but it’s an innovative product and the herbs have just started to grow so I’m optimistic! Easy to follow instructions too
H**9
Looks Great. Works Well.
This is a fun gadget for growing plants in winter or non sunny spots. As other reviewers have mentioned, the light is quite bright- as we have it in our kitchen this has actually been quite handy and we use it as a night light at times but I wouldn’t want it in my bedroom. The light also appears less bright as the plants grow. The pump is reasonably quiet and we hardly notice it. All the plants have sprouted and grown. The mint is a bit sad but everything else is flourishing. Have posted photos from the first 8 weeks below to show the progress. Beware the dill! This sprouts first so is most exciting but then it just keeps growing and despite trimming it regularly we have more dill than we’ll ever need. The roots get very entwined so we can’t just rip it out and replant it so next time I’ll just order the herbs we want. Maintenance is easy - top up with filtered water regularly, feed fortnightly with 2 caps of supplied food and change water monthly (they recommend siphoning but I just tip it down the sink) Not value for money system for cheap herbs, but nice if you want fresh herbs all year round and maybe to use as a seed starter. I have it on a window ledge which will probably be too hot for plants in summer so will move it when temperatures warm up
N**A
Heute möchte ich das AeroGarden Set "Harvest Slim" (Modellnummer 200694) von AeroGrow vorstellen. Ich habe das Gerät in schwarz, aber es gibt es auch in der Farbe weiß. Im Lieferumfang enthalten sind: - Garten (das Gerät) mit Wachstumsbeleuchtung - Netzkabel (2 Stück: 1x für die normalen EU Steckdosen und eins für Steckdosen wie z.B. in UK) - 6 Samentöpfe (2 Sorten Basilikum, Petersilie, Dill, Minze und Thymian) - Zuchthütchen - Pflanzennahrung - Kurzanleitung zur gesamten Inbetriebnahme - Ausführliche Anleitung, wenn man mehr zu dem Samenkit wissen möchte - Heftchen mit Gartentipps und ein paar beiliegenden Rezepten für die gezüchteten Kräuter Das Design des Harvest Slim gefällt mir gut: Es ist aus Kunststoff, sieht wertig aus und ist gut verarbeitet. Alle Sachen sind sehr schnell eingerichtet und man kann direkt mit dem Gärtnern beginnen. Da nur drei Knöpfe am Gerät vorhanden sind, ist alles schön übersichtlich und man wird ans Wasser einfüllen und Pflanzennahrung zu geben erinnert. Die Beleuchtung hat wirklich ordentlich Power und aufgrund der starken Helligkeit stelle ich das Gartenset nicht ins Schlaf- oder Wohnzimmer. Die Kräuter, die beiliegen, habe ich auch so schon zu Hause gezogen und diese sind relativ pflegeleicht. Für mich persönlich wird es erst spannend, wenn ich dann irgendwann im neuen Jahr in der Wohnung versuche Tomaten selbst zu ziehen. Ich finde, bei diesem Set handelt es sich um eine schöne Erfindung, die ein sauberes Gärtnern in und für die Küche ermöglicht.
M**A
Después de un año con dos AeroGarden distintos y algún cultivo que llegó casi a los 250 días (cerca de 9 meses), creo que he aprendido lo suficiente como para sacarle ahora todo el partido a este modelo más pequeño y compacto así que te puedo dar unos cuantos trucos y consejos para aprovecharlo mejor. Antes de contártelo te voy a hablar un poco de este modelo en concreto: En mi opinión este es con diferencia el mejor después del más grande, del que lleva pantalla táctil. En primer lugar porque se saca más rendimiento de los que cultivan 6 plantas a la vez que de los de 9, 7 o 3. En segundo lugar porque al tener las plantas en línea es mucho más fácil ir recolectando las hojas y también controlar que ninguna de las plantas se contagie de hongos (a mi me ha pasado). En tercer lugar porque este modelo alargado es mucho más fácil de colocar en un mueble que uno más profundo. MIS TRUCOS PARA LOS AEROGARDEN —————— DONDE PONERLOS - No te preocupes del consumo eléctrico, apenas llega a subir 1 euro al mes - ¡La luz de los LED es súper brillante! Para que no moleste es mejor colocar la maceta lo más cerca del suelo posible, nunca a la altura de los ojos - La mejor habitación para poner un AeroGarden es una que tenga muy poca luz natural y dejar que las plantas se alimenten solo de las luces LED: por ejemplo yo tengo el AeroGarden grande en el recibidor de mi piso, que no tiene ventanas. Lo tengo sobre una cajonera de dos cajones (bajita). No solo se me dan mejor los cultivos así sino que además aprovecho la luz de crecimiento para que la habitación no esté a oscuras - Puedes poner otras plantas alrededor para que aprovechen también esa luz de crecimiento (yo tengo una mini jungla en la entrada cuando antes no podía tener ahí ninguna planta por falta de luz). - Busca una esquina lejos de los radiadores: las plantas de los AeroGarden están mejor alejadas del calor. COMO DISPONER LAS PLANTAS - Pon las albahacas y la menta lo más alejadas posible de la bomba del agua: en este modelo la bomba va justo en el centro así que lo mejor es poner en un extremo la albahaca tailandesa, en el otro extremo la albahaca normal (la genovesa) y la menta justo al lado de cualquiera de estas dos. ¿Por qué? Porque son tan vivaces que echan muchiiiiísima raíz y si las pones cerca de la bomba no dejarán que el agua fluya bien dentro de la maceta. La consecuencia se que el agua no fluya bien es que estas tres plantas mataran al resto de hambre. Así que ya sabes. DURANTE EL CRECIMIENTO - Las albahacas son las primeras plantas en salir: tendrás los brotes una semana antes que las de el resto de las plantas. Van a crecer más grandes y más rápido así que tendrás que controlar su crecimiento para que no ahoguen al las demás. - Empieza a quitar las hojas superiores de las albahacas en cuanto las plantas tengan unos 18 - 20 días y sigue retirándoles hojas a menudo para que no se descontrolen. Al principio las de arriba, luego cuando empiecen a crecer mucho hacia los lados también las de los lados para que no le quiten luz al resto de plantas. - Lo ideal es no dejar que las plantas pillen mucha altura y mantener las más altas controladas para que no sobresaltan de las bajas. - Si en algún momento ves que una o más de las plantas se pone grisácea o blanquecina en la zona de los tallos, córtala por completo, saca la cápsula con las raíces y tira todo. Se han infectado de hongos y si no las tiras perderás todo el cultivo. El tomillo es de las plantas que con más facilidad pilla hongos. Vigílala. A las plantas que te quedan puedes darles un tratamiento con agua oxigenada: pon en una botella con spray un vaso de agua sin cloro ni cal y añádele 1 cucharadita de las de postre de agua oxigenada. Pulveriza con esta mezcla los tallos y hojas para matar los hongos. Guarda lo que queda menos la botella en un sitio lejos de la luz fuerte y repite la pulverización cada dos o tres días hasta que acabes el agua de la botella. - Si tienes que quitar alguna planta por una infección de hongos, tapa ese agujero con algo opaco para que la luz no llegue al agua o el agua se llenara de algas. - FLORACIÓN: la albahaca tailandesa llega a echar unas preciosas flores moradas cuando llega a los 75 - 80 días de cultivo. Si quieres que la planta dure más, quita todas las flores. Vas a tener que seguir quitando flores cada semana, pero si no lo haces la planta terminará su ciclo y morirá. RAÍCES Y NUTRIENTES ————————— - Para 6 plantas se ponen dos tapones de la botella de nutrientes cuando empiezas el cultivo y luego otros dos cada dos semanas (el aparato te avisa). No pongas más, no hace falta y hasta puede dañar alguna de las plantas - Una vez al mes cambia todo el agua de la maceta por agua limpia: después de poner nutrientes dos veces, antes de poner nutrientes por tercera vez saca todo el agua de la maceta y llénala con agua nueva. Luego añade los nutrientes. - Aprovecha el cambio de agua para vigilar las raíces de las plantas. Van a tener un color como amarronado, es normal, se debe a los nutrientes. - Cuando veas que las raíces de las albahacas y de la menta crecen tanto que amenazan con comerse a las de las otras plantas ¡dales una buena poda! Si, también se podan las raíces. Yo podo hasta 1/3 de las raíces de las albahacas cada vez que crecen demasiado. No solo no daña a la planta sino que le sienta bien (y evita que ahoguen a las plantas menos vivaces) - Asegúrate de que la esponjita del flitro de agua permanece libre de raíces para que la bomba pueda trabajar bien - Usa el agua que quitas de la maceta para regar otras plantas, está aún llena de nutrientes Cultivar plantas diferentes en un solo AeroGarden es un reto, mucho más difícil que tener todas las plantas iguales así que toma el primer cultivo como un aprendizaje. Yo ahora cultivo solo albahaca genovesa, pero me gustó mucho la experiencia de tener seis plantas diferentes creciendo a la vez.
R**É
les 6 capsules ont germées, les premières au bout de 4 - 5 jours, la dernière après 3 semaines. Evidemment on ne va pas faire des récoltes énormes, mais c'est beaucoup plus le plaisir de voir les plantes germer et grandir jour après jour. L'utilisation est simple, il suffit de vérifier le niveau d'eau et rajouter l'engrais tous les 15 jours.
F**O
È il primo vaso di questo genere che acquisto, quindi non ho termini di paragone. Comunque io mi sono trovato molto bene. Ho già coltivato con successo del basilico. Le piante crescono velocemente e rigogliose! Le spie ti ricordano quando aggiungere il fertilizzante e ti avvisano quando il livello dell'acqua scendo troppo. Il vaso una volta che fate accedere la luce, rimane accesa per 15 dopodiché si spegne automaticamente per riaccendersi all'ora in cui l'avete accesa il giorno prima. Una cosa che non mi è piaciuta è dovuta al fatto che il vaso non ha memoria. Cioè se la luce è già accesa e salta la corrente, una volta che tornerà, non riparte da dove aveva lasciato, ma il vaso ripartirà il conto delle 15 ore. Il vaso ha una pompa che si accende per 5 min ogni 25, ed è un po'rumorosa, quindi valutare bene dove si posiziona. La mia valutazione nel complesso è ottima perché fa quello che promette ed è un oggetto utile, interessante e formativo per i bambini.
C**N
Han germinado 4 semillas de las 6, ha fallado el Enerdo y la Menta, pero las cápsulas que no han germinado las he aprovechado para plantar lechuga. El crecimiento es rápido, lleva muy poco mantenimiento.