


🚴♂️ Elevate your biking game with style!
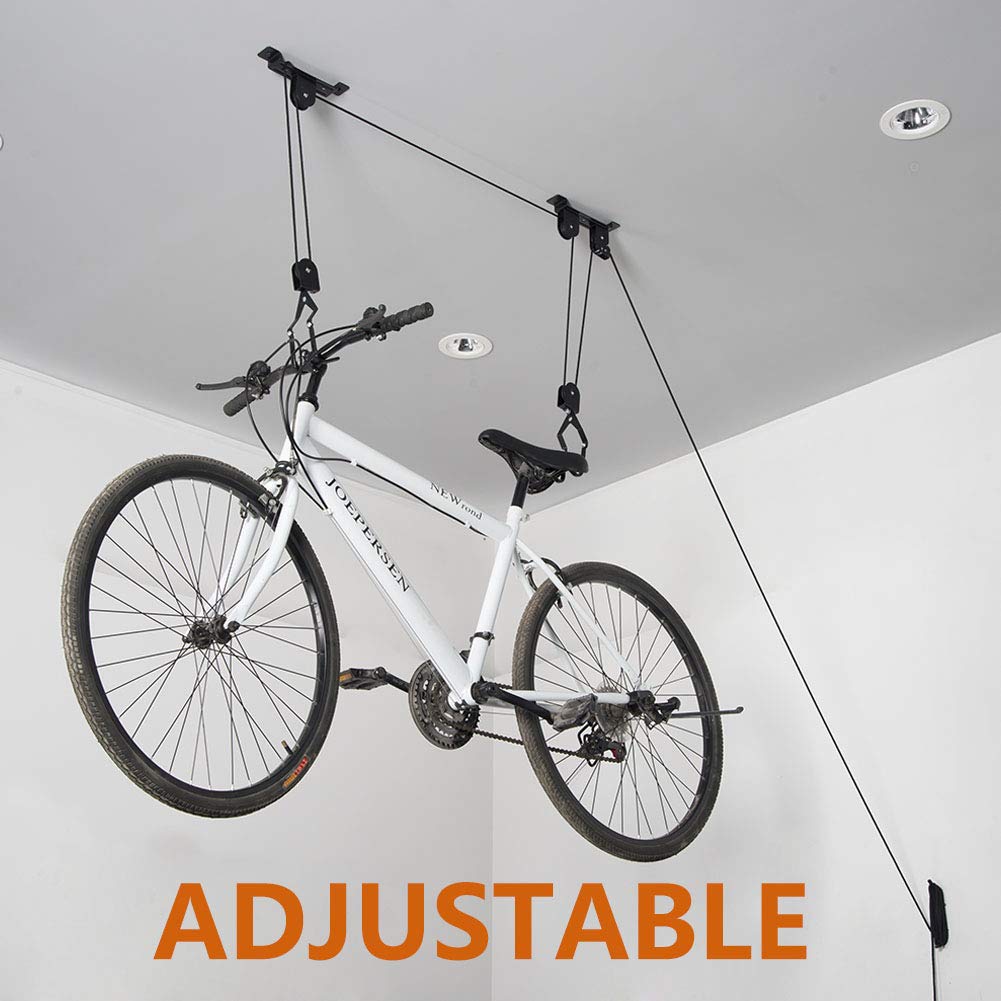
The Wallmaster Bike Ceiling Mount Lift Hoist Hanger Storage Rack is a robust solution for bike storage, capable of lifting up to 100lbs with a safety locking mechanism. Designed for ceilings up to 12 feet high, it features anti-scratch rubber hooks to protect your bikes while maximizing garage space. This heavy-duty, alloy steel construction ensures durability and reliability, making it an essential addition for any biking enthusiast.
| Manufacturer | Wallmaster |
| Part Number | Bike Lift 2Pack - 35203Z-2 |
| Item Weight | 6.16 pounds |
| Product Dimensions | 4.21 x 8.98 x 9.33 inches |
| Item model number | Bike Lift 2Pack - 35203Z-2 |
| Size | 2Pack |
| Style | Heavy Duty |
| Material | Alloy Steel |
| Mounting Type | Wall Mount, Ceiling Mount |
| Special Features | 防锈 |
| Included Components | [1 x Bike lift Hanger, 4 x Metal Screws] |
| Batteries Included? | No |
| Batteries Required? | No |
S**L
Sturdy Bike Lift, Does the Job
This is my review of Wallmaster’s Ceiling Mount LiftThis is an excellent way to claim space in your garage or storage space, by lifting your bikes off the floor, and up to the ceiling.The system is made of black-coated stainless steel that will support a load of up to 100 pounds (45kg) and is relatively easy to install. In my personal experience, I had it up and working in about 30 minutes.The rubber-coated bike hooks attach to the handlebars and the back of the seat and is adjustable to almost any size or type of bike. The pully system distributes the weight of the bike, making it easy to lift even heavy bikes. I can lift my heavy mountain bike up to the ceiling with one hand.Having never used one of these lifts before, I was skeptical, but no longer.If your bikes are taking up too much room, my suggestion is just lift them up to ceiling… using this device.
N**4
Works Great; Best Way To Store Your Bike
This is one of the best ways to store your bike if you’re out of space in the garage. If you’re capable of installing it yourself, you can hang your bike close to the ceiling of your garage, up and out of the way so it doesn’t get damaged and you can use the space in your garage you don’t normally utilize. Overall installation took me about 2-3 hours since I had to build a way for the mounts to screw into the ceiling of my garage because of the way the 2x4’s are placed due to the build of my house. Build quality is really nice. I’ve used this bike mount multiple times now and haven’t had any issues with it. My bike has never slipped down or moved once it’s set. This is a great way to keep your garage organized. Since you can mount each mount whatever distance apart you need to, this bike mount can accommodate any size bike whether mountain or road. I use it for my Trek Top Fuel 9.3, hooking the handlebar and the back of the saddle to lift the bike into the air. Great product.
K**2
Worked But I Made a Few Modifications
The design, as purchased will work and you don't have to make the mods I made.....but....I personally do not like to attach anything overhead that bears any significant weight using lag bolts through drywall to hit a ceiling joist. Never know for certain that you hit the center of the wood and have a strong, sound support Based upon the spacing of my joists (24" centers) I also wanted to raise the bicycles up to a different location from the joist location. This also depends on the direction in which your joists run in the ceiling. My joists run perpendicular to the 2x6. I chose to attach 2x6's over a span of 3 of my ceiling joists with several lag bolts and deck screws to be sure it was solid so I was confident in its load bearing capability and for general safety.First minor annoyance was that the brackets are too long for a standard 2x6. The attachment flanges hang over the edges of a 2x6 as you can see in the pictures. I used an angle bracket to attach the brackets to the 2x6. Guess if I used a 2x10 (because I believe a 2x8 would not have sufficient wood attachment area at the edges) it would have been ok... know that a 2x10 costs more and is overkill for the weight of a bicycle.....Second minor annoyance is the height of the hooks from the ceiling. I chose to remove the "Y" yoke from between the hooks and installed an aluminum "L" piece to shorten the distance of the hooks from the pulleys. This allows the bicycle to be raised up much closer to the ceiling giving me more head clearance beneath the bike when it's raised.Third minor annoyance was the bend in the hooks. It's simply insufficient to safely lift and hold onto the back of the seats on my bicycles (I made two of these lifts). Had to put the hooks into my bench vise and bend them so they securely grabbed onto the back bottom of my bicycle seats and did not slip off when I raised or lowered the bike. The standard bends in the hooks worked fine for the handlebars.Fourth minor annoyance was that one of the hoist hangers was bent upon removal from the box and the safety rope stop did not work. I bent it back and it works properly now.Last minor issue is the rope itself. Yes, it does work, but its cheap and of low quality so if you use the hoist frequently you will be replacing the rope sooner than you might expect. I will only be using the hoists and rope for winter storage so I am not too concerned about the rope wearing out.Gotta say though, for the money, and if you wish to live with the standard design, it works well for what it is and will save you garage floor space. It's easy to use, and the pulley design reduces the weight of the bicycle to a little over a quarter of its ground weight. I would however, strongly recommend that you bend the hooks that grasp under the seat to be sure they grab firmly. I gave it 4 stars because it does perform it's intended function, it is cost effective (until you do what I did...:)) but not 5 for the reasons stated.
P**X
They work
I installed these in maybe 2 hours onto a garage roof with exposed ceiling joists. I could have probably done it faster, but I wanted to be certain that the final outcome would hold one each 56 pound electric bike.I used a 1x4 cut to length for a mounting surface and installed these perpendicular to the joists. They seem to be made to be affixed parallel and directly to the 2xXs in your ceiling but I needed them perpendicular. The screws they come with were fine for most of the installation, but I used some longer construction screws for the points where I could put a screw directly into the joist.Lastly, I got some 5 inch carabiner clips and some 1/4 inch nylon rope and made "safety clips." I put these in parallel to the hooks this contraption comes with, so if the hooks slip, the safety clips will only allow a maybe 2 or 3 inch drop. I picked up the clips at a local discount hardware store, but they sell similar on Amazon.I am not sure this rope will hold up to long-term use. I don't take down my bikes all that often, but if you hang and drop daily - such as using your bike for a commute to work - then I fear that the locking mechanism will likely wear out the ropes in short order. I will be inspecting the locking point regularly and take corrective action if and when I notice wear.The instructions could be better, but this is not an overly complicated piece of equipment. It is easy to figure things out. Once you figure it out, you can sort of see what they meant in the instructions. That said, the instructions are adequate for a minimally-skilled DIYer to follow.The pulleys and holders seem sturdy enough to support any reasonably weighted bike. Again, I'm a bit leary of the rope, and will update this review if wear is noticed.This unit if fit for purpose.
B**L
Easy to hoist a 55 pound ebike
Easy to install and did not take too much effort to hoist a 55 pound ebike. I like the automatic brake on the lifting cable that kicks in when you release the cable adjust your grip
Trustpilot
3 days ago
2 weeks ago
