We remain fully operational. Our teams are working around the clock to ensure your deliveries continue safely.

下载应用程序


🛻 Elevate your Jeep’s front game with strength, style, and unstoppable off-road readiness!
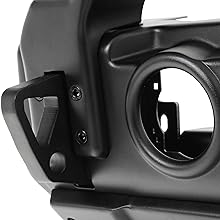
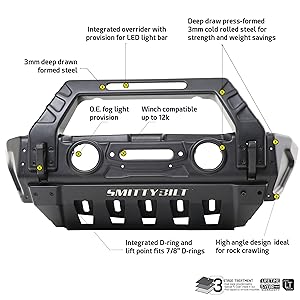
The Smittybilt Stryker Front Bumper (Center Section only) is a precision-engineered, modular bumper designed for 2007-2019 Jeep Wrangler JK/JL models. Crafted from 3mm cold rolled steel, it balances rugged durability with weight savings. It features a bolt-on winch plate supporting up to 12,000 lbs, integrated lift points, and D-ring mounts for recovery. The removable overrider accommodates a single row LED light bar, while the reinforced skid plate offers superior front-end protection. Backed by a limited lifetime warranty, this bumper is the ultimate upgrade for serious off-roaders and style-conscious Jeep owners alike.


| ASIN | B07N9J1PT4 |
| Auto Part Position | Front |
| Best Sellers Rank | #1,773,180 in Automotive ( See Top 100 in Automotive ) #11,911 in Automotive Bumpers |
| Brand | Smittybilt |
| Brand Name | Smittybilt |
| Color | Black |
| Compatible with Vehicle Type | Trucks, SUVs |
| Customer Reviews | 4.3 out of 5 stars 78 Reviews |
| Exterior Finish | Alloy Steel |
| Global Trade Identification Number | 00631410116250 |
| Included Components | Bumper,instructions,hardware |
| Item Dimensions D x W x H | 16"D x 43"W x 13"H |
| Item Type Name | Smittybilt 76731 STRYKER Front Bumper Wing for 2007-2018 Jeep JK |
| Item Weight | 454 Grams |
| Manufacturer | Smittybilt |
| Manufacturer Part Number | 76730 |
| Manufacturer Warranty Description | See Rep |
| Material | Alloy Steel |
| Material Type | Alloy Steel |
| Model Number | 76730 |
| UPC | 631410116250 |
| Unit Count | 1.0 Count |
| Vehicle Service Type | Trucks, SUVs |
A**R
Arrived in perfect condition
Amazon says this bumper does not fit my 2020 Gladiator. The Gladiator is identical to the JL all the way to the back doors, and as you can see from the attached picture, it fit my 2020 Gladiator perfectly. The packaging was flawless and there wasn’t a scratch on anything. Everything was perfect. The instructions on the other hand were nearly worthless. I also installed a 12000 lb Smittybilt XRC Gen3 winch at the same time and it’s instructions were almost as bad. Overall, I’m happy with the quality of this bumper.
D**K
Great front bumper for Jeep Wrangler JL
Really great looking front bumper for JL, solid packaging, & terrible instructions. Could have taken 1-2 hours less to assemble with a winch if instructions were any better. Still I consider it a great bargain, especially with Amazon’s low price & 2 day delivery!
C**G
ugh, instructions
like many others have stated, the instructions that come with bumper are horrible. with that said and after several mistakes, i love this bumper. sturdy and good looking, i had a friend help with installation. between the removal of the old one and installation of the new one it took the better part of the day. had a good day, along with a few laughs, we got it done and i am happy with the result.
J**.
Made In China
As the title says, made in China. I knew this going in, and I took a chance. The packaging was good, and the bumper was well protected. The finish was nice, although the powder coating seems a bit thin. It is a very great looking bumper. However, the stamping process which makes it look so cool probably requires a thinner gauge steel. I measured the bumper at 0.11 inches, or less than 1/8 inch, with the coating. The bumper, in my opinion, will only offer moderate protection before it bends. The metal seems to be very malleable or soft. The winch cradle is much heavier, and I assume that it would be adequate for all winching needs. The instructions could be much better; they don't even mention some parts or important assembly directions. There are square shaped spacer plates included, but not mentioned, apparently to space the bumper from the winch cradle so that the stock fog lamps will fit. I went with an aftermarket Xprite LED fog lamp set-up which was not as deep. This allowed me to mount the bumper without the spacers. (As a side note, those lights are awesome driving lights and plug right into the stock harness.) There are ovaI shaped spacers, also not mentioned. They space out either side of the cradle between the frame where the top bolts go. I have a 2007 JK, and it appears that there is no clear answer as to how to attach the back of the skid pan to the factory cross member on early model JKs. The instructions simply say to "bolt it on." I think I am expected to drill five holes and "bolt it on." I will find a better, less invasive solution. I recommend assembling the entire product, loosely, and after you have figured out all of the little secrets, reassemble it with Loctite and torque it down. Yes, it is another less than perfect product from China proudly displaying the name of a once high quality American manufacturer. If you want a cool looking bumper, one that your winch can sit into, one that doesn't weigh a ton, and one that doesn't break the bank, then this is probably the right one for you. If you plan to duke it out with boulders, then I suggest a heavy duty American made bumper. I hope this helps.
K**.
Lo rápido del servicio
Excelente producto
L**.
Great looking bumper
Very nice bumper. I like that I can add extra lights inside of the bumper.
S**O
Don't rush through putting it on
Great looking bumper instructions sucked but I won't knock the rating down for that...maybe made in China but built very well and what isn't made in China
R**N
Great upgrade!!
This bumper looks awesome! It was easy to install. Smittybilt Did a great job designing it.
TrustPilot
2 个月前
3天前